I have quite a collection of card sketches ; it might be time to put them to work instead of taking up space on my computer - what a concept!! I think I just challenged myself! Will see how I do with that one.........stay tuned!!
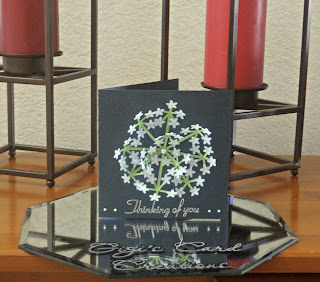
But for this card, I wanted to make a special card for a friend going through a difficult time. And I wanted to try something out of the norm for me, so I chose an older cutting file from SVG Cuts from their 3D Flowers, Part 2, It's called Queen Anne Lace. I loved how light and airy it appeared and was hoping I could capture that.
I have wanted to try cutting a new material that I had been reading about -- it is a fabric paper made by Nasco and it comes in variety pack of beautiful colors. It has been sitting in my craft room begging me to try it -so I did!! Using a new medium is always challenging, but the Silver Bullet Pro does the hard work. I thought I would need the fabric blade, but actually was happiest with the results I got with the 45 degree blade.
These flowers were VERY tiny (and yes I need to clean my mat!!) and they turned out very well. Teh material feels a bit like interfacing, only softer and thinner.
I turned to Paper Temptress Mica Papers for the card base (lapis lazuli card stock) and the flower stems (fairway text weight). I love the shimmer of this line and turn to it time and time again. It gives the cards I make such an elegance.
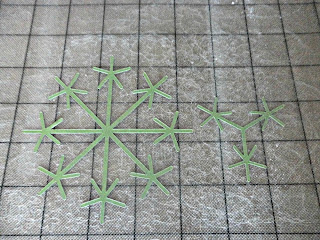
Here are the stems before the flowers are added
Assembly was simple but time consuming! Gluing all of those flowers on the stems was a good exercise in patience and I can always improve in that area! Instead of doing a section and waiting, I would just keep going and inadvertently knock off a "not yet adhered flower" in my attempt to glue a new one on. Did I learn to wait? Nope....... I am stubborn and refused to be defeated by glue and paper, so I persisted, gluing and regluing and getting more creative with the placement of my fingers so as not to knock off any more!! I finally succeeded, but it was definitely a learning experience!!
I used the embossing tool pictured above in the center of the stems to get added dimension in the flower.
I really like how this turned out and would happily make it again/ I am excited to do more with this fabric paper again too! The greeting sticker is a 3D variety that I have had for a long time. I have a wide variety of these, so you probably be seeing them in cards to come!!
Pin It Now!


Oh what a VERY VERY pretty card!!! The recipient of this is going to SO love it!!!!
ReplyDeleteThanks Penny! It was fun to do something a little different.
Delete