Sunday, June 30, 2013

A Neighborly Get Well

I am WAY out of my comfort zone on this project! Let me make that clear right from the start - the results will support that!

There was a time when I used my markers to color stamped images all of the time, but my first love was coloring with pencils and blending them.  After this marker meltdown, I am remembering why I loved pencil coloring so much  - I felt like I had more control and I really loved it. (and mistakes were easier to cover!!)  So the next project that I color will be with pencils!  Ok - enough of my excuses!

One of our dear neighbors had surgery Friday so he is off his feet for THREE weeks. I found the perfect digi image from Birds Cards to portray his current predicament!!  He will have to go through a series of boots as he begins the recovery process.  It's a long haul , but I am sure will be worth it when he can finally walk without experiencing constant pain.. Hopefully he will be up and around sooner than expected! (But he has to be really careful so his wife is on patrol!!!)

So on to the card.... I printed the image on Paper Temptress Cryogen card stock and used the Print and Cut method in SCAL - I love how easy it makes this process. I first printed the image on my laser printer , foiled the outside text in the circle and then used the print and cut to method with my Silver Bullet Professional to cut it out perfectly.


You can see the bronze foiling on the text around the circle. 
Have I said lately how much I love my FoilMaster???

 Then I printed it again, but this time used SCAL to make a shadow layer of the inner image and cut that out. This is when I ran into trouble with the markers. Even though I used a cardstock I have used before, the colors seemed to really bleed.  After I was done I covered the turtle skin in crackle accents so it would get some fine lines in it, and then used glossy accents for the eye and the shell. The green and bronze papers are both from  the Paper Temptress Mica line.


I love how the Crackle Accents gave the turtle skin some "wrinkles"!!


It really is a simple card, I think I have just forgotten all that I learned years ago about coloring with markers! So back to the colored pencils for me!!


Pin It Now!

Saturday, June 29, 2013

Time Crunch - Three Cards in One Day!

I think this is a record for me!!!  I am usually lucky if I can make one card in a day because of how long it takes me to come up with an idea!!  Sad I know.... but under pressure, apparently I really CAN accomplish more.

So here are three cards - all very different and relatively "simple" for me (!) - that I put together in one afternoon thanks to my wonderful Silver Bullet Professional cutter that repeatedly comes to my rescue!

First on the list,  and most pressing on my mind, was a sympathy card for a dear friend who recently lost her father.  I used a file I had used before so it was already adjusted in size (I tend to make larger cards - 5x7 or half fold size or a square card) .  My go to paper for most sympathy cards is the luster line from Paper Temptress - I love the elegance and sophistication of it. I used the Viva Decor Pearl Pen in silver to make the pearls in the varying sizes.


The cut files........

I think you can see the beauty of the Paper Temptress vintage luster paper in this pic - it is my favorite paper to use!  It is the card base.


Next was a simple card for the granddaughters.  I had picked up a couple of really cute necklaces for them from Cookie Lee Jewelry that spelled out "DANCE" so wanted to get those off to them!  I decided just to wish them a happy summer!!  The file from Birds Cards was meant to be used with the cut out pieces, but I decided to use the negative image (as I have done many times) and create a card in their favorite colors.  One loves yellow and the other turquoise - so that is how this developed using the Pop Tones paper from Paper Temptress.


This is the part of the file that is meant to be used!  It will be featured in a card coming soon - no doubt!


But instead I used the "remains" (!) and cut another layer of yellow which I ran through an embossing folder to let the sunshine glow!!


The finished card with the little necklaces all wrapped up in "their" colors!


I had a stamp made years ago that goes on the back of the cards that I make for the grandkids! 
 It makes me smile every time  I use it!  
You can get a wide variety of personalized stamps from The Paper Angel.


And finally, I had a leftover negative image from the Rose birthday card that I posted a few days ago, so that was my inspiration for the last card.  I used the double sided adhesive from Tyler at All That Jazz Supplies to make a shadow layer and pull the pieces off the mat intact.  Then I took a slightly lighter Ritz glitter and covered the open areas.  Rather than pull the back layer of adhesive off, I left it on and just used pop dots to layer it on the card give it some dimension.


The negative rose image from the Rose card  (file by Dominic)


A closeup of this beautiful rose by Dominic


The rose on pop dots!!  Reaching new heights (that was bad!)


I printed the "Thinking of You" greeting on my laser printer and foiled it in black on my FoilMaster from That's Scrap Inc. It really isn't that obvious but there is a nice sheen to it when the light hits it!


You can really see the shimmer of the luster cardstock from Paper Temptress here.


I am going to try to work at not over obsessing over each card and each detail - it's a process!  No guarantees that I can do that, but I am going to try harder!!

All three cards went out in the mail the same day they were made  - yippee!  Success!!


Pin It Now!

Thursday, June 27, 2013

Nectarine Cinnamon Scones


Disclaimer:  I didn't think I really liked scones.  It is probably because the ones I have tried were over-processed when kneading, so they were dry and unexciting.  I think that has all changed now!!

The inspiration for this recipe came from Created by Diane.  She cleverly paired nectarines with white chocolate chips and that was my intent until I started pulling ingredients out of the pantry... and there it was.  A bag of cinnamon chips from King Arthur Flour. I had not even opened them yet, but was looking for an excuse to use them and this was it.  I made a few other changes to the recipe and am really happy with the results.  I was worried that the flavor of the cinnamon chips would overpower the scones, but they ended up giving a yummy melt in your mouth light cinnamon smoothness to the flavor. Because they are mini, you don't get the texture of the chip; just the flavor and it worked wonderfully with the almond extract and nectarines!

NECTARINE AND CINNAMON CHIP SCONES

Adapted from Created by Diane (link above)

2 cups flour, plus additional for kneading
1/4 cup sugar
3 tsp. baking powder
1 tsp. salt
1/2 cup cold butter
1/4 cup skim milk
1 Tbsp. dry buttermilk powder
1 tsp. almond extract
2 eggs
1 cup diced nectarines
1/2 cup cinnamon chips (King Arthur makes mini cinnamon chips)

Directions:

Cut the nectarines into small, diced cubes and toss in 1 Tbsp. flour.  Set aside.


Mix flour, sugar, baking powder, salt and dry buttermilk powder.  Add the cold butter in small pieces (makes it easier to blend) and cut in with a pastry blender until the mixture is crumbly.

Mix milk, eggs, and almond extract and add to the crumb mixture.  It will be very sticky!  Add the diced nectarines and cinnamon chips and turn out onto a floured surface.


Knead lightly and pat into a circle about 9 inches round..


 Cut into 8 wedges with a knife or pizza cutter (that works great!)  Place on a parchment lined baking sheet or in a scone pan.


Bake at 400 degrees for 15 minutes. Cool for 10 and remove from pan.


AFTERTHOUGHT:  Sprinkling a little cinnamon sugar on top would have been yummy had I thought of it early enough instead of after I had already eaten one!!


These pictures are making even me hungry!! LOL  And they warm up beautifully. I had a one for breakfast this morning.  YUMMMM!  I wanted a second, but behaved!


Pin It Now!

Tuesday, June 25, 2013

A Rose for a June birthday!

It was time to make a birthday card for a dear friend and I was at a loss for an idea until I thought about doing a birthday flower.  And lucky for me it was a rose as that gave me a lot of options - well it would have had I not waiting until the day before to make it.  I used make cards weeks in advance of a needed date, but those times seem to be part of the past!!

I knew that Dominic (Crafty Vector) had wonderful flower file cards that needed very little embellishment, so I relied on his rose to make my card.

My Silver Bullet Professional did an awesome job of cutting this file, so well that I will be able to make two cards from one file .


The card front turned into the birthday card, and the remaining pieces, on the right, will be a card later in the week!  I cut out two shadow layers - one in a slightly lighter color to go behind the rose on the left and provide some contrast, and the second was out of double sided adhesive to pick up the pieces on the right.

Here is the finished card.


I also quickly (the afternoon of the celebration!!) decided to make some monogrammed notecards for her, using my FoilMaster that I am loving!

I have learned that if I print on the laser at a dpi of 1200, I will get better results.  Unfortunately because I was in a hurry I didn't catch my mistake and printed at a lower dpi, so the foil did not adhere as well as I know it can. It gave the monogram a sort of enameled effect and she loved them so that's great!! 

Next time I will be more careful and try not to get an idea at the LAST minute!!  I am eager to make more monogrammed notecards as this was really fun!


This was the basic printed notecard.  The filigree on the top and bottom was done in silver on 4 of the notecards and gold on the other 4.  The monograms were all a different color.


I am still struggling with getting good photos of foiling, but this at least shows the blue and the gold!

The final product was placed in a plastic card box with 8 vellum envelopes and tied with twine!


It was a fun project that I am eager to try again!
Pin It Now!

Sunday, June 23, 2013

Fruit for Forty!!!

Not too long ago, a neighborhood friend was having a party for 40 (+) to say goodbye to some dear friends who are moving away - the same ones mentioned in the "Going Away Card" post.

I was asked to do a fruit platter for 40 - something I have never done.  And it's quite obvious when you see all of the fruit I bought!!!  And yes, quite a bit of that fruit never made it to the platter, but quite a bit did!! LOL!


Suffice to say all of the containers of cut up fruit that I took to refill the platter were never used and I ate fruit for as long as it lasted and shared it with anyone who got within 20 feet of my front door!! Lesson learned!

But. the surprise in all of this was the fruit dip I made. It was a new recipe and it called for Kahlua, but I made it with Amaretto and it was sooooo incredibly good.  And one of the best things is that it can be made the night before!!


FABULOUS FRUIT DIP

(adapted from Cooks.com)

1 small (8 oz.) container of French Vanilla Cool Whip
1 8 oz. package cream cheese, softened (the lower fat version works well)
1 1/2 cups powdered sugar
4-6 Tbsp. Amaretto (to taste!)

Cream the cream cheese. Cool Whip and powdered sugar with a spoon until well blended.  Add the Amaretto until the dip has the right consistency - and taste!  Beat with a whisk until smooth.

Dip may be made ahead and keeps well in the refrigerator for a week or more.  Make the night before to allow the flavors to blend well.

I actually made enough dip for two platters (and then some!)/  There were strawberries, blackberries, raspberries and nectarines on a smaller platter that was on the dessert table.  I forgot to take a picture as we were rushing out the door!

(TIP:  I cut the nectarines in chunks several hours in advance and tossed them in a small amount of orange pineapple juice.  They stayed nice and bright - no browning - and the juice did not change the taste of the nectarines at all - it was wonderful!)


And it adds the perfect touch to any fruit display.  Enjoy!


Pin It Now!

Tuesday, June 18, 2013

Going Away Card..

Sometimes cards are really hard to make because they are not about something happy or fun.. Such was the case with this card that I made. I will admit that I am in a "bit" of denial that a very dear friend of mine is moving away.  The good news is that she is not leaving the country or even going to the opposite side of the country.   The bad news is that she and her husband are moving and will be six hours away instead of five minutes.  I don't want to have to think about "goodbye".   So I made the card about friendship..... and life.  It made it a little easier and lighter on my heart.

I found this beautiful Irish blessing that inspired the rest of the card.  It was difficult to get a good picture of the foiling - I am still working on mastering that, but I used the FoilMaster from That's Scrap and foiled the text on marbled vellum in bronze foil on the inside greeting.  The outside of the card was also foiled in bronze


The card front is a file from Mamaw's Legacy. She is no longer creating files, but she made some beautiful ones a few years ago...


And I finally got the courage to try one of  the rose files from my dear friend, Penny of Penny Duncan Creations.  She always leaves me in awe with her creativity and vision.  I had tried one of her roses about a year ago and it was a dismal failure, but I was determined to try again.  Here are some of the cuts with my Silver Bullet Professional.


 And I did it!! It looks nothing like Penny's, not near as perfect or beautiful, but at least it resembles a flower and it was actually fun once I started to get the hang of it. It is clear that I have a lot of practice ahead of me to get a better grasp of this skill, but I am so glad I persevered. It was a lesson in what you really can do when you set your mind to something, and I was determined to make my own roses for this most special friend.


She is leaving in a week which makes me sad, but she and her husband are coming back to town in two months for a gala we are both working on so I am just focusing on when I will see her again. And there are already several of us talking about excursions to see them..... I think half of Oceanside is planning trips to visit them in their new home.

So I am going to focus on that butterfly and let the love in my heart fly freely with them and bring us all joy and gratitude for the time we had together and the adventures yet to come...


"Beautiful and graceful, varied and enchanting, small but approachable, butterflies lead you to the sunny side of life.  And everyone deserves a little sunshine."  ~Jeffrey Glassberg Pin It Now!

Sunday, June 16, 2013

Stencil Inspiration

I have spent the past week trying to come up with card ideas. I need to get quite a few done and each one is totally different from the next.  This first one is a birthday card for a wonderful lady.  She comes weekly and cleans house for me and is just the sweetest, so I knew her card had to be extra special - just like her!

I started with a Dreamweaver stencil.  I have a lot of them and really do love them. I get mine from Stencils with Style. The customer service is awesome.  I created a shadow layer with the Sure Cuts a Lot  (SCAL) software to give the cut image a bit more depth. The Silver Bullet Professional did a beautiful job as usual!

Yes I need to clean my mat - I know!

\\

Here is a close up of the flower cut out.  
I love the shimmer of the Mica paper from Paper Temptress!

Once I had it glued in place I added a layer of glossy accents to the flower petals.  
I sprinkled a little fine glitter on the flower while it was still wet!


TIP:  This is something I have been doing for years, but I love how it finishes the look.
The black cardstock that makes up the shadow layer has a white core. So I took the Memento
Tuxedo Black marker and ran around the edges.  Up until now my favorite tool for this was a calligraphy marker, but it finally ran out of ink.  I have tried the Copic and Spectrum Noir markers and they do an okay job, but the Memento brush tip is perfect for getting into those nooks and crannies and wiping out the white core!


And here is how it all came together.  The flower has pop dots underneath to give it added dimension.
I am really happy with how it turned out!

And, by the way, she loved it!!

Pin It Now!

Thursday, June 13, 2013

Mom's Banana Bread!

Yes...   I have been on a banana kick.  I get in a rut and it takes me a few dishes to get out of it!! Plus it's what I happen to have available in the kitchen and I have not been paying attention to my bananas recently, so they tend to get overripe before I can put them in a fruit salad or do anything else!! (and I do have a supply of frozen bananas in the freezer for smoothies - YUM!!)

So.......I have been seeing a lot of banana recipes on food blogs the past few weeks, and there is none better than this recipe of my Mom's.  The grated orange rind gives it a wonderful fresh taste, and I love the addition of the chopped dates. They end up so moist and sweet and are a wonderful surprise texture in the bread.  My mouth is watering while I am typing this!!  I leave the walnuts out as I am not a big chopped nut fan in quick breads, but by all means add them if you like them!

And don't forget that awesome topping.  The buttery cinnamon sugar crust that is created on the still slightly warm bread adds another flavor level.  Wow!  You can also just brush melted butter over the top and sprinkle a cinnamon-sugar mixture over the top if you forget to have the topping ready to go.  Yes that has been my emergency fix on many occasions!!  And you can leave it plain as well - this bread stands on its own just fine!

MOM'S BANANA BREAD RECIPE

BATTER:

1/2 cup butter
1 cup sugar
2 cups flour
1 tsp. baking soda
1/2 tsp. salt
2 eggs
1 tsp. vanilla
1/3 cup dates, chopped
4 very ripe banana
zest of one orange
3/4 cup chopped walnuts, optional


TOPPING:

1 tbsp. butter, melted
2 tbsp. sugar
2 tsp. cinnamon


Cream butter well and add sugar gradually.  Add eggs, one at a time and mix well.

Sift dry ingredients and blend into creamed mixtured.  Add 4 mashed bananas, 3/4 c. chopped nuts (if desired), rind of 1 orange and dates.

Grease and flour a bread pan.  Bake at 350 degrees  for 50-60 minutes.  Leave in the pan for 10 minutes.

After removing from the pan and while the bread is still warm, spread the topping mixture over the top and let cool.  (Mom says wait 48 hours before cutting ).

God bless her - I am lucky if I can wait 1 hour!!  But on the rare occasion that I have waited 48 hours, the flavors are at their peak!

And this time I really waited...... but look who else was waiting......

Here is a great photo of the bread...... but see that out of focus blur in the background???


Amazing what you can see when you shift the focus on the camera!!!  
That is Roxy ready for her own piece of banana bread.  She is still waiting!!!


 This is truly the BEST banana bread ever!

Pin It Now!

Tuesday, June 11, 2013

Banana Blueberry Lemon Muffins

I know... it's almost too good to be true to have all of those ingredients playing together in one recipe.  And they do so really well!!

I am not particularly found of "regular" bananas. I will eat them in fruit salad or throw them in a smoothie, but if I want a piece of fruit, it's never a banana I reach for.

However, I absolutely LOVE them in breads and muffins and any other baked concoction. Strange I know, but true! And I had quite a few very ripe bananas (that usually end up in the freezer for smoothies), big beautiful blueberries that I had picked up at Trader Joe's, and my ever faithful lemons!  So I was ready to tackle this recipe.  Banana Blueberry Lemon Muffins

It was super easy to put together and the results were great.  The banana was definitely the predominate flavor, but also led to the extreme moistness of the muffin.  The only change I made to the recipe was to put the lemon rind INTO the batter rather than on top.  Then I just topped the muffins with sparkling sugar!!


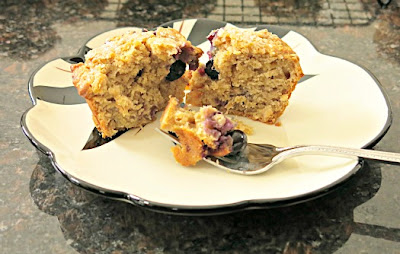
Is your mouth watering?? You can see the berries bursting!!


These two muffins made their way to my neighbor!!


And of course I had to sample one!!


It needed a LOT of sampling!! YUM!
Pin It Now!

Tuesday, June 4, 2013

Still Foiling...

There clearly seems to be a method to my work -whether baking or crafting.  When I try something and am happy with the results, I get in a sort of rut and bake 10 things with lemon in a row, for example.  Or in this case , with my card making, I can't seem to stop foiling everything I can!!  I am so enjoying getting great results and am addicted~~

So I have needed to make a wedding card for some time. It's a good thing there is a grace period for such things as I am long overdue! I have a beautiful ornamental alphabet from Thyme Graphics.- Thyme's Alphabet - that I used as my inspiration.  As I said earlier, I knew I wanted to foil but was looking for the right image and the alphabet was perfect.  And the wedding colors were green and navy blue. Since I have not seen a navy blue foil, I used the royal blue in the background to let the green "shine".

I did a print and cut using SCAL and the Silver Bullet Professional.

SCAL print and cut showing the registration marks


I foiled the letters AFTER I did the print and cut as I have not used the print and cut feature a lot and was a little out of practice.  They came out great but it was good to know that foiling after a cut works fine too!  I love options!


The card base was is the Vintage Luster from Paper Temptress. The stamped sentiment is from JustRite Wedding Nested Sentiments , stamped in Memento Tuxedo Black.  The little roses were from my stash, I sprayed them with Dylusions spray mist in london blue and cut grass.  The sentiment tag has pop dots under it for added height.


I am still learning how to take good photos when using foiling. I love the PicMonkey program, but I still need to improve my skills!


Pin It Now!