Showing posts with label SCAL. Show all posts

Saturday, March 30, 2019

Hello Card - Graciellie Design

 I have been spring cleaning and uncovering layers/piles/drawers full of craft supplies that either need to be used or donated. So I sent boxes of "stuff" over to the Boys & Girls Club because I know they put all of it to good use as they have the main site plus have after school programs in 8 schools.  They are always happy to receive whatever I can share.  So it makes the giving away process so much easier!

And during that process I always seem to get invigorated and feel creative again because I am reminded of all that I have wanted to use and forgotten about - or just haven't had time.  I find ideas whirling around in my head again and it just feels so good.  So even tho my craft room is in a bit of chaos at the moment (I promise new pics soon when I CLEAN it up), it's all good.  I am rediscovering the things I love doing and starting physical lists of what I want to try as the ideas come because I just don't trust my memory anymore!  I should not say that out loud. :(

I have done the same with the kitchen and I am sure that is why I have started doing more baking and experimenting there as well - so there will be more recipes to share soon - it all feels good. And maybe that is part of what spring cleaning is all about - letting go of what gets in the way and making room for whatever it is you want to do or what feels important in the moment. So glad I am at least in the process!  Progress is often baby steps, but at least there is movement. I will take it.

Enough chatter - on to the card.

This is one of the newer designs from Graciellie Design.  She is such an engaging artist and her artwork always makes me smile.  The image is from her "Your Kindness" collection and it was such fun to color even tho I am still a work in progress on that front!


The fun thing about coloring on vellum is that it is so forgiving whether it is markers or pencils.  You color on the backside and it is super forgiving - you don't have to do a lot of blending


This was printed in SCAL using a print and cut on the Silver Bullet Platinum.
I purposely left an edge because I wanted it to pop a little more...


And here it is from the front - so soft and the colors are 
diffused but I love how subtle the colors are - like a gentle spring day.


Here it is assembled on the card with ribbon and backing
and some foam squares to pop it up a little.


Designed in SCAL from a simple font and cut on the Silver Bullet Platinum.
Look at now narrow the lines are - cut with ease!


 Loving the finished product - hope you do too!


Pin It Now!

Tuesday, November 14, 2017

Even Sweeter Seventeen!

It is so hard to believe that my oldest granddaughter turned 17 the end of October.  How could that be possible when I still remember the day she was born so clearly??  Where has the time gone?  She is now a senior in high school and making college plans - yikes!

So what do you get a 17 year old for her birthday. For many years, when the girls were little, I got them clothes for their birthdays and toys for Christmas.  But Kendra is too old to have her Grammy picking out her clothes so I had to find something else to do for her that she would like.  She loves mandalas, so I had fun finding some great coloring books for her to enjoy and got her a huge collection of glitter gel pens.  I had started doing a little coloring on cards myself, so I at least had an idea of what products were good.  She was thrilled with the Amazon birthday delivery!

And I used her love of mandalas as inspiration for her birthday card.  I found a cool site - Monday Mandala.  They have a lot of downloadable mandalas and saved quite a few of them.  I like the variety and the one I chose for her.  This one is called Sunny Day - just right for a "happy" birthday card!

I printed it out and did a print and cut to make it a little more interesting on the card.  I did all of the coloring with glitter gel pens (they are addicting so consider yourself warned...) and enjoyed every minute of it.  Every time I color a card like this, I understand the popularity of adult coloring books.  It is relaxing and stress relieving. 


Here is the mandala all ready to be cut. I printed it on Paper Temptress
Cryogen  - it has a beautiful sparkle and is the perfect media for coloring 
with pencils, markers or gel pens and more.


You can see the perfect precision of the print and cut.


Here is the cut out mandala all ready to be colored. 
I tend to cut out first just in case I make a mistake setting
up the print and cut. I don't want to go to all of the work of coloring 
and then make a user error setting up the print and cut.


Almost finished - I like leaving some white for contrast - I think it lets 
the other colors shine be the stars!


I added two shadow layers to compliment the colors in the mandala and used small pearls to accent the outer edges. Foam dots were added to the back of the mandala when mounting it to the card front.

I was really happy to send this to my granddaughter, and happier that she loved it as much as I did!


Pin It Now!

Saturday, October 7, 2017

A SeaHawk Birthday Card

My neighbor (the same one who got me hooked on the Traeger) is a die-hard SeaHawk fan.  His enthusiasm for the team is only surpassed by that of his wife's.  Oh how they love their team!

So when his birthday rolled around recently, and just happened to coincide with the football season's first game - the theme of his birthday card was a no brainer!

I found a logo online, traced it, tried to duplicate the colors as much as possible - and created this fun card.


The Happy Birthday greeting is a digi stamp from Graciellie Designs, Elegant Greetings.  It is printed on a laser transparency and then foiled.  It's an easy and fun way to 
add an interesting background.


I tried to get the coloring of the foil, but also got the reflection of the transparency.


I had to include a closeup of the mascot!  And yes, there is green shimmer in his eye!


Pin It Now!

Tuesday, September 5, 2017

Crafting and Generosity in the Wake of Harvey


I have been so touched by the amazing generosity of the crafting community the past week. So many companies (especially the small ones) have been sending a percentage of profits to TX or creating groups of items where proceeds will go to help.  It is just a reminder that it doesn't always need to be a large gift to make a difference; a lot of small gifts add up as well and bring help in just the same way.

In that vein, I was reading a post from Patricia at A Little Hut.  She lives in the Houston area and luckily is okay, but she has been spending a lot of her time volunteering to help others who did not fare as well.  She also spent sleepless nights during the howling winds - so she drew.  Her story is here.

I loved the simple but stately qualities of her bird (the state bird of Texas) and wanted to use it to celebrate a birthday.  Out of tragedy and sadness, good things can happen.  And I am hoping this bird will bring joy to the recipient.

In her details about her creation with the bird, she didn't have perfect shade she wanted for one of the colors in the leaves. So she took a colored pencil and made the shade she wanted.  OMG - a lightbulb went off,  Why did I never think of that - I can create the colors I need with pencils, markers or watercolors.Duh!!  And it just so happened that I ran out of the silver Mica paper (from Paper Temptress) that I wanted for the lighter gray color, so I grabbed the opal Mica paper and colored it with a marker.  And you will see the unexpected but fun results!


A little closeup of the bird - see the mottled gray coloring? That is the marker colored paper. 
I love it and can't wait to try it again with other mediums.
I also embossed the background to give it some interest,
and added sequins and clear butterflies from the 28 Lilac Lane collection.


I attached the bird with foam dots to give it some dimension. I also cut an
extra layer of the stems out of black and offset it to define the leaves a bit more.


Thank you, Patricia, for all you are doing to help those who are suffering so much devastation.  
God bless Texas (and Florida who may need all the prayers we can spare as well).
Pin It Now!

Sunday, May 14, 2017

Happy Mother's Day


First of all, I want to wish the happiest Mother's Day to my daughter, daughter in law and so many dear friends.  Even though we all know that EVERY day should be Mother's Day :), I hope today was extra special for all of the amazing mothers I have been blessed to know along the way, especially my own mother and grandmothers.  

Continuing my preoccupation with foiling (sorry -I just cannot get enough of it!), the card above was a traced stencil, scanned and printed and foiled with watercolor Decofoil. I love all of the beautiful shades in the watercolor foil.  The foiled image was cut on the Silver Bullet Professional using the print and cut method in SCAL, as was the foiled greeting tag that was threaded on the ribbon.  The tag was printed on a 3M transparency and ran through the FoilMaster with ease.  Assorted sequins and beads were added (see pics below) to give it some added interest.  


You can see the print and cut layout - above and the result below...


A perfect cut thanks to the Silver Bullet and SCAL software.


And again, the transparency foiled and then cut.  I placed small pieces of
                         removable tape behind the registration marks to make them easy to see 
when doing the laser registration.


HAPPY MOTHER'S DAY!

lebug


Pin It Now!

Tuesday, February 14, 2017

Valentine Fun!

I hope everyone is feeling loved and special, especially today.

The best part about today, for me, is reminding my grandchildren that they are loved.  And making cards for them is a fun way to do that.

I relied on the images from Miss Kate's Cuttables again to create their Valentine cards.

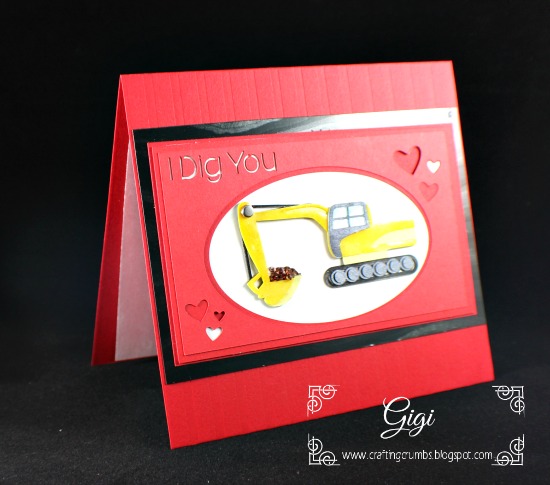
First of all, Carter is totally into trucks - ALL BIG TRUCKS and the noisier the better. He loves trash trucks and dump trucks and bulldozers - well you get the idea.  So when I saw this file I knew it was what I had to make for him.  I hope he likes it!


This is the cute little "digger". I have glossy accents on the
deeper yellow to make it shine and colored little rocks
being picked up.  So much fun to make!


Here is a side view so you can see some of the dimension and shine.


And the final product - I love it!

As for the girls in northern CA, I am really feeling their age gap now when I make cards for them. I used to be able to make similar cards, but now with Kendra (16) and Haley (10), I cannot get away with two too cutesy cards!!  I need to be a little more grown up with the teenager; at least I think I do!

So Kendra's card is feminine and bright and a tad simpler. 


I love all of the dimension and sparkle in this one. I hope it makes it through the mail in one piece!!


I have just recently started adding sequins to cards. They are fun to play with and add a nice touch!

Haley's card is still cute and a bit more playful.  I don't know how many more years I can get away with that!

This little bee has double wings with a layer of vellum over them.
He is really cute in person!


I thought the marbled vellum over the hot pink gave this a bit of a fantasy look and added
to the floating format.

I hope all three of them have a GREAT day!!

Happy Valentine's Day to all!

Pin It Now!

Sunday, February 12, 2017

February 2017 - Carter is TWO!

Where oh where did January go?  The new year has barely begun and I am already a month behind!  Yikes!

I had the best of intentions and I blew it.  January came and went and so many things that I had planned/wanted to do just didn't happen.  I am not going to let myself label that a failure, which is progress for me!  Sometimes life just doesn't go the way you plan.  So you regroup and start anew. And that is what I am doing. It's a new year - a month late!

Happy February! I have been busy baking and card making and m eager to start sharing again. 

First up is the card I made for my rapidly growing grandson, Carter.  He is SUCH a delight and is full of the joy and inquisitiveness (and boundless energy) that are typical of two year olds.  He brings such joy into all of our lives.

His birthday was actually the beginning of the month, but I am playing catch up for a while. Forgive me.

So here is his birthday morning!  I think it is the perfect way to start a birthday - I would just add a nice LARGE cup of coffee (and would definitely stay in my pjs!!)

For his card I used a cake design from Miss Kate's Cuttables to celebrate this second birthday.


I ran the frosting layers through embossing folders to
give them a little interest and added colored brads to
the dotted sprinkles for dimension and interest.


This little greeting was all done on the Silver Bullet.  I used the pen tool with
Staedler fineliner pens (love them) to "write" the message and then
cut the little banner greeting out - all on the machine. Fun and easy!


I got this stamp years ago to put on the back of the cards
that I made my granddaughters.  Now Carter gets it on his cards
too.  I stamped this on a sheet of 2" square labels so I
have them all ready to go!


The only way to start a birthday!


HAPPY SECOND BIRTHDAY DEAR CARTER! 


Pin It Now!

Monday, December 19, 2016

December Birthday Cards


Here it is a week before Christmas and I still have Christmas cards and recipes to share.  I guess I better make a real concerted effort to post a lot in the next week!!  And what's wrong with sharing a few Christmas recipes in January to get a jump start on the coming year - right??  Geesh...... one of these days I will do a better job of juggling all of it. But for now, until the little elves come and give me a hand, I will do the best I can!

I needed to get a few birthday cards made, so I tried to combine birthday and holiday and am really pleased with the results.  I made ornament embellishments for both cards using two entirely different files and designers, but kept the same greeting because it worked so well!


This design is from Craft Vectors (Dominic). It is one of his Christmas Baubles collection.
It was cut out of gold vinyl.

The designs were cut out of vinyl then transferred to adhesive backed acetate to mimic an ornament. Then each was glittered from the back side. It's a bit tricky to stay in the lines (my perfectionist striving self struggled with glitter that went awry), but I still love  how they came out!


This is the end result - after the adhesive acetate has been added
and it has been glittered from the back.


Here is the second design from A Little Hut and is part
of the Poinsettia  Gift Set.   It was cut from silver
vinyl and also glittered from behind once the acetate was adhered to the front.
This is a relatively simple way to get a stunning look.


This was the first card I did with simple sequins added to the card base. 
The sequins reminded me of falling snow.


I used the same font in both, cut out of vinyl but made this ornament a bit larger
and added the glittered bow.

More projects and goodies to come.....stay tuned!


Pin It Now!

Saturday, August 15, 2015

Heritage Ball Thank You


This is the last time.  Yes I have said it before but I am getting old"ER"....... and burned out..... at least with some things!  I have chaired a lot of fundraising events over the years and I love it because I have learned many of the tricks from many talented people over the years and organizing and cheering people on is easy for me.  But.....I am tired.  It takes a lot of time and energy to do a really good job and I am ready to back away. So my last one (so help me, I mean it this time) is now...tonight (Saturday!).  It is a fundraiser for one of the CA Missions which is a remarkable national historic landmark.  It is rare to have historical landmarks on this side of the country, but for whatever reason, it is challenging to raise funds for this 200 year old Mission.  Much of the existing architecture is original  and is just so amazing - historical, spiritual, and magical all in one.  The grounds are beautiful and they are opened up to all of us for the ball that is held outside in the gardens.  The venue is really breathtaking.  The powers that be have decided that this will indeed be the LAST Heritage ball - after a great 32 year run.    (I can remember attending with my parents as a young woman... it was magical even then and is full of wonderful memories...) That is a long time to hold an event and there are now a lot of other organizations and causes fighting for donor dollars from the same group of people. So it is time to move on, go out on a high, and create something new going forward.  So we all put a lot of effort into this black tie event to pull out all of the stops this year, including fireworks!  My fingers are crossed that all goes off as planned - or even better ! :)

So this year the colors were gold and green and the theme was an elegant summer garden. With the heat we have already experienced, we figured it was a good way to go. :)  (and as I write this, we are having an unprecedented heat wave and breaking records.  It will be over 90 in the heat of the day today so flowers will NOT be going on the tables until the last minutes.)  The good thing is that because the Mission is in a valley, once the sun sets, there will be a wonderful breeze through the area and everyone should be comfortable - eventually!

Over the years, when I have chaired an event, I have tried to make the committee a thank you card and mail it out the day of the event so they receive it the Monday after.  I just want everyone to know their help and support has been so appreciated and is not contingent on how well things go that night -  they helped it all come together and worked hard and that is all anyone can do.  We cannot control what happens that evening - we can only set the stage for success.


The print and cut background 


Print and cut flower with shadow layer...

I often do a cut file from the invitation, but this was a bit more challenging as it was a flowing arrangement of cascading flowers. So I ended up doing a print and cut of the background and of one single rose.  Both were backed in a solid color (the green of the theme) and then assembled. The rose is popped up on foam dots for a touch of dimension and interest.  I wanted it to look elegant and I think I achieved that, as much as possible.  Hopefully they will be delivered on Monday and the recipients will feel appreciated. They truly are....


The label on the back with the themed floral - a simple memento


Pin It Now!

Monday, July 6, 2015

Baptism Day for Carter -


This was a special weekend.  Not only was it a celebration of our country's independence, but in our family, it was also a celebration of Carter's baptism.  It was a very small intimate ceremony- just family and close friends of Scott and Megan -  it was truly a blessed day.

I had been trying to figure out the perfect gift, even though we were told "no gifts".  How can a Grammy not bring a gift??  Nope - not gonna happen! Besides, I had already made it when the "no gift" edict came down - so too late for me!

I found the coolest idea on Pinterest. (how did we come up with ideas before Pinterest?!?)  This is where I got my inspiration. I loved the idea of a printed plaque, but remembered that I had some mirrored plastic (from Darice and Tim Holtz).  I have been wanting to try engraving but I have been such a coward. :(  So I figured no time like the present.  And let me preface the rest of this by saying it's a good thing I had a surplus of mirrored plastic as there is definitely a learning curve with engraving. But I kept trying and finally ended up with a gift I am so proud of and happy to share with Carter.  I had it framed so it would be a little more "finished".  Here is how it turned out when all done. (as you can see in the pictures above, engraving on mirrored surfaces is really difficult to capture in a photo...)


This is mirrored plastic - hard to capture the sheen of the mirror
Can you see his name is spelled out in the verses? That was fun!


A closer look at the engraving - all done in SCAL with the new crosshatch fill


All framed and ready to reside in Carter's room.

Next up was his card.  Back to Pinterest I went.  It was not as much help this time. Tons of ideas for girls, but not so much for little boys!  So I kept it simple using blue and silver and white.  I found a decorative cross on the internet that became the central focus of the card and am happy with how it took shape.

Cut file printed on laser printer and foiled with FoilMaster.


Results of the print and cut...


The finished cross

It was fun to put the FoilMaster to work along with the Silver Bullet.  They are such good partners!!


Embossed background with Stained Glass folder .


To personalize the card and occasion :)


May God bless you always, Carter J...

Pin It Now!