Showing posts with label birthday card. Show all posts

Thursday, October 12, 2017

A Special Two Year Old Birthday

My SeaHawk loving neighbors have such a precious grandson.  His name is Merritt and he is about six months younger than my grandson.  He is such an adorable boy and has easily won my heart.  When he comes to visit his grandparents, he goes out on the patio and yells my name - seriously!  There is nothing cuter than hearing this little voice calling "Gigi" as loud as he can.  It's so adorable.

The funny thing is, that when my grandson,Carter, comes to visit, he will go out on my deck and look down and say "Where's John?"    Those two little boys have us all wrapped around their little fingers - and we don't mind in the least!!

Recently, Merritt had his second birthday and his grandma needed a birthday card.  How could I say no??!!??  I was kind of stumped until I remembered a file from Ducky's Designs that I had used many years ago.  (By the way, we have been talking recently and she is slowly redoing all of her files and her website as well.  I am so excited to see what she comes up with so stay tuned!!)  Anyway,  her "Look Who's Turning ___" was perfect for Merritt.


I wanted it to be bright and fun.  He loved it!  (his grandma suggested that I just make all of the numbers and they can just trade the number out each year and keep using the card!!)

I love how the #2 came out - all glittered.  Who says boys can't have a little sparkle in their lives...right??


You can certainly see the sparkling prisms in the number 2!

And I do have a bit of a confession to make. I normally do not go into a lot of detail on the inside of the card. I just don't take the time.  I will often print a greeting on vellum and heat emboss it for the inside, but that's about it.  However..... I wanted to make this card extra special for Merritt, so I used some mirror card stock in the frame so he could see himself when he opened the card.  You can see the reflection of the "Happy Birthday"  on the left side of the card in the mirrored card stock.  Too fun!


Pin It Now!

Wednesday, August 3, 2016

From Baby to Boy to Young Man - 27 Years to Celebrate!


Yesterday was the birthday of my youngest.  As I have said before, male cards are not my forte, but Rob makes it a little easier for me because I see him fairly often and know what he is "into"  - and it's no surprise that he is an avid Pokéman Go player/walker/streamer.  So it made the card decision easy.

It was not difficult to find logos of Pokéman Go - but finding a good quality and one that would trace was a different story.  I just kept it simple with a print and cut and fun background elements. And he loved it so that was my goal!  He is now sporting a Fitbit Blaze which he really wanted as his android knockoff was not working well.  The good thing about Pokéman Go is that it is getting him off his computer and out of his apartment. He has been walking a minimum of three miles a day (guesstimate) so now he can actually track it.

I don't now when this current game craze will be over, but I love that people are getting out and seeing the world around them in a different way.  Just hope everyone pays attention and plays safely (such a "Mom comment"!)

Happy 27th Birthday, Rob!


Simple print and cut - wanted the full image (bottom)
and just the logo from the top piece -
that's why the registration marks don't encompass the entire print.

Perfect cuts every time - love the ease of this.


Pin It Now!

Sunday, July 12, 2015

Happy Birthday Neighbor!


A very special lady in the neighborhood has a birthday today.  She has the most beautiful yard around because that is her love - flowers, plants, vegetables - you name it, she can grow it.  And she is really a master - she isn't just successful at it, but she understands why it does well or what needs to change in order to improve the results. She is amazing and her backyard always reminds me of the most enticing, welcoming park with the birds always singing and the butterflies fluttering among the greenery.....

Design from Dover Clip Art - converted to cut file
Paper is Paper Temptress Mica

We both love orchids, so I added to her "collection" both in the simple gift and in the card I made.  I used an image from Dover royalty tree Floral Stencil Designs and turned that into a cut file -  so easy.  The background is another Brusho experiment using the yellow ochre and sea glass.  The more I play with the Brusho colors the more fun it is but will try not to overdo it!

The stamp is from Hero Arts and I used my MISTI to double stamp to get the best color intensity from the ink.  Absolutely LOVE the MISTI - it's getting me to use my stamps again!

Sea glass and yellow ochre Brusho colors on watercolor paper


Closeup of the design and pearl embellishments.  Simple but effective, I think.


Happy Birthday, Lo'Vetta!


Pin It Now!

Thursday, May 21, 2015

Happy Birthday, Missy...


Today is the celebration of another family birthday - my daughter who lives in northern CA.  I hope she has a wonderful day full of hugs and love from her daughters and all things that make her happy.

This card was an experiment.  My kids tend to be my "guinea pigs" when it comes to trying new card making techniques. I know if the card fails, they will still love the thought.  At least that is what I tell myself...

I have been reading about Brushos all over the internet and seeing amazing things created with them. So this was my first try and I cannot wait to do more.  I want to make pages of colors and cut them out rather than just use them as background.  And next time I would probably use less as this is a bit intense, but I love the colors.  This  background represents just two colors used - look at all of the variations of color that literally explode off the paper.  It's such fun and makes a non artist feel talented!  LOL


Isn't that fun??

I used a clip art pattern for the dandelion image and great mica paper from Paper Temptress.  It's a whimsical card, but I am happy with it - I hope she likes it. :)


I love the fine detail...


Love this dandelion image...


A print and cut with the greeting that was foiled...

I love the rhinestones but they are really hard to capture in a photo - 
they are scattered throughout the background...

HAPPY BIRTHDAY MISSY!


Pin It Now!

Monday, May 4, 2015

Birthday Cake Celebration!

You thought this was going to be a food post, didn't you?!?  Surprise!  No food here - not this time.  But there is birthday cake, made from beautiful colors of paper from Paper Temptress. :)


My youngest granddaughter is 9 today.

File is the Birthday Cake from Miss Kate's Cuttables. I cut out extra candles and stars to get" nine" on the cake, plus added the number "9" for one of the stars at the top of the cake to set off her ninth birthday!
It is a lot of detail cut and it all went beautifully thanks to the Silver Bullet Professional.


You can see how detailed the cuts on the candles are. Two of the layers were run through an embossing machine to get the swirled look.


I wish I could bake a cake that looked like this!


"Haley" is cut out of vinyl to help personalize it more.  Really happy with how it came out and hope she loves it too...


The vinyl cut beautifully and I really like that font.

This was a really fun card/cake to make and there are many things you can do with the design of the cake. I used all of the layers, but you could certainly simplify it, which is one of the things I love about making my own cards. There are so many ways to personalize it with "your special touch".


A side view to see the image attached to the card with foam dots.


HAPPY BIRTHDAY, HALEY!!!

Pin It Now!

Wednesday, January 28, 2015

"Celebrate" Birthday Card


This card was made for a special friend.  This began as a Dreamweavers stencil (I have quite a collection of them) that I traced and then turned into a cut file with a shadow layer.  I love the interesting look you can get when you paper piece a stencil rather than color it!  Such fun.

The papers are of course from Paper Temptress and the yellow background was enhanced with an quatrafoil embossing folder.


Quatrafoil embossing for added texture


The center of the flowers was accented with a little gold liquid pearl and the vertical greeting was added using the SCAL software


Love the detail...


An added greeting...

It was a relatively simple card but am happy with the results.  And my friend was too!


Pin It Now!
Thursday, January 15, 2015

Happy Birthday, Penny!

Since the actual card is en route to its destination (and yes it will arrive a "little" late...), it seemed like the next best thing was to turn this post into a birthday greeting, so.........

Happy Birthday to you..........


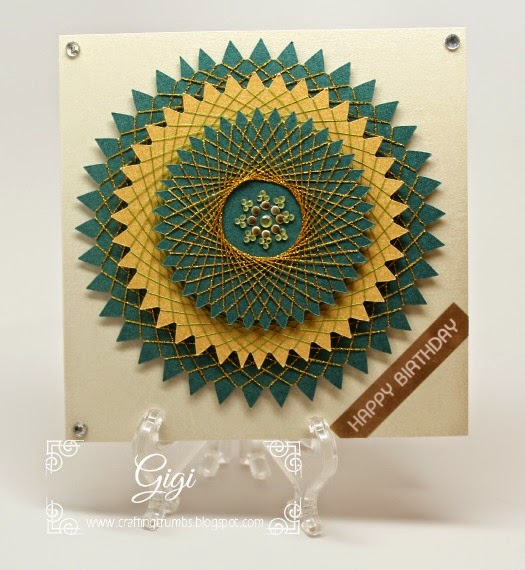
This card uses one of Penny's own shapelie files - the Starburst shapelie.  I resized it in SCAL software so I would have 3", 4" and 5" shapes.  I decided to do spirelli on each because that is such a simple craft technique and really adds a WOW when all is done.  I really should use it more often - it's a great way for me to utilize metallic threads left over from other projects!  And you can use any thread that you like or have on hand - I just happen to prefer the sparkle.

Spirelli is just wrapping thread around a design. The shorter the interval between wraps, the larger the opening when you are done.  The wider the interval, the smaller the opening as you can see in the pictures. The two largest shapes were wrapped at 10 spaces apart, the center top shape was wrapped at 15.


Numbered on the back in case I get lost counting!


All three shapes wrapped - green with gold and gold with green.

From here I just stacked the shapes with foam tape to give it dimension  and kept the rest of the card simple so this medallion could be the star.  The Happy Birthday Greeting was done on my  Brother labeler with satin silver on gold tape.  A few crystal rhinestones and this card was in the mail.


Card stock is the Mica from Paper Temptress.


 I hope it makes it safely to its destination.  In the meantime, birthday wishes are flying your way....


Happy Birthday, Penny!

Pin It Now!

Thursday, October 16, 2014

Birthday Greetings!


I have been watching some of my friends make some really fun cards with files from SVG CUTS, and since I have amassed quite a collection of those files, it seemed like time to put one to good use!

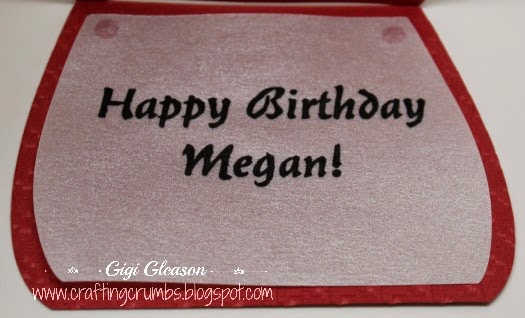
October has become a busy time for family cards - my daughter in law's birthday, their anniversary, and my oldest granddaughter's birthday right before Halloween.  So I have been busy trying to get them done in time and so far it is looking promising..... well sort of.  Megan won't actually receive her card til next weekend when I see them and can deliver her present as well, but hopefully the thought will make up for the tardiness of the actual greeting.

So there is a theme going on between the card and the present and that is ALL I am saying!  I know - it doesn't take a rocket scientist to fill in the blanks, but such was my inspiration for the card.  I thought the Luxury Purse set from SVG CUTS was so cute and immediately wanted to make the purse card.  It was simple and fun and went together easily.  Love it when it all works!  Hope you enjoy the pictures!

The purse base itself is Coredinations cardstock which I embossed with a preppy houndstooth folder.  I really like the added  texture.  The silver pieces are Mica paper from Paper Temptress (who else?!?)

I highly recommend giving these files a try - there are quite a few really interesting purses to create!


Inside was printed on vellum with inkjet printer and heat embossed.


Assembly was a breeze!


The final result - I added the little buckle (Prima embellishment) and the little tag.  
The Happy Birthday greeting is printed gold on silver with a Brother tape labeler.
 Brads were added at the handles to give the purse a little more interest.


Pin It Now!

Thursday, August 7, 2014

Birthday Brunch Bake! - Part One - (the card)


The brunch description and recipe will be part two of this post, but  first, the birthday prep began with the making of a card - of course!  It's so hard to realize and accept  that "my baby"  has reached his mid- twenties.  I am not "that old"...... how could he be???  It still seems like yesterday when I brought Rob home for that first time...... my  how fast it all flies by!

So what does one do for a birthday that marks a quarter of a century??  Yes I should have done something with a "quarter" theme, but of course that didn't come to me.  I was focused on the "25" - so that was it -- a very simple card,  but sometimes simple is the best.  The sun ray shape (not sure what to properly call it)  was a free clip art image and I just cut the numbers from a font and added a shadow layer - easy peasy!  The gold background was run through a 6x6" embossing folder from  Embossalicious called, not surprisingly, "Happy Birthday".  I know..............  The papers are all from the Paper Temptress mica line.

It was hard to figure out what to do for him as I have pretty much hit all of his interests over the past few years, but hopefully the effort was appreciated.  Will have to start working ahead of time to get more creative next year!  If I can ever master my coloring skills, then that would broaden my options and I could take on an Animé character!!  That would be fun and he would love that.  Better start practicing!


The sun ray was placed in an Embossalicious folder - Chevrons.  
So if the thin rays look uneven, it is because of the embossing as it distorted their shape a little!


Pop dots behind the numbers to give them a little dimension


The final product!

Pin It Now!

Thursday, July 24, 2014

Birthday Card - July friend - Fail and Success!!

July was a big birthday month for me - I had many friends with birthdays and am trying not to get too far behind.  (UPDATE: I started this post a week ago, my computer then decided to go on vacation and leave me high and dry, so I am beyond far behind.  But I am doing my best to catch up!!)

The idea for this card changed several times along the way. Initially I cut the flower image and used double sided adhesive so I would be able to make two cards from one cut!  I so love that.  All was going well...


Main piece for the first card idea


Negative pieces left on the mat

I worked with the main piece and adhered a shadow image of double sided adhesive to the negative pieces.

All ready with the adhesive for another card!

That part is safe and awaiting a project.  But something happened along the way with the main piece and I just didn't like it  It was ok, but the adhesive was buckling and it was my fault for not getting even coverage

Just not happy with how this turned out and the more I tried to make it better the worse it got.  
So it sadly went into the trash.  Just trust me that the "final product" didn't look anything like the 
card above after I got through trying to make it look better. What a mistake!!


So....... I decided to try something I never had.  (not always a good idea when you are already late - right??) I tried to make the same design with a frame attached, but I blew it!  I didn't weld the right pieces to the frame so that part was a huge failure, initially  But I still had the pieces of the  flower that cut out beautifully.  I tried making the frame from the same paper as the flower since that was my initial intent, but something was missing.  So I covered the frame piece with a different color (Paper Temptress Glimmer ), and put foam tape on the bottom to give it dimension, like a shadow box. I backed the flower cut  with the Paper Temptress mica line and then sprayed it with an iridescent glitter to give it some sparkle. Then it was just a matter of putting the frame and flower together and adding some pearls. Even though my original idea didn't work, I am happy with how this mistake transformed and it was a good lesson in not giving up!!


I used my Brother labeler (with the satin silver tape that I had never used before) and created the Happy Birthday greeting. I will definitely use that again. I am really happy with how this card turned out (and I still have the negative pieces on adhesive for another card project!!)


More to come soon......... :)

Pin It Now!