Showing posts with label Penny Duncan Creations. Show all posts

Friday, August 5, 2016

Watercolor Cards

I have slowly been getting back into card making and wanted to put what I have to good use.  I have always loved floral images and the digi stamps from Power Poppy are beautiful. I love that digi stamps are so versatile and you can make them any size you want/need for any project.

I needed summer birthday cards and flowers always seem appropriate no matter what the occasion.  These make me smile as they are so realistic.  I have a healthy appreciation for anyone who can draw this beautifully - I was not blessed with artistic talent but I certainly recognize it in others!  I am so grateful that they are willing to share their gifts.

The images were cut out using the SCAL software and Silver Bullet Pro. The shapelies (nesting shapes) are from Penny Duncan Creations.


Watercolored with Spectrum Noir Aqua markers - still learning.
Geraniums from Power Poppy


Finished card with a little texture and bling added.


Another watercolor attempt with Power Poppy Gerbera Daisies.
Lots of dimension and bling in the centers and ribbon to accent.

Pin It Now!

Thursday, January 15, 2015

Happy Birthday, Penny!

Since the actual card is en route to its destination (and yes it will arrive a "little" late...), it seemed like the next best thing was to turn this post into a birthday greeting, so.........

Happy Birthday to you..........


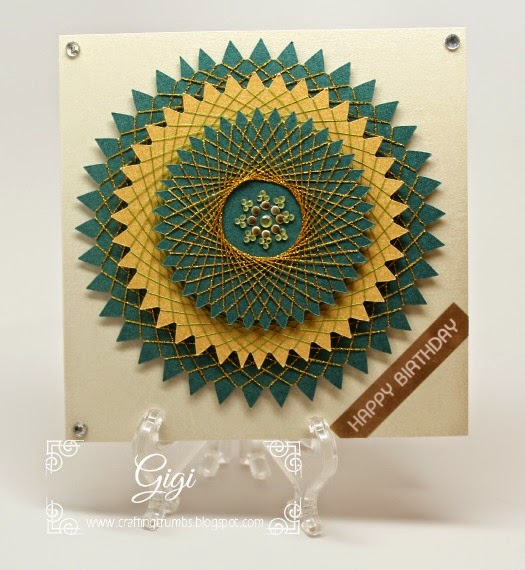
This card uses one of Penny's own shapelie files - the Starburst shapelie.  I resized it in SCAL software so I would have 3", 4" and 5" shapes.  I decided to do spirelli on each because that is such a simple craft technique and really adds a WOW when all is done.  I really should use it more often - it's a great way for me to utilize metallic threads left over from other projects!  And you can use any thread that you like or have on hand - I just happen to prefer the sparkle.

Spirelli is just wrapping thread around a design. The shorter the interval between wraps, the larger the opening when you are done.  The wider the interval, the smaller the opening as you can see in the pictures. The two largest shapes were wrapped at 10 spaces apart, the center top shape was wrapped at 15.


Numbered on the back in case I get lost counting!


All three shapes wrapped - green with gold and gold with green.

From here I just stacked the shapes with foam tape to give it dimension  and kept the rest of the card simple so this medallion could be the star.  The Happy Birthday Greeting was done on my  Brother labeler with satin silver on gold tape.  A few crystal rhinestones and this card was in the mail.


Card stock is the Mica from Paper Temptress.


 I hope it makes it safely to its destination.  In the meantime, birthday wishes are flying your way....


Happy Birthday, Penny!

Pin It Now!

Monday, September 29, 2014

More Card Foiling on Transparencies - ADDICTING!!


Yes I am addicted - seriously addicted to foiling on transparencies, foiling in general, and print and cut.  I honestly haven't had this much fun making cards in a long time and I feel it has opened up a whole new world for me.

Before I get on with the details of the card, I have to say that I am literally blown away with the detailed print and cut that I can get with SCAL (Sure Cuts A Lot). I was really timid about foiling the butterfly first and then cutting it out and even toyed with the idea of filling it all in with foil and then cutting out the detail. But as you will see, I did it the way I was supposed to and the accuracy of the software coupled with the precision of the cutter was just downright amazing.

My inspiration came from Dominic (Crafty Vectors) and his butterflies file (there are many fluttering delights to choose from) .  Playing with this one gave me all sorts of ideas for future cards - so this will not be the end of spotlighting Dominic and his talents.  I am such a fan.

I started by taking one of the beautiful butterflies, created several shadows, and welded one of the shadows to a frame.  I then printed the detailed silhouette of the butterfly on a laser transparency so I could foil and then cut it out - all using the print and cut method in SCAL.  I really was afraid that the detail would not be captured.  I just didn't think the cut could possibly be accurate enough, especially on the transparency using multi cuts - but it was!!  I was so excited to see the idea come go life.


The file laser printed on transparency


The foiled print and cut


All cut  out perfectly...


Once the foiled focal point was cut, it was just a matter of cutting out the other parts from Paper Temptress and assembling using papers from the Sparkle, Mica and Incandescent lines.
The greeting tag was also a print and cut using a reconfigured nesting shapelie from Penny Duncan Creations and the words were foiled in the same lilac as the butterfly.  The font is one of my favorites thanks to my dear friend Ducky of Ducky's Designs.  She introduced me to that font several years ago and I love the elegance of it.


Foiled greeting on Mica paper


This will definitely not be the last time foiling or acetate will be part of my cards... I really do think I am addicted and can hardly wait to develop the next idea!

 
I really love this card and hope you do too.  Hope you will try adding transparencies to your cards!


Pin It Now!

Tuesday, July 1, 2014

Birthday Card with New Techniques!


It has clearly been ages since I have posted a card on this blog. And those of you who know me, know that I love making cards.  I get in a real funk if I go too long without crafting. There is something about making cards that just fills me up - it is like adrenaline for my soul.  It just gives me a sort of energy that nothing else does, and I feel so good when I actually complete something and can deliver it to the recipient.

And it was really fun to try some new things.  This was way out of my comfort zone, but it's good to stretch every now and then  - right?

The inspiration started from Splitcoast Stampers. I love getting their new techniques every Wednesday.  I usually just read them and file them in One Note so I can refer to them later. But this time, it really caught my eye  - heated copper embellishments.  And I desperately needed to get a birthday card made for a dear friend.  So I just went for it , not really sure what would happen, and honestly I hope I can do more of that in the future because this was really fun.

I had a piece of copper that has been waiting for a little attention, so I decided to go for it and heat it with a butane torch.  Of course the one in the kitchen was out of fuel (why does that always happen?!?) - so once I got the refill it was good to go and I had a blast!!  This is how it turned out and for a first time it wasn't bad.

Wherever you see silver, that means I over-heated it a bit, but it also adds a nice effect.  It's one of those things that I don't think you can really plan - you just have to be open to the process and I was.  I gave up control and that was hard for me!  Then I put it in an embossing folder (Ornate Butterflies from Embossalicious) and ran it through my eBosser.  I love how beautiful the embossing looks with all of the colors.

Isn't this cool??  Heated and embossed copper sheet.

Of course I went into this not really sure how the card was going to develop.  So once I saw the colors I thought of the Shimmer Sheetz that I had. They too were gathering dust in my craft room.  So out they came.  I used a great file from Penny Duncan called the jagged flower and I will definitely make it again with more layers.  It would look better fuller, but this worked for the effect I wanted....


These cut out so easily and perfectly with the Silver Bullet Professional.

After they were cut out with my Silver Bullet, I heated them slightly to give them a little curl. Then I decided to emboss them which was a bit backwards and I hate to fight to get them flat in the embossing folder, but I won!  Then I heated them again to get a little curl back.  I cannot wait to play with the Shimmer Sheetz more in the future - they were fun as was the copper!


Embossing the flowers - so easy and fun!


Four layers of iris Shimmer Sheetz attached with glue dots
and enhanced with a large rhinestone.

I mounted the copper on Paper Temptress Azalea mica card stock as it has a good weight and handled the weight of the copper easily. (and yes, I have ordered some light and medium  weight copper to play with it and see if I can heat it as well without melting it!!  Stay tuned for that one!)


I had a stash of thin ribbon that I ran over the corner of the card and put a Peel and Stick birthday greeting on the ribbon - I didn't want to clutter the card so that was just the touch I wanted.


The card base is Orange Sparkle.  You can see the detail of the Happy Birthday Peel Off Sticker.


Really happy with how the flower pulls in all of the colors of the card 
and adds a lot of interest and texture.


I hope you love this card as much as I do and will try some of the techniques.
You will be addicted!

Pin It Now!

Monday, May 26, 2014

A Heartfelt Get Well Card.....

I have a dear friend who was recently in the hospital for a heart repair.  As far as I am concerned, there is not one single thing wrong with his heart, but some rather renowned cardiac surgeon felt otherwise! Anyway..... he and his dear wife are doing well. She is certainly relieved and happy to have him home and heading for a full recovery - GREAT news!!  His heart is mending beautifully!

In my usual form of late, the get well card was just mailed.  I am not sure why I cannot get things done in a timely manner anymore.  I always use to be early with everything, but no longer!  It's the thought that counts, right?  I so hope so........

My inspiration for the card was one of the  Dreamweavers stencils. They have a wide variety of beautiful stencils (many of which are quite at home in my craft room!)and some of them are vertical greetings.  I used a take off on their Get Well greeting, cut it out of some fun Coredinations card stock that I have had sitting around here forever, and then cut a lot of layers with the Silver Bullet Professional.  The greeting is backed with Paper Temptress brown bag, the rectangle is Coredinations and the mat shadow is Paper Temptress Basis card stock.


You can see the detail of the letters on the mat and the various layers...


The card front....

I used some white and taupe Coredinations for the background that I ran through a Teresa Collins embossing folder (Woodgrain) and then distressed it to show the detail of the embossing. I love the look of that and have vowed to do more of that - it was like watching magic before my eyes. :)  I think the light sanding really made the woodgrain pattern pop!!  The whole thing was placed on Kraft card stock from.. you guessed it.... Paper Temptress.


Wanted to share a close-up of the woodgrain distressed.  I love the wood pattern.

Since this card was for a male, I didn't want to overdue it with too much, so I used the Fern Branch from Penny Duncan Creations (thank you Penny!) and cut it out of Paper Temptress Mica and Pop Tones papers to add a slightly different look.


This was a relatively simple card for me and I would like to play around more often with the vertical greeting  idea -it was a fun twist.


Pin It Now!

Wednesday, March 12, 2014

Sympathy Cards - Made with Love...

The ideas have been seeping into my head and I am trying to do a better job of writing them down as bits of creativity slip in and rapidly out of my brain.

It has been a sad couple of weeks.  I have spent the past few days making sympathy cards.  It is such a heart heavy reminder just how fleeting life is and how important it is to make the most of every day.  We all get hung up, it seems, with projects and meetings and just the demands of daily life. But I am acutely aware now (and hope I don't forget the lesson) that it should not be so hard to schedule lunch or coffee with a friend.  That time should be much more important than any other meeting or "thing to do". When it comes right down to it, it's about making the most of the time that has been gifted to us, and the older I get, the more I realize just what a gift it is, and how quickly it can be taken away.  So..... a renewed commitment to make time with friends a priority - the other "stuff" can wait.......

So here is a brief glimpse of what I have been working on - trying to make each different and personal to the recipient.....  and I am determined to make simpler cards.... my version of clean and simple.  I could accomplish much more if I simplified things.  Also on the list of things to do is to utilize the stamps I have.  Lots of goals , but that's a good thing.  It keeps me motivated.  But first things first...

The first card is a very nice cross from dear friend, Penny.(Penny Duncan Creations).   It is her Fancy Christian Cross.  I love her files and can always count on them to cut beautifully.   This paper is from Paper Temptress and is the incandescent paper - blumarino and candido.  They are elegant and make any card look more special!


Love the simplicity yet beauty of this cross.


A better look at the detail......


You can see the richness of the colors in the closeup.

And the next one I am choosing to share also utilizes a file from Penny.  I got  the idea from something I saw on Pinterest and I used Penny's file as the foundation to make a medallion.  This is a fleur de lis from Penny's embellishments - Deco Items.  I wanted it to look like ribbon was running along the side of the card and was anchored by these embellishments, so I took Penny's design and and a frame design in the shape library of SCAL, and welded them together - success.  It was very easy to do and I love the way it looks.
As you know, I almost always use papers from Paper Temptress as they are my all time favorites to use when creating cards, but I found a rather large stash of Coredination papers while reorganizing my craft room and liked the two tone colors of the paper.  It has a sort of tweedy look on one side and a smooth color on the other.  I shortened the width of the front so the inside would show when the card was closed and complement the embellishment.  I love how it looks and how simple it is.  I felt like this card needed more, but I held back and just "let it go" without adding clutter to it.  The stamp was an old one from my stash - I think it is the Clearly Inspired line....


Again, thanks to Penny for inspiring these two cards.  It really jump started my ideas.

Will be sharing one more in a few days.


Pin It Now!

Friday, February 28, 2014

Dutch Papercrafting Revisited - a Lacé card


The past few months have not only drained my energy, but I have been wanting to find the desire to make cards or bake and that was as far as I got - my thinking about it was not producing any tangible results! I poured over cards posted on Pinterest, looked at my favorite blogs, looked through my COLLECTION of card making books..... nothing sparked an idea.  So once again I went back to my first card making efforts - Dutch papercrafting.  And the ideas started.  I knew Penny Duncan  (Thank you , Penny! had created some cutline designs  also known as lacĂ© so I used her arch design to make a card for a friend recovering from surgery.  She just returned home, in record time, so I am glad the inspiration surfaced.

The printed paper is from my stash and it is double sided so that made the folding easy.  The solid colors are all from Paper Temptress of course - Neenah green, and bubble gum and banana split from the Pop Tones collection.  Her papers always make my projects look pulled together.  The sentiment is from the Cats Meow (line discontinued) and the pearls are from Kaisercraft.  Both the lacĂ© file and the tag were cut on the Silver Bullet Professional.  If you have not tried cutline or lacĂ© designs, well you just have to!  They are such fun and there are a wide variety of shapes that lend themselves to every type of card.  So give it a try!

I apologize for the camera settings. They were clearly off when I took the pictures and didnt catch it til I went to edit the photos.  Unfortunately the next few posts will be "off", but will work at getting them better going forward........  Oops!


The process of cutting and beginning to fold.  Instant gratification! 


The design with the backing contrast color...


Voila!!  So simple... 


The end result


The finished card


Pin It Now!

Friday, July 19, 2013

Another Lacé Birthday Card

I am so loving these lacĂ© patterns from Penny Duncan Creations.  I think it's the end result that pushes me through the folding process.  I love the surprise color element and the possibilities are endless. I have been using the sorbet duo from Paper Temptress, but realized I have lots of papers that are monotone - solid on one side and textured on the other and they would make beautiful cards too. Of course I could glue thinner papers or card stock together to make my own double sided papers as well, but will work on the stash that I have for now.  :)  The base of the card is from the Pop Tone line with Paper Temptress. Yes I love her papers!  And the Silver Bullet Professional did its usual great job. Since this file is so intricate, I think the next time I cut it, I will use the detail blade!


This pattern is Penny's cutline half moon file.  Instead of scoring it this time, I took a little ruler and folded against it to get smooth folded edges and that worked well.  It seemed easier and a little quicker that way.


This file cut well and with the duo sided paper, the rest was easy!


The flower in the center is from my supply of 3D precut papers.  I continue to try to use up what I have which should keep me going for a LONG time!  I embellished the flower with yellow Stickles in the center and Kaiser pearls on the corners.


You can see the "fold and tuck" technique here and a closeup of the Stickles!


I love these files! Thank you , Penny!

Pin It Now!

Saturday, July 13, 2013

Lacé Birthday Card

I am still on a Dutch paper crafting kick. There is SO much I want to do and not enough hours in the day...

I have two friends with birthdays on the same day next week.  So I am trying to get a head start on the cards.  Again my inspiration came from files from Penny Duncan Creations.  This woman is so darned creative and I am so lucky to also call her a friend, so it's double fun when I borrow some of her talent to help me design a card!

LacĂ© (pronounced law-say) originated in Europe (they come up with so many cool things) and is also called "cut 'n fold" here in the US.  Whichever way you say it - it is so much fun I started doing this decades ago when there were no cutting machines, only metal templates, and you had to cut each angle with an exacto knife.  I cannot believe I had that much patience then, because I don't think I have it anymore!  I must have used it all up back then!  LOL  This process is SO much easier with a cutting machine, especially with the Silver Bullet Professional .  I used the double sided Sorbet Duo from Paper Temptress, so it was super easy to create the fun effect of the double colors -  the paper already determined the colors for me!!


Here are the basic lacé cuts - and you can see where I started to do the folding
on the far right.  It is easier if you score at the fold edge to get a tighter fold. 
I did the scoring by hand.


One edge all folded. Love the surprise pop of color you get from the duo paper!


I kept the center of the card front simple just using Penny's diamond shaplie. (Yes any diamond shape would work but I had her files open and wasn't sure what I was going to do until I started playing around!)


Just two simple diamond shapes with the larger center one on pop dots for added dimension.
The flower is from Prima - I just switched out the pearl for a hot pink rhinestone!

And here are all of the pieces put together..  I backed the 5x7" design with the solid color sorbet
and then put it all on the cryogen white for the card base and to pull the white all together.

I love how this turned out. Thanks Penny for a FUN file! Cannot wait to do more!


Pin It Now!

Thursday, July 11, 2013

A Neighborly Birthday Card!!

My taste-testing, recipe critic neighbor is having a birthday so she needed a special card.  I turned to files from Penny Duncan Creations this time for inspiration and my idea bank was quickly on overload.  I had a vague idea what I wanted to do, but it changed during the process as most of my cards do!!

And then of course, by the time I settled on the idea, I jumped headfirst into it at warp speed and totally forgot to take photos along the way. So you will just have to pretend that there are progress pics!!

I love all kinds of Dutch paper crafting and when I saw one of Penny's files I knew that spirelli (the art of wrapping thread around a shape in a design) would be perfect.  Here is a close up of the spirelli design using metallic thread around  Penny's Pearl Lobe Oval Shaplie.


Look at the detail of that inner circle pearl lobe - that is about 1 1/4" wide! 
The Silver Bullet Professional makes projects like this so easy.


The background is Penny's lattice rectangle cut out of the laser silver luster from Patricia at Paper Temptress. I LOVE that paper.


A closeup of the lattice detailed cuts and  you can see the striations in the paper.


The card base and the spirelli oval are cut from from the Paper Temptress mica line. 
This was a fun card to pull together.

Thanks Penny for the great files AND inspiration!!

HAPPY BIRTHDAY, Lo'Vetta


Pin It Now!