Sunday, March 31, 2013

My New Favorite Short Rib Recipe

It was time to start using up meat in my freezer and try some new recipes for main dishes. It is often a challenge to figure out what to fix for dinner and not have to eat it for a week because I made so much!!  I am pretty good about putting my "Seal A Meal" to work and saving servings for future busy days.   I keep index cards clipped on my refrigerator listing what meats are in the freezer and have a separate one for cooked entrees so I don't forget I have things ready to go if I don't want to cook or don't have time to do it. That system works pretty well for me - most of the time!!

I don't eat a lot of beef, but every now and then I just crave it and the short ribs had been calling out to me for awhile, so I decided to borrow a recipe from Framed Cooks to make a delicious meal of Mustard Short Ribs.  All I can say is............. Ohhhhhhhhhh  Myyyyyyyyyyy Goshhhhhhhh!!!! These were fabulous.  I love the way the coarse mustard melted into the beef  broth and the meat and created such an unexpected yet rich flavor.  And the sour cream blended with the grainy mustard and fresh garlic chives added a tasty cool complement to the tender, juicy short ribs.

The ingredients were relatively simple and straightforward as you can see from the linked recipe above.  I followed her recipe pretty much, just changed the potatoes using what I had, and added my favorite seasoning, the Borsari from King Arthur Flour, decreasing the salt, but still adding the pepper called for.
OOPS - forgot to take the ribs out of the fridge and add them to the photo!!


Once again I put the Ninja Cooking System to use to brown the ribs before letting the slow cooker setting take over.....
Can't you just hear the sizzle???

Then add the onions, potatoes, carrots and garlic on top....


The beef broth and coarse ground mustard smell  incredible over the ribs and that wonderful scent fills the whole house as the day goes on and made my stomach growl hours before it was time for dinner!


And finally it was ready.  I actually hesitated adding the sour cream and mustard to the ribs. They smelled and tasted - (yes I cheated and tested them!) so good already - what could that sauce add?  Well let me tell you - it was  a true surprise to experience those flavors take this dish from wonderful and yummy to downright fabulous!!!! 


This makes my mouth water just posting the photo.

You have to visit Framed Cooks and try this recipe - it's a keeper!!  Enjoy!
Pin It Now!

Wednesday, March 27, 2013

Ducky's Birthday Dilemma

I have a very dear friend with a birthday on St. Patrick's Day - March 17th (for those who missed it!!)  She is an incredible graphics designer. You may have seen her work at Ducky's Designs - she used to work for Disney, and you can certainly see her love for all things Mickey especially!!

I have to share a quick story.  We met on a forum for electronic cutters  4-5 years ago  and over time we found out that we not only lived in the same state, but were in the same city - and believe it or not, only four blocks apart!!  She has become such a special friend and I cannot imagine not having her in my life.  And I LOVE her designs and know she has quite a cult following - and rightly so.

So a few years ago as her birthday approached, I decided to use her files to make her a card - and incorporate as many different ones as I could.  Each year since,  I have tried to outdo myself!!  I love a challenge!  LOL  Not sure I exceeded the number of files used last year, but I did have a lot of fun putting her card together......

If you are a collector of Ducky's files, here are the ones I used....
Birthday Alphabet "D"  (the letter)
Birthday Alphabet "W" (the hat from the monkey!)
Alpha Charms (the small letters that spell "Ducky"
Treasure Box (the shamrock border)
Mickey Lying Down
Birthday Mickey (the balloons)
Look Who's Birthday?? ( the frame behind the letter )


Coming up with the vision was fun.  Her files lend themselves to all sorts of creativity. It was exciting  to see it come together!

Most of the papers are from  The Paper Temptress - many colors of the Mica text weight and some of the Pop Tones. I am excited to share the detail I was able to get with the Silver Bullet Professional. As many different things as I have cut on the machine, I am still caught off guard by the precision and detail with which it cuts.  Mickey's gloved hands were three separate pieces on one hand and SO small - as were the whites of his eyes.  Pretty incredible!!


The letter charms (only 1/2" thick), main letter and balloons were coated with an iridescent medium.  It created a sort of webbing on the letters and dried quickly.  I  love the way it shimmers and best of all it didn't weaken the paper or distort it!

The clover border outline is just under 1 MM  thick - or I should say thin!


Here is another photo of Mickey resized much smaller then the original design and perfectly cut.
This Mickey is 3 1/2" long (including the 1/2" tail!!) and 2 1/2" tall)
Look at how THIN the tail is!!


And I am so happy with the final results.


  Happy Birthday, Ducky!

Pin It Now!

Monday, March 25, 2013

More Lemon Lovin'

Continuing my love of all things lemon, here is another recipe favorite of mine.  I have made this several times and it is from "Eat More of What You Love" by Marlene Koch.  As I think I have mentioned before, she is a nutritionist and her recipes are lower in sugar and healthier.  I have enjoyed experimenting with some of them and plan to do much more.  It's nice to make something that I feel I can eat without instant guilt and/or the need to go exercise for a half hour. The muffins that I am sharing with you are GUILT-FREE!  

The first time I made this I followed the directions exactly which is usually what I do.  The next time I am a bit more creative if in the mood, and this was one of those times. I didn't stray too far away from the core recipe, just added a bit more flavor!
Ingredients Ready for Duty

One thing I learned this time around is that I am not a fan of the tulip papers. I love how muffins and cupcakes look in them, but they become one with the batter and do not want to let go once the cooking process is over.  And it made me sad to see any of my muffin glued to the paper, even though I was tempted to lick it off!! LOL  So next time. I will either spray the papers with a non stick spray first, or bake them and then place them into the papers .  I think the latter would make a lovely presentation (and neater too!)

So here is the recipe for my adaptation of "Triple Lemon Blueberry Muffins" by Marlene Koch.

Quadruple Lemon Blueberry Muffins AKA Lemon Times Four Blueberry Muffins!

1 - 6 oz. container light lemon yogurt
1/2 cup lowfat or non fat milk
3 tbsp. butter, melted
1 extra large egg
1 tsp. vanilla extract
1 tsp. lemon zest
1/2 tsp. lemon extract
2 cups flour
10 packets Truvia
2 tbsp. sugar
1 tbsp. baking powder
1/2 tsp. baking soda
1/3 cup lemon bits (King Arthur flour)
1 cup fresh blueberries
2 tsp. sparkling sugar (optional)

Preheat oven to 375 degrees.  Lightly spray 12 muffin cups with non stick cooking spray or line with paper liners.

In a medium bowl, whisk together the yogurt, milk, melted butter, egg, lemon zest, and the vanilla and lemon extracts, and then set aside.

In a large bowl, stir together the flour, Truvia, 2 tsp. sugar, baking powder, and baking soda.  Add blueberries and stir lightly to coat the blueberries with flour.  Add the lemon bits (optional).  Make a well in the center and add the yogurt mixture.  Using a large spoon, stir until dry ingredients are barely moistened.

Wet and dry ingredients ready to be mixed!

New addition of Lemon Bits from King Arthur Flour


Perfect measures for muffins/cupcakes - smalll, regular and jumbo!
 I really love how easy these make it to have perfectly sized muffins!

Spoon the batter evenly into the prepared muffin pan(s), filling each cup two-thirds full. Sprinkle the two teaspoons of sparkling sugar over the top of the muffins.

Oven Ready

Bake for 17-20 minutes or until the center springs back when lightly touched.  I use the toothpick test just to be sure!  Cool for 5 minutes  before removing to a wire rack.
Fresh From the Oven!

NOTE:  If using the tulip papers pictured above, see my comments above!.

I love the combination of lemon and blueberries and this is quickly becoming a favorite recipe for me!

                  
Anyone hungry??

AND A SECOND NOTE:  I have had requests for the recipe for Scott's Tomato Soup, so that blog post has been updated so everyone can enjoy it!!            


Pin It Now!

Sunday, March 24, 2013

Lovin Lemon!


My lovely lemon tree could be appropriately called "the giving tree".  Except for about 2-3 months of the year  (right now) it just gives and gives and gives.  I can be grabbing the current crop of beautiful yellow lemons and see both new green ones growing and blossoms popping. It rarely rests!   The last crop I had well over 200 lemons and kept neighbors and friends well stocked.

When I have an over-abundance, I cannot possibly use them all up and I hate throwing them out, so I  juice and zest them and put them in the freezer.  The zest is in an airtight container that I can easily access and the juice is first frozen in ice cube trays and then put into freezer bags so I pull out what I need.

I don't know what it is about this lemon tree (and it is even MORE special because it is a Meyer lemon!) but it makes me smile just to see it - whether or not it is lemon bearing season.  Maybe it is just because it knows how much I appreciate all that it shares with me and all of the wonderful things I can make because of its generosity - from lemonade to lemon bars to lemon pound cake to the lemon yogurt muffins below......


The Lemon Yogurt Sugar Muffins from Cinnamon Spice and Everything Nice were very good, but I made some changes that may have affected the outcome.  The recipe called for plain Greek Yogurt and I used vanilla Greek yogurt which may have diluted the lemon flavor,  So next time if I use the vanilla yogurt again, I would substitute the vanilla extract that was also added for lemon extract.  I think that would enhance the flavor. Other than that, they were very good and a treat.  When they were still slightly warm, they were brushed with melted butter and dipped in sugar.  They made a great presentation.


  I use the King Arthur Muffin pans and they are truly a breeze to clean even without liners. I highly recommend their entire line of baking pans.  They are pricey, but you will have them for a lifetime and you can tell when you use them that they are quality,


I had a surplus of  lemons from the last crop and more than enough lemon juice cubes to keep me going for awhile, so I decided to juice more and make a Meyer Lemon Loaf Cake  from the Brown Eyed Baker and I am so glad I did.  As you will see if you follow the link above, the recipe calls for 2 Tablespoons lemon zest and I used 3 Tablespoons.  The lemon smell filled the house with the scent of spring and I could hardly wait for it to cool so I could glaze it and get it out of the house before I devoured it whole!![


The glazing was fun. After it has been out of the oven for 10 minutes, you prick the entire cake (sides too) with a long bamboo skewer, and then brush a mixture of cooked lemon sugar syrup over the cake and let it set until cool.


I would definitely make this again!

And here is a sneak preview of things to come with my energizer lemon tree.  See the little buds that are beginning to populate the tree?? In no time at all there will be 100-200 lemons  gracing the kitchens of  my friends as I share the wealth!!  Here is the evidence of the new lemons coming  I will take a new picture when the tree is bursting with lemons again!
Look at all of those blossoms - and they are all over the tree like that!


You will be amazed!  I still am with every new crop!  And look for more lemon recipes to come!
                            Pin It Now!

Thursday, March 21, 2013

Fabric Flowers

I am not one to make cards in advance and have a stockpile.  It would certainly be easier,but I like to tailor every card to the recipient. It helps inspire me as I usually struggle to figure out in my  head just what the card is going to look like.  It can take me the better part of a day just to know what I want to do - good thing I am not trying to make a living out of card making!  It would be a rough go!!
I have quite a collection of card sketches ; it might be time to put them to work instead of taking up space on my computer - what a concept!!  I think I just challenged myself!  Will see how I do with that one.........stay tuned!!

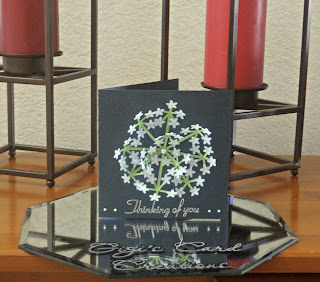
But for this card, I wanted to make a special card for a friend going through a difficult time.  And I wanted to try something out of the norm for me, so I chose an older cutting file from SVG Cuts from their 3D Flowers, Part 2,  It's called Queen Anne Lace.  I loved how light and airy it appeared and was hoping I could capture that.

I have wanted to try cutting a new material that I had been reading about -- it is a fabric paper made by Nasco and it comes in variety pack of beautiful colors.  It has been sitting in my craft room begging me to try it  -so I did!! Using a new medium is always challenging, but the Silver Bullet Pro does the hard work. I thought I would need the fabric blade, but actually was happiest with the results I got with the 45 degree blade. 

These flowers were VERY tiny (and yes I need to clean my mat!!) and they turned out very well. Teh material feels a bit like interfacing, only softer and thinner.

I turned to Paper Temptress Mica Papers for the card base (lapis lazuli card stock) and the flower stems (fairway text weight).  I love the shimmer of this line and turn to it time and time again.  It gives the cards I make such an elegance.

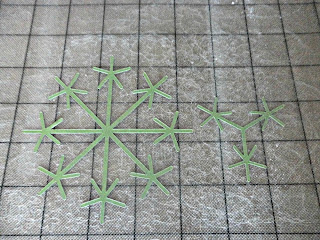
Here are the stems before the flowers are added


Assembly was simple but time consuming! Gluing all of those flowers on the stems  was a good exercise in patience and I can always improve in that area! Instead of doing a section and waiting, I would just keep going and inadvertently knock off a "not yet adhered flower" in my attempt to glue a new one on.  Did I learn to wait?  Nope....... I am stubborn and refused to be defeated by glue and paper, so I persisted, gluing and regluing and getting more creative with the placement of my fingers so as not to knock off any more!!  I finally succeeded, but it was definitely a learning experience!!


I used the embossing tool pictured above in the center of the stems to get added dimension in the flower.

I really like how this turned out and would happily make it again/  I am excited to do more with this fabric paper again too!   The greeting sticker is a 3D  variety that I have had for a long time. I have a wide variety of these, so you probably be seeing them in cards to come!!


Pin It Now!

Tuesday, March 19, 2013

Amazing Apples


It was cold and dreary out when I decided that it was the perfect time to try an apple recipe that my neighbor had shared with me.  I had not been able to get the incredible flavor of this recipe out of my mind since I tasted them.  This was not your ordinary, run of the mill, cooked apple concoction......this  was delectable.  The apples tasted like the most delicious, scrumptious apple pie you have ever eaten - but there was no  the pie crust. I could not figure out how she got that tantalizing flavor ...but I should have known......... it was the BUTTER.  What a difference it made to saute the apple slices slowly in butter. YUMMMMMMMMM!!


 I made a HUGE pot because I wanted to use a wide variety of apples  - doubling the recipe so I would not run out for a while!   I have eaten them plain, with Cool Whip, on hot oatmeal, and with caramel crunch frozen yogurt.  And honestly, there are probably a dozen more ways to use them and I love them just plain best of all.  This recipe is a MUST TRY.  Thank you Lo'Vetta for being such a caring and giving neighbor.  I will never think of apples the same way!!


Lo'Vetta's Amazing Apples

Peel 6-8 apples and slice them into a bowl with the juice of one Meyer lemon.  With the addition of each apple, toss in the lemon juice so you are constantly coating the apples with the juice.


Take a stock pot (enameled or cast iron - be sure you have enough room to properly toss the apples) and melt 3-4 Tablespoons of butter in the pan over medium high.  Add the apples and saute in the butter, stirring every 2-3 minutes.  


In between stirring, add cinnamon and allspice to taste.  (I love Penzey's Spices apple pie blend). If you have fresh nutmeg, grind a little in at this point (it adds great flavor and anything fresh is better!)  After stirring in the spices, add 3 Tablespoons brown sugar, stir and then add 3-4 Tablespoons real maple syrup (I use Grade B - it has more flavor for cooking).  Toss in a handful of dried cranberries and stir.  Cook 10-15 minutes, stirring occasionally (and tasting too!!), until the apples are done.  They can be as crunchy or soft as you like.


Toward the end add some water so there is enough juice, and then combine about  1/2 cup of apple juice with 1 Tablespoon cornstarch, mix, and add to thicken the sauce.  This gives them a beautiful glazed look.   Turn off the heat and let stand until it is time to serve them.  They refrigerate beautifully and keep for quite a long time (if you can leave them alone that long!!)


NOTE:  Remember, I doubled the recipe and used a combination of apples:   Braeburn, Gala, Fuji, Pink Lady, Ambrosia, Pinata, and Honeycrisp.  It was a great blend!!

Apples unadorned and perfectly wonderful for breakfast, lunch or dinner!   


Morning oatmeal with cooked apples!

Apples with Caramel Crunch Frozen Yogurt
 I am sure you will come up with your own special ways to enjoy these apples.  I hope you enjoy them as much as I have!!


Pin It Now!

Friday, March 15, 2013

Eatin of the Green!!!

 Have you noticed that I have been making a lot of soup lately???  Last week one of the stars of the meal was spinach.......... and here again it is the featured player.  I am not sure what is going on with my love affair with spinach lately.  I even put it in a smoothie the other day and it was actually good! (of course I loaded it with blueberries and pineapple so it would be impossible to taste it!!)  I love it in a spinach salad, but it's only been the last ten years or so that I loved it in just about any form.

I grew up watching Popeye and learning the importance of eating this nutritious green vegetable. My Mom served it to my Dad and I every couple of weeks.  But there was only one way he would eat it and I bet you can't guess.  Give up??  Creamed BABY spinach.  Yep - I am serious - real live baby food spinach was the only way it was served in our home - and the only way Dad would eat it, so of course it was the only way I would eat it as well.  In later years he would learn the joys of Boston Market's creamed spinach and was delighted when I got the copycat recipe and made it for him!  But it was a long slow progression from baby food to Boston Market!!!  I don't think  my kids even know that story - oops!!

So I have quite a history with spinach and am so grateful I progressed from baby food or I would never have tried this fabulous Italian Wedding Soup from Iowa Girl Eats.   l love her blog.

My mouth was watering for this soup and I was eager to get all of the ingredients ready for this relatively quick and easy dinner.  Since I was unable to find the tiny mini meatballs, I got a bag of ready made minis from Trader Joe's and cut them in quarters.  The next thing that was going to take time was the thawing and draining of the frozen spinach.  And even though I had just picked up a bag at the grocery store, I was pretty sure I had seen another bag in the freezer and wanted to use it up first.  So I grabbed it and  dropped the contents into the strainer in the sink.  The minute I dumped it out of the bag I knew I had a problem.  It was super icy and what green I could see  looked dried out and rather disgusting.  I pulled the bag back out of the trash and it said "sell by June 2009"!!  OMG -  that was embarrassing!  Good thing I had plan B - the new bag I had just purchased.  So I quickly dumped that in the trash and started over with spinach that looked like it could actually be edible!!  And no  -- I am not sharing pictures of that!!

So after a rough start, this soup went together easily and simply.  The only changes I made to the recipe on the linked blog above, is that I used shallots instead of the onion and doubled the garlic. When it comes to garlic, my philosophy is usually - if whatever the suggested amount is good; double is better. That garlic math has not failed me yet!!


The chicken broth is bubbling with the spinach, garlic and shallots.


Now you can see all of those wonderful ingredients bubbling together.  Had to add a more green on top with the parsley!!


The layer of mozzarella cheese on top made it that much better - but cheese makes everything better, right?


I wasn't sure this would be one of my favorites because of ALL of the spinach and the meatballs - but the different flavors really play well with each other and make it a real treat in your mouth with each bite/slurp!!  I hope you will try this soup soon - you will love it! Pin It Now!

Wednesday, March 13, 2013

Italian Bean and Bacon Soup

I have an addiction to cookbooks.  I love trying new things.  I like to push myself out of my comfort zone - just a little.

This time of year I tend to do a lot of crock pot or pressure cooker cooking .  I love the smells that both evoke, although I am probably more partial to the crock pot because I can start it in the morning - run out and do my volunteer work and come home to not only a hot meal but a home that smells like my personal chef had been working all day !! (well a girl can dream...)

This recipe was perfect for a blustery day - yes we do have a few of those in sunny California!!
I really like the "Eat More of What You Have " cookbook by Marlene Koch.  I will be cooking more and more of her recipes as time goes on. I am really trying to cook and eat healthier.Some days that task is easier to accomplish than others...She also has another one called "Eat More of What You Love".  I have tons of recipes earmarked so stay tuned.  She uses Splenda in her recipes requiring sugar, but I plan to use Truvia as I like it  better, so we will see how that works!!


ITALIAN BEAN AND BACON SOUP

1/2 pound dry Great Northern or small white navy beans
*3 slices center cut bacon, cut crosswise into 1 " pieces (I used hickory smoked bacon)
4 large garlic cloves, peeled and sliced very thin
1 medium onion, chopped
3 medium carrots, peeled and sliced 1/4" thick
4 cups reduced sodium chicken broth ( I doubled it to 8 cups - it was too thick without it!)
1/2 cup heaping pearl barley (probably heaping the 1/2 cup is what soaked up all of my broth!)
4 sprigs fresh rosemary. plus 1 Tbsp. coarsely chopped, divided
1/2 tsp. salt
1/2 tsp. pepper
** Borsari seasoning to taste
***8 cups loosely packed, stemmed Swiss Chard leaves, chopped

*I cooked double the bacon called for to use for garnish and cooked it crunchier - YUM
**This is from King Arthur.  It is a wondrous blend of sea salt, kosher salt, fresh garlic, fresh basil, fresh rosemary,  black pepper, and nutmeg.
***I used a combination of 6 cups baby spinach leaves and 2 cups Swiss Chard

1.  Pick over the beans, rinse, soak overnight, and drain.

2.  In a small skillet or the Ninja Cooking System, cook  the bacon over medium heat, stirring often for two minutes, just until the fat starts to melt..  Add the onion and garlic, stirring often and reducing the heat, if necessary, for 3-4 minutes or until the bacon is lightly crisp and the garlic is fragrant and turning golden at the edges.  At this point it will smell sooooo good!

3.  Add the carrots, celery, chicken broth, 2 1/2 cups water, barley, rosemary sprigs, salt and pepper.  Cover and cook for 6-7 hours or until the chard is tender.

4.  Remove the rosemary stems.  Add the chard and/or spinach leaves (discard chard stems) and chopped rosemary.  Cover and cook about 45 minutes more or until the chard is tender.
 
Adapted from from "Eat More of What You Love" by Marlene Koch

 This was relatively healthy (if you ignore the bacon - but why would you?!?) - and was quite filling.  I added a little Parmesan cheese on top as I love cheese melting and gooey on the top of hot soup!!

I guess I need to redefine "healthy"! Pin It Now!

Monday, March 11, 2013

Tribute to a Special Friend

The weekend was time to make a few cards .  One was particularly difficult for me as it was a sympathy card.  I wanted this one to be extra special -  and struggled as I always do, with what to do.  It seems to take me as long to come up with an idea for a card as it does to make it.  I know that doesn't make sense, but it's my reality.

I knew I wanted a cut file as I was not in the mood to stamp and color.   I hope someday soon I will want to do that again as I have some great stamps.  But not this time.  So I found a beautiful ornate cross from SVG Cuts and knew that was perfect, and that my trusty Silver Bullet would make this task easier.  It's a simple card, but that's how it needed to be.  I wanted the card to say the words that I could not find and somehow mirror the depth of my feelings.


From begining detailed cut file................... to the weeding of that file.............. to the finished card - ready for delivery.


THE STORY BEHIND THE CARD

A few weeks ago I shared a story about two special friends - a mother and a daughter who have left an imprint on my heart and on the hearts of my family.

Little did I know that the seashell card I shared on here would be our last communication.  She left this world last Wednesday - just a week later.  So now I had to make a different card -one that is more final and reflects so many emotions - sadness, loss, hope ... and most importantly, love.

The feelings of sadness and loss are selfish on my part..  It is hard to let go and I long for one more phone call; one more chance to hear her voice; one more opportunity to share a hug.  And I am reminded of how quickly life can change.  I have cried for all that I wish I could have experienced with her.  But time is a great healer.  And  as the days pass, the tears become less frequent and now merely glisten in my eyes.  And much like the miracle of the rainbow when the sun peeks through a rainy day, my mind is  flooded with beautiful vivid memories that fill my heart  with gratitude and joy for having been so blessed to be able to share part of my life with her. 

I am going to keep looking for rainbows.  I hope  you will too.


Pin It Now!

Thursday, March 7, 2013

When Cooking and Computing Meet......

I felt like I was living under a rock when I first heard about Biscoff.  All of a  sudden bloggers were posting about Biscoff cookies and cupcakes and cakes and..... well...... you name it. And I had NO CLUE what they were talking about.  So of course I had to find it online and order it.  That is the normal response, right?  So Amazon came to my rescue and it a few days I was able to sample this new (to me) taste treat. And those are the perfect words - taste treat.  I tried the cookies first and they were good - naturally good with brown sugar and cinnamon baked into them.  Crispy and yummy.
But then I moved on to the spread and if I had not had a lot of self restraint I could have eaten spoonful after spoonful of the contents of the jar. Good thing I ordered two jars.  For the next few days I made toast for breakfast just so I had a reasonable excuse to pull out that delectable jar and savor it first thing in the morning!!  Pretty pathetic but very satisfying!!!

So next on my list was to actually experience  baking with it .  Trying the Biscoff Banana Bread with Biscoff Cookie Streusel from Two Peas and Their Pod seemed like the perfect candidate for me as it used the spread AND the cookies.  So if one form of Biscoff was good, two HAD to be even better!

The recipe was pretty straightforward and the ingredients were similar to basic banana bread, with the addition of the Biscoff!

Now if you cannot find it locally or do not want to order online, run don't walk to your nearest Trader Joe's and grab their Speculoos Cookie Butter (and it comes in crunchy now)-- it's a great substitution and more economical too.  Here is what you are looking for (and I forgot the brown sugar in the photo above so it was a good excuse for a second photo!)


One  thing I learned (and really should have known) is that when you do a streusel topping that is SO thick on top , you really should press it down into the batter so it stays in place when you turn the bread out of the pan.  I think next time I might try to put half of it in the center of the bread and the rest in top so more bites will be full of that cookie mixture - it was yummy!  But I wasn't too upset when I just HAD to clean up the crumbly topping that fell off,  and of course I sampled it... just a little!!  I knew instantly that this would be  a recipe I would try again.
Just look at that scrumptious topping - Biscoff cookies, brown sugar, butter and flour!

Fresh out of the oven - minus a bit of streusel on top!

Can you see how moist and wonderful it is??  Trust me!


And while I am talking about recipes, I would love to share my new kitchen companion with you.  I have been looking at tablets for a long time. I have the Kindle Fire which I really love and it's great to grab to read books, peruse cookbooks, or even answer email - but I couldn't actually "work" on it - at least not easily. With all of the blog recipes I am saving, I am creating quite a collection!

So to make life so much easier, I am welcoming the Sony Vaio Duo tablet into my life!


Oh how I love this toy!!  Yes I am a techie junkie too!   One of the best things is that I save all of my favorite blog recipes to Microsoft One Note.  And because my computer and tablet are all synced through Office 365, I can instantly pull up the recipe on my tablet and bake or cook to my heart's content!!  I love the ease of use and the convertibility and that I can do all that I need to do on it.  It's a perfect fit for me!

That's it for now! Pin It Now!