Tuesday, July 19, 2016

Strawberry Cheesecake Ice Cream


I just found out this weekend that July is Ice Cream Month.  How convenient because I have quite a few ice cream recipes to share with you - and since I didn't know there was a whole month dedicated to ice cream,  I started my obsession with this frozen delight in June!!  I like to be early with things that are so good - and the recipes I am sharing with you are really THAT good - and I have more in the works so stay tuned.  I don't know why I have a fascination with ice cream these days.  The weather hasn't even been that hot (although reports are that a heat wave is coming the end of the week - yikes!)  so I cannot use that as an excuse....yet.  Maybe I just want to have all of my favorites figured out so when it is hot and miserable and the only thing that tastes good is a cold bowl or cone of ice cream, I will be totally prepared!  Makes sense to me!!  I currently have four different flavors in the freezer - how absurd is that?  The only redeeming (barely) fact is that I only make a quart at a time, so that makes it more acceptable in my book. If they were the half gallon size, then you could conclude that I have a serious ice cream addiction  - but quart size is totally acceptable. Right?  And I don't even eat it that often - that is the funny thing. You would think I would be attacking it on a daily basis, but since it's there in a variety of flavors, and I know I can easily make more, it just doesn't seem to have control over my whole being - at least not this week!  Will keep you posted on that one.

So - now that I have tempted you with the idea of more deliciousness to come, I will share this winner with you.  You do need an ice cream machine to make this one, but it is worth it.  The next time I make it, I would add graham cracker crumbs for a little more cheesecake texture - but it is fabulous as it is.

Strawberry Cheesecake Ice Cream

adapted from Hip Foodie Mom

8 oz. cream cheese, softened
3/4 c. organic cane sugar
1 c. cold heavy cream
8 oz. strawberry Greek yogurt
1 T. fresh lemon juice
3 T. strawberry jam (good quality)
1 t. vanilla extract (I use Vanilla Bean Crush from King Arthur flour that has bits of vanilla beans in it)
2 heaping cups of fresh strawberries, hulled and chopped.

OPTIONAL:  If you don't want it to freeze quite so hard, add 1 T. vodka when you are mixing all of the ingredients. Alcohol doesn't freeze, so that makes it a little easier to scoop out.

With a stand mixer or good hand mixer, use the whisk attachment and blend together the cream cheese, heavy cream, sugar, strawberry yogurt, lemon juice, and vanilla extract and beat until smooth, scraping down the sides of the mixing bowl as needed.

Using a rubber spatula, fold in the chopped strawberries gently until well combined. Cover with plastic wrap and chill well in the refrigerator - for about an hour.  Pour into your ice cream canister.


When done processing, put it in an airtight container and freeze for at least 6 hours before heating (although licking the ice cream beater when it is finish in the machine is certainly acceptable - and even necessary!


Pin It Now!

Wednesday, July 13, 2016

No Knead Skillet Rosemary Parmesan Bread... ON THE GRILL!


I love making bread.  I grew up with a grandmother from Austria who was the most incredible baker. She made everything without a recipe - and it was always delicious. I can still smell the aroma of brioche fresh out of the oven.  It was intoxicating!  I wish I had inherited her baking abilities, but perhaps my love of "dough" in general comes from her. I like to think so!

So when this recipe came across my computer screen, I was intrigued.  I have made no knead bread before, but always in a Dutch oven.   This had a much shorter rising time and was baked in a skillet.  So I just had to try something new. And because I didn't want to heat up the kitchen, I decided to put my outdoor grill to work and see if it could indeed bake.  I am happy to say it did not disappoint!  I am now quite eager to do more cooking on the grill, especially as the sun becomes more intense.  I love the idea of being able to bake all year long. 

The thing I love about no knead bread is the ease in which it is made.  You just do a little mixing with a wooden spoon.  It looks rough and like it needs more attention (aka kneading into a nice smooth ball), but it actually is quite happy to gently rise in the bowl it was mixed.  Then you shape it, bake it - and voila - hot homemade herbaceous bread!

If you are at all hesitant to try your hand at bread baking, this is a great place to start.  It is simple, VERY forgiving, and well worth the little attention. And the end result make it enormously gratifying.

You just have to try this!

No Knead Rosemary Parmesan Skillet Bread

adapted from Handle the Heat

Ingredients:
1 pkg. (2 1/4 t.) instant yeast
2 c. lukewarm water
4 1/2 c. regular flour
2 T. chopped fresh rosemary (plus extra for sprinkling on top)
1 1/2 t. fine salt
1/4 c. Parmesan cheese
olive oil (2-3 T)

In a large mixing bowl, combine the yeast and lukewarm water.  Add about half the flour and stir with a wooden spoon. Add the rosemary, salt and remaining flour and stir until combined.  It won't be pretty - sort of shaggy looking, but that's ok.  Cover with plastic wrap (spray the underside of the plastic wrap with cooking spray so the dough won't stick if it rises too high!) and let it rise in a warm place. This should take about an hour.


Brush the bottom of the cast iron skillet (10" or 12") with about 2 T olive oil and set aside.
Dust the dough and your hands with flour before shaping it into a round disc.  The dough will be sticky.  Don't worry about creating a perfect circle - it still has to rise one more time.  Place it in the skillet, cover loosely, and let rise until puffy, about 30 minutes.

While the dough is rising, preheat the oven to 400 degrees. (I set the grill to 375 ).

When ready to bake, drizzle or spray the top of the dough with olive oil.  Slash the dough with a sharp knife in an "x".  Sprinkle with a little more chopped rosemary.  Bake for 20 minutes.  Remove from the oven (or grill), sprinkle with the Parmesan cheese, and bake for an additional 20 minutes or until a golden brown (I did 25 minutes in the grill).


Remove from skillet and enjoy every morsel!


Pin It Now!

Saturday, July 9, 2016

A Couple of June Cards

The end of last month brought a need to make a variety of cards, so I decided to showcase the two together -  a birthday and a get well .  Actually there was a third - a sympathy card, but I must have sneezed when I tool the photo as it was THAT much out of focus.  So when I make another one like that (and I used a new to me technique too) I will share.  And since I have not been able to find a really good spot in my beach condo to take photos, I have ordered something that will help me immensely and hopefully you will see the difference in a couple of weeks - at the most!

The birthday card was for the mother of a dear friend - I grew up on the same street and she was one of my mother's special friends.  Her daughter has been a dear friend since we were both three years old - and we are both well beyond that now!  I spent many of my childhood hours/days/months  at her home - I was an only child so life with a family of five brothers and sisters  was much more exciting!   I wanted to live there.  We seem to want what we don't have, especially when we are young, and realize many years later just how lucky we were to have exactly what we needed...... I guess that is what getting older  maturity - does for you.

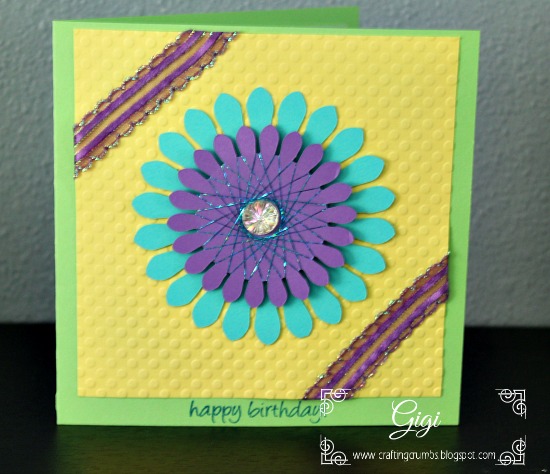
So here is the card for my dear friend's mother.  In later years, I have called myself the adopted daughter since I was always hanging around there - whether or not they wanted me to!  She celebrated her 88th birthday and that is such a joyous occasion.


This is spirella that I have not done in a while - it's addicting.
The ribbon is really purple, it just isn't showing well in this photo. 
All of these beautiful colors are from the PopTone collection at Paper Temptress.
Next -- in my own back yard, one of my "new" neighbors is recovering from a hip replacement, so I wanted to let him know I was wishing him well.    He knew my father well, so we bonded immediately when we met almost a year ago now.  He has an affinity for vintage cars, so I found  an illustration online, traced it, cut out the various parts and put it all together to make a  "get well soon" card for him.  I handed it to him this week - just 11 days after his hip replacement and he was walking around with barely the use of a cane.  I was and still am in awe!  Good for him!


This was fun to do and was easy to trace with the SCAL software.

Each of the cards is quite different, but it was gratifying to push myself creatively and try some new things, while reaching out to special people to let them know I care...


Pin It Now!

Thursday, July 7, 2016

Cinnamon Sugar Blueberry Banana Bread


If you have bananas that are ripening way too fast (especially in the summer) and some fresh blueberries, then this recipe is for you!  Most of the work is done in the blender so it is easy and delicious too.


Cinnamon Sugar Blueberry Banana Bread

adapted from Crazy for Crust

Ingredients:
3/4 c. cane sugar
1/2 c. butter, softened
1/4 t. salt
2 overripe bananas
2 eggs
7 T. buttermilk
1 t. vanilla extract
1 t. baking soda
1/2 t. baking powder
2 c. flour
2 c. fresh blueberries

Topping:
1/4 c. cane sugar
1 t. cinnamon

Directions:
Preheat the oven to 375.  Grease a 9x5" loaf pan and dust with sugar.  Set aside.

Cream the butter and 3/4 c. sugar with a hand mixer. Set aside.

Add the bananas, eggs, buttermilk, vanilla, salt, baking powder and baking soda in a blender jar and process until smooth.

Pour half the banana mixture into the butter mixture, along with 1 c. flour. (Remove 1 T. flour from remaining cup and toss with blueberries).  Mix with hand mixer just until incorporated.  Add the remaining banana mixture and flour.  Mix just until combined.  Gently fold in the floured blueberries (this prevents them from falling to the bottom of the loaf while baking).  Pour mixture into the prepared pan.

Combine the 1/4 c. sugar and cinnamon in a small bowl.  Sprinkle evenly over the top of the batter.

Bake for 45-50 minutes or until a toothpick inserted in the center comes clean.  The edges should be a dark brown with a crack down the middle.

Cool completely before removing from the pan.  This keeps for quite a while. Put it in the refrigerator after a day (if you are lucky enough to have any left!  Enjoy!


Pin It Now!

Monday, June 27, 2016

A Special Card


A beautiful young woman who is close to my family is going through a very challenging time in her life.  She is in a daily battle with cancer and it has reminded all of us just how quickly life can turn upside down.  Each day is a gift and we truly have no guarantees.

I wanted to make her a card to let her know I am thinking of her. She loves the ocean and all things nautical, so I tried to combine the two in this card.  I hope she likes it and feels loved because she certainly is.


A well made design like this one will give you two cards with one cut - love it!


The design is from one of my early favorites - Dominic of Crafty Vectors.  He has created a beautiful shell collection and this is just one of them.  One of the many reasons I love his designs is that I can get two cards out of one.  I used the main design for this card, and cut out a piece of double sided adhesive for the negative piece so I can use it for another card later.


Saving this shell, now covered with adhesive, for another day.


I used the MISTI to get the sentiment in the perfect spot.  Thanks to how
easy it is to align things with this tool,
I am no longer hesitant to stamp directly on a finished card.

I used the Stampendous texture stamp to create a mottled effect on the frame around the shell and give it a little dimension.  I love the detail in the shell and hope it helped her feel a little of the magic and calm of the ocean.


Pin It Now!

Wednesday, June 22, 2016

Simple and Easy Pizza on the Grill


I admit to being a little more than intimidated by this Traeger wood pellet grill initially.  I knew NOTHING about cooking on one and had never even tasted something grilled on one.  Yet I trusted my new neighbor and bought a small one.  Talk about a leap of faith, but it was one of the best leaps I have taken - and, I might add, I landed safely!

I had no idea that a pellet grill could actually take the place of an oven - what a concept.  If you don't know or aren't familiar and are living in the dark ages like I was (!),  let me tell you. This amazing creation can be your new best friend!  I plan to spend a good portion of the summer getting to know it very well, and look forward to baking on it as well as grilling, roasting and smoking. 

I cheated a bit on this meal as I had a batch of premade pizza dough in the freezer so this isn't totally from scratch, but sometimes you just need a little shortcut, right??  This is the third time I have made pizza on my new grill, and it has turned out better each time.  I think I am finally getting the hang of it.  Practice makes perfect.... or at least better!!

There are a few things I have found that work well.  Using a pizza stone helps the crust cook quicker and more evenly and you don't have to prebake one of the sides first before adding the topping.  It allows you to put the raw dough straight onto the stone - toppings and all.

Whether you make your pizza sauce or use it straight from a jar, you are not going to need much of it.  A tip for the extra is to pour it into an ice cube tray.  Freeze until firm and then pop the pizza sauce cubes into a freezer safe bag. Then you have easy to use pizza sauce in small increments whenever you need it. That method works for a wide variety of things and will save you from throwing out massive amounts of jarred foods.

So for this pizza the ingredients are simple.

Pizza dough (homemade or ready made)


Easy pizza dough


Ready to become a pizza

Pizza sauce (homemade or bottled)
Roma tomatoes, thinly sliced (or homegrown even better!)
Fresh mozzarella cheese, thinly sliced
Parmesan cheese (optional)
Fresh basil, oregano and/or parsley for garnish


Fresh oregano, basil and parsley

That's it - You can certainly add chopped veggies or cooked meat to it, but you don't want to overload it so the toppings are too heavy for the dough.

Preheat your grill with the pizza stone inside so it warms up with the grill. Now...assemble your pizza.

On a well-floured surface, pat the dough into a circle , 12-14 inches approximately.  You don't want it too thick or too thin.  Put a thin covering of fine corn meal onto a pizza peel or whatever you are using to transfer the pizza dough to the grill. Place the dough on the cornmeal.


Topping ready...

Put just 3-4 tablespoons of sauce on the dough and spread  to cover.  Add thin tomato slices (no need to cover all of the dough) and thin slices of mozzarella.  You can also sprinkle shredded mozzarella over the top.


Time for the grill...

When the grill temperature is 400-450, carefully transfer the pizza dough to the stone and cook 8-10 minutes, depending on the temperature of your individual grill. The dough should look lightly browned and the cheese well melted on top.  Remove the cooked pizza from the stone (pizza peels are wonderful transferring to and from the stone), slice, and enjoy!


Cooking on the grill...


Wish you could smell this....YUMMMMM


All that's left is to eat!


Pin It Now!

Friday, June 17, 2016

No Churn Roasted Berry Vanilla Bean Ice Cream


Finally I am starting to do more cooking and baking.  Ok - well I am not really sure that ice cream falls into the cooking or baking category - but will stretch a little for this new recipe.  Actually the berry mix is a beautiful blend that was roasted in the oven , so I did a minimal amount of cooking! And O...M...G...!  If I had known that roasting berries would have produced the most delicious, intoxicating smell ever... I would have done it ages ago. 

I actually made this a couple of weeks ago and it is honestly one of the best flavor combos I have had in a while... maybe EVER!  (Full disclosure - there are very few ice cream flavors that I don't like, especially when they involve berries of any kind.  And I really am a vanilla purist. To me, there is nothing better than real vanilla ice cream.   So in all fairness, I have to say that this is a shortcut vanilla base, and one that I would make again, but only in a pinch.  I love the REAL vanilla with the scraped vanilla beans and cream and yes, even the making of the custard.  It's a process, but one that turns out fabulous results.)

BUT.... on those days when it's just too darned hot to stand over a stove and/or you are just too tired to put out the effort it takes for the longer version, this is a great substitute - really.  And the roasted berries take it over the top.  And with temperatures hitting the 90s here on the beach this weekend and into next week, I am glad I still have some of this in the freezer (and a few other varieties I will share soon).

This honestly is a MUST TRY. And I am sure you could substitute with peaches, nectarines and raspberries, ( a great flavor combination),,,,you name it!!

NO CHURN VANILLA BEAN ICE CREAM WITH ROASTED BERRIES

adapted from Food Fanatic


Roasted Berry Sauce:

1 quart fresh strawberries (halved)
1 pint fresh blueberries
2 pints fresh blackberries
1/3 c. organic natural cane sugar
1 t. Madagascar bourbon pure vanilla powder (you can use extract if you don't have the powder, but the powder really mixes beautifully and is nice to have on hand)
1/8 t. ground cardamom

Preheat oven to 450 degrees.  In a large bowl, mix the berries, sugar, vanilla and cardamom gently in a folding motion so as not to crush the berries.


Fresh berries - still "raw"

Pour the mixture into a large baking pan (I used a 1/2 sheet pan that was the perfect size) and spread the berries so they are not layered on top of each other, as much as possible.

Bake for 20-35 minutes or until the fruit is soft.  Allow to cool completely and then cover and refrigerate for at least 4 hours.


Roasted berries.......wish you could smell them!

NOTE:  You may want to hide all of your teaspoons, tablespoons, ladles - anything that will make it easy for you to literally devour this pan of berry lusciousness. I don't normally get weak in the knees over food, but this..... THIS is just beyond words.  It would be fabulous on its own mixed into yogurt, or a smoothie, or over pound cake - the list is endless.

Vanilla Ice Cream Base:

2 c. whipping cream
1 - 14 oz. can sweetened condensed milk
2 tsp. vanilla bean paste (takes the vanilla to the next level)
1/2 c. roasted berry sauce, gently mashed

In the bowl of a stand mixer (fitted with the whisk attachment), whip the cream until it holds stiff peaks.  That should take about 4 minutes.


A yummy mixer concoction...

Turn the mixer down to low and slowly stream in the sweetened condensed milk and vanilla bean paste.  Continue to mix until combined, about 1 minute.

Pour the ice cream base into a freezer safe container *(I love the Tovolo containers that you can buy from Amazon).  Spoon a 1/2 c. of roasted mashed berries over the ice cream and use a small knife to swirl the berries into the base.  Cover with a piece of parchment paper set on top (to prevent ice from forming) and then close it tightly with the lid.  Freeze overnight.


You can see how the COLD ice cream is already freezing the juice from the berries!


I promise - you will LOVE this!


Pin It Now!

Monday, June 13, 2016

Smoked Mac and Cheese on the Grill!

So....... I have been trying to do the unexpected on my new grill because it is supposed to do it all - easily. And so far it has not disappointed.  If things have not turned out, it has definitely NOT been the fault of the grill!  I am eager to share some of the successes with you as time goes on.

This is one of the first "out of the norm" things I did on the grill.  I would definitely make this again.

Smoky Triple Mac n' Cheese                                       

adapted from the Traeger Grill recipes
Serves          6 - 8

Ingredients

2 1/2 c. half and half or milk (plus more if needed)
8 oz. pkg. cream cheese, cut into cubes
4 T. butter, cold
1 t. dry mustard
1 t. hot sauce, if desired (not for me!)
3/4 t. black pepper, freshly ground
1 1/2 c. shredded sharp cheddar cheese
1 c. shredded mozzarella
1 c. smoked gouda (with bacon for extra zip!)
16 oz. of pasta (I used half whole wheat corkscrew and regular cavatappi)
pinch salt
1 c. Panko breadcrumbs
2 T. butter, melted
smoked paprika to garnish 

Preparation

Start the Traeger grill on Smoke with the lid open until the fire is established (4 to 5 minutes). Set the temperature to 225F and preheat, lid closed, for 10 to 15 minutes. 
Make the sauce: Combine the half and half, cream cheese, 4 tablespoons of chilled butter, dry mustard, hot sauce, if using, and black pepper in a large (12-inch) well-seasoned cast iron skillet. 
Place the skillet on the grill grate, uncovered, and smoke the mixture for 30 minutes. Remove the sauce from the grill and whisk until fairly smooth. Increase the Traeger temperature to 350F. 
While the sauce smokes, bring a large pot of salted water to a boil on the stovetop. Cook the pasta 1 to 2 minutes less than the package directions call for; the pasta will continue to cook on the grill. 
Drain, rinse with cold water, drain again, and return to the pot. Toss the cooled pasta with the shredded cheeses.


Pour the smoked sauce over the pasta and cheese, stirring gently with a rubber spatula to coat the pasta well.
Combine the melted butter with the cup of Panko crumbs and set aside.
Rinse out the cast iron skillet and dry thoroughly. Turn the mixed macaroni and cheese into the clean skillet or a buttered 3-quart baking dish or casserole, smoothing the top. Sprinkle evenly with the breadcrumb mixture. Place on the grill grate. 


Time to cook on the grill...
Bake the macaroni and cheese until it is bubbling and the top is lightly browned, 30 to 40 minutes. Dust lightly with the paprika. Carefully transfer the skillet to a trivet or hot pad before serving.


Toasty and golden and heavenly!


A touch of parsley for freshness and flavor...


Good enough to eat!

This is not as "cheesy" as the standard mac and cheese, but the cream cheese makes it smoother and luscious and the smokiness of the sauce gives it a surprising and tasty bite.  It is delicious!


Pin It Now!

Monday, June 6, 2016

Office/Craft Room REVEAL....


Moving into the craft room...... yes I had post-it notes
on everything to help me organize all of the supplies,.
It was a monumental task - but SO worth it!


More boxes and post-it notes!  I think I am a little OC when it comes to organizing!

So...... here is where I started with boxes galore (and trust me - I downsized here as well and donated about half of my cardstock supply, markers,  paints - (so many things that I  either had barely used or had not used at all...) before I packed up what was left. 

I loved this room even when it was a mess because I could always see the potential in it.  Just look at all of those windows (4 regular and 1 double) and space to move around!. I knew from the moment it was designed that creating would be so much fun in here,  It makes me happy just to be in here!

OMG - such pandemonium initially and such excitement when it was all finished.  I wasn't sure the contents of all of those boxes would find a home, but they did! Trust me - I had my doubts MANY times!


The unpacking begins as the post-its directed my efforts and kept me focused!
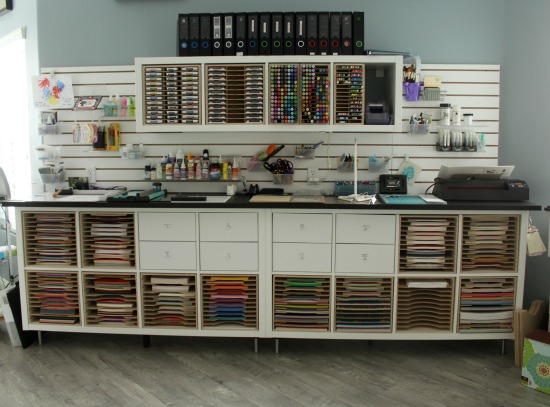
With the help of Ikea, Stamp n Storage products, and my youngest son's ingenuity (along with the detail oriented and committed contractor and his great crew), I have an amazing space to do all of the things that I love.  I can hardly wait to get some mojo back. I would love to have a list in my head a mile long of things to do.   I just need a good swift kick to get myself in gear again.  soon....

In the meantime, I have been slowly making headway on the organization of my craft room.  I am so glad (and relieved)  that the ideas that started in my head, moved to paper and then took actual form really worked!  In fact, it came out even better than I had dreamed. I love everything about it.  And I may still be moving things around, but that's just part of who I am. I am rarely content to keep things status quo - at least not in my craft area.

To share a little background, this is the fourth or fifth craft room I have put together from scratch.    I have put together a mish-mash of workbench storage, shelving, plastic containers to having an organizational company create a space.  It was great - but with each project I learned a little/usually a LOT more....

All of that design and trial and error came with me to the condo where I designed a space all with IKEA pieces.   I poured over catalogues until the pages were worn, marking what I liked, took several trips to IKEA in San Diego (I could live in that store quite happily!)  and make mock up after mockup - trying to figure out how to make it all work together.  The contractor and his guys were the best, although they were not thrilled when they realized they had to assemble 32 drawers - and that was just for one wall!  Ahhh yes - organization taken to the next level!

I also used products from Stamp'nStorage that are designed for IKEA (they have other products that work for any storage, but they do have some specific pieces that fit in IKEA units) to help keep my paper, markers and ink pads all in neat order.  I am still shifting a few things around but it's done for the most part.  I just need to do a better job of keeping excess paper OFF my computer area.
That is a work in progress!


The two organizers on the upper left are for ink pads. 
The remaining ones are for markers of all kinds


Here is what they look like filled and neat.
Underneath the counter are all of the paper organizers with removable dividers
so the size can be customized based on the amount of cardstock.
I divided my stash by brand and color and made labels
to go on the front edge of each paper divider.


This is the back of the room - pics below show a little more detail.
The work area is to the left and the sewing area and
lots of storage are to the right...
Assorted ribbons are hanging on the left side of the storage unit.


Here is a close-up of the upper storage -
I opened one row of doors so you could see the inside -
the cupboards (shown) and double drawers below are
individual inserts that fit into this open "cubed" storage piece!


This cupboard (above) is supporting the
12 cubed piece.   There is printer paper and toner
on the right side and  Silver Bullet Mats,
adhesive, crafting sprays on the left, as you can see.


This is the back corner of the craft room - a view
of the sewing area and great craft storage.


A better picture of the sewing area with most of the supplies
contained within the sewing "desk".


It is so difficult to get photos of this amazing room
because of all of the angles.  It would have made a
disjointed master bedroom - it's much better suited
for crafting, especially with ALL of the wonderful windows!


Just a peek of mini ink storage...


...and glitter all in one place...

...and foil especially for the Silver Bullet!


This bookcase houses my cookbooks (yes I downsized my "collection"! ) and volunteer notebooks. 
The bookcase at the other end has my crafting books and sewing materials (threads, etc).


This area is the front wall of my office (it backs the kitchen)
and holds office supplies in the drawers and printers on the shelves..


This is the front corner with all of the wonderful sunshine - love it!
It's a pleasure to sit here and work on things.  I cannot enjoy the scenery  from this spot,
but I can always sit on the deck if I need an ocean breeze...


A close up of the work area........


New home of my Silver Bullet - front and center!

Hope you enjoyed an overview of my new craft room.  It has been a long time coming, but so worth the wait.
Pin It Now!