Showing posts with label Silver Bullet Professional Cutter. Show all posts

Tuesday, September 5, 2017

Crafting and Generosity in the Wake of Harvey


I have been so touched by the amazing generosity of the crafting community the past week. So many companies (especially the small ones) have been sending a percentage of profits to TX or creating groups of items where proceeds will go to help.  It is just a reminder that it doesn't always need to be a large gift to make a difference; a lot of small gifts add up as well and bring help in just the same way.

In that vein, I was reading a post from Patricia at A Little Hut.  She lives in the Houston area and luckily is okay, but she has been spending a lot of her time volunteering to help others who did not fare as well.  She also spent sleepless nights during the howling winds - so she drew.  Her story is here.

I loved the simple but stately qualities of her bird (the state bird of Texas) and wanted to use it to celebrate a birthday.  Out of tragedy and sadness, good things can happen.  And I am hoping this bird will bring joy to the recipient.

In her details about her creation with the bird, she didn't have perfect shade she wanted for one of the colors in the leaves. So she took a colored pencil and made the shade she wanted.  OMG - a lightbulb went off,  Why did I never think of that - I can create the colors I need with pencils, markers or watercolors.Duh!!  And it just so happened that I ran out of the silver Mica paper (from Paper Temptress) that I wanted for the lighter gray color, so I grabbed the opal Mica paper and colored it with a marker.  And you will see the unexpected but fun results!


A little closeup of the bird - see the mottled gray coloring? That is the marker colored paper. 
I love it and can't wait to try it again with other mediums.
I also embossed the background to give it some interest,
and added sequins and clear butterflies from the 28 Lilac Lane collection.


I attached the bird with foam dots to give it some dimension. I also cut an
extra layer of the stems out of black and offset it to define the leaves a bit more.


Thank you, Patricia, for all you are doing to help those who are suffering so much devastation.  
God bless Texas (and Florida who may need all the prayers we can spare as well).
Pin It Now!

Monday, June 27, 2016

A Special Card


A beautiful young woman who is close to my family is going through a very challenging time in her life.  She is in a daily battle with cancer and it has reminded all of us just how quickly life can turn upside down.  Each day is a gift and we truly have no guarantees.

I wanted to make her a card to let her know I am thinking of her. She loves the ocean and all things nautical, so I tried to combine the two in this card.  I hope she likes it and feels loved because she certainly is.


A well made design like this one will give you two cards with one cut - love it!


The design is from one of my early favorites - Dominic of Crafty Vectors.  He has created a beautiful shell collection and this is just one of them.  One of the many reasons I love his designs is that I can get two cards out of one.  I used the main design for this card, and cut out a piece of double sided adhesive for the negative piece so I can use it for another card later.


Saving this shell, now covered with adhesive, for another day.


I used the MISTI to get the sentiment in the perfect spot.  Thanks to how
easy it is to align things with this tool,
I am no longer hesitant to stamp directly on a finished card.

I used the Stampendous texture stamp to create a mottled effect on the frame around the shell and give it a little dimension.  I love the detail in the shell and hope it helped her feel a little of the magic and calm of the ocean.


Pin It Now!

Thursday, January 15, 2015

Happy Birthday, Penny!

Since the actual card is en route to its destination (and yes it will arrive a "little" late...), it seemed like the next best thing was to turn this post into a birthday greeting, so.........

Happy Birthday to you..........


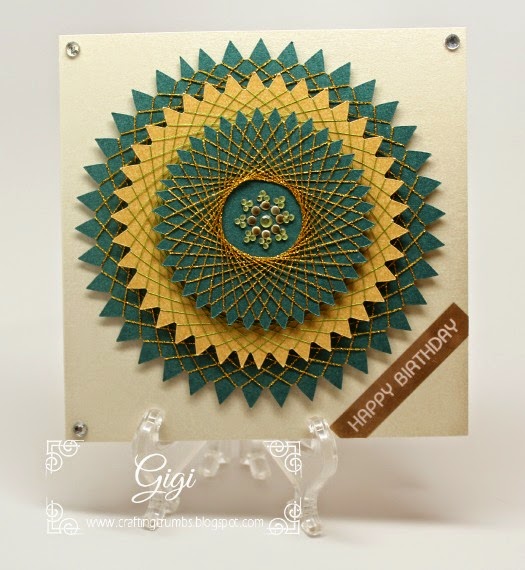
This card uses one of Penny's own shapelie files - the Starburst shapelie.  I resized it in SCAL software so I would have 3", 4" and 5" shapes.  I decided to do spirelli on each because that is such a simple craft technique and really adds a WOW when all is done.  I really should use it more often - it's a great way for me to utilize metallic threads left over from other projects!  And you can use any thread that you like or have on hand - I just happen to prefer the sparkle.

Spirelli is just wrapping thread around a design. The shorter the interval between wraps, the larger the opening when you are done.  The wider the interval, the smaller the opening as you can see in the pictures. The two largest shapes were wrapped at 10 spaces apart, the center top shape was wrapped at 15.


Numbered on the back in case I get lost counting!


All three shapes wrapped - green with gold and gold with green.

From here I just stacked the shapes with foam tape to give it dimension  and kept the rest of the card simple so this medallion could be the star.  The Happy Birthday Greeting was done on my  Brother labeler with satin silver on gold tape.  A few crystal rhinestones and this card was in the mail.


Card stock is the Mica from Paper Temptress.


 I hope it makes it safely to its destination.  In the meantime, birthday wishes are flying your way....


Happy Birthday, Penny!

Pin It Now!

Friday, May 2, 2014

Family Birthday Cards.... Part Two - My Youngest Granddaughter!

HAPPY BIRTHDAY, HALEY!!!

I can hardly believe that my youngest granddaughter will be 8 in a few days. How could that be??  I love this age - she is still a little girl, but there are glimpses (thank goodness they are quick) of the young woman she is becoming.  Please let the time slow down!!

A special note about her May 5th, Cinco de Mayo, birthday.  She was born on my dear father's birthday, her "Papa", as my children fondly and adoringly called him. Unfortunately, they never had the pleasure of meeting each other, but I have no doubt there is a special place in their hearts for each other.

So....what kind of card do I make for an eight year old?? After talking to her Mom, my card choices were anything related to Frozen (what a great movie!!), Monster High (I was clueless!), One Direction or Wonder Woman!!

After doing some searching for inspiration , I settled on the Monster High logo.  I am not a big fan of skeleton skulls, but the little girl was just too cute!!  So I found the same font on Dafont.com and tried to imitate the color patterns.  It is called Runy Tunes Revisited!  What a name!  I traced the logo in SCAL and made the cupcake with a variety of papers from Paper Temptress.  The gradient paper is actually a pattern made in Inkscape and printed on to Luster canvas text weight paper from Paper Temptress too.  I love the way the letters still shimmer through the ink.


 Just placed the letters randomly on a dark background so you could see the gradient color
in each letter - I loved learning something new....

This card was so much fun and I hope she has as much fun receiving it as I had making it!

All of the papers used are from Paper Temptress - the mica, luster and sparkle lines.  There are more details below under the pictures.


The cut pieces - using Paper Temptress Black Sparkle (shadow of cupcake) Luster for the skull and cupcake frosting (frosting embossed with a Cuttlebug embossing folder) and Mica for the wrapper...


A closer look at the Azalea Mica in the bow and wrapper and mat with the embossed Luster frosting (D'Vine Swirl - Cuttlebug) and embossing on the Laser Luster )Dotted Chevron - Teresa Collins) for the background.  I love the layers of texture.  Glossy Accents make the skull eyes shine!


Here are the printed letters matted on Canvas Luster  and then again on the Black Sparkle 
similar to the actual logo


The cupcake is on pop dots to give it a little more dimension.


And finally... the finished product.  A birthday card for a 
very sweet eight year old girl.


Pin It Now!

Sunday, December 22, 2013

Christmas Money Cards


Finally I am made some cards, and accomplished a little Christmas baking.  It seems like no matter what I am focused on, there is something else nagging at me that needs to be done.  Tis the season.....

Every year I try to make a few simple cards for the special people in my life who consistently make it easier...people like the gardener, mail lady, UPS (yes we are on a first name basis - **shock** I know!), the cleaning lady and a few others.  They all go above and beyond and I want to be sure they feel thanked and appreciated, especially this time of year.

And of course every year the card needs to be different. Not sure they would remember or care, but I do! So this year I used a file from The Cutting Cafe that is a "thanks money holder card".  It was easy to cut with my Silver Bullet and Sure Cuts a Lot and  I like the touch of Christmas paper on the "thanks".  The papers are from Recollections at Michael's - I think I picked them up last year.  Yes I am trying hard to use what I have.

I kept these simple - and then printed their names on labels, affixed them to the other side and presented them in a clear envy.

The cut file from The Cutting Café


A better view of the pocket for the $$$


Added a closure to make it easy to open and close


These are easy to apply fasteners that work really well --


The finished card in green


Same card in red

These were fun and easy to do and the recipients seemed to love that they were handmade.
Pin It Now!

Thursday, December 19, 2013

Simple Iris Folding Holiday Cards


I am not at all sure who these cards are for.. but I was in the mood to do some iris folding (love playing with the paper patterns) so the rest came together quite easily.

I used a simple tree pattern in SCAL (Sure Cuts A Lot) and the Silver Bullet Pro and easily created my template for the folding.  I have a variety of iris folding patterns printed on transparencies so it is easy to know how to line up the paper strips.  The solid card stock is primarily from Paper Temptress; the patterned pieces are from a variety of sources!

These were fun to put together and strips of foam tape on the back make it easy to attach to the card (and all of the messy work is hidden that way!)  Not sure the photos capture it, but in the center of each is a bright metallic or holographic paper that is sparkly and pretty. This is where the "iris" folding comes from - the opening in the center is the iris like the center of the eye or a camera lens. And the spiral pattern in traditional folding resembles the layers in the camera lens - just a bit of trivia!

I think I want to do some snowflakes next, all in white, but with different textures of papers. Will see if I can pull that off.  If I could ever think of these ideas in time, they would make interestingly different Christmas cards.

Hope you enjoy!


Pin It Now!

Sunday, December 15, 2013

Snowy Cards

"Oh where oh where did my mojo go? Oh where oh where can it be?............"

Boy it's been a  LONG time since I even felt like I wanted to make a card, let along execute it.  So I think I have been cooking and baking to fill the void, but that doesn't work.  They are two entirely different kinds of creativity and one doesn't replace the other.

Well I think I am finally in a bit of a transition.  I actually cut out a few things today on my Silver Bullet Professional (I still so love that machine), and believe it or not, I used the pen tool "officially" for the first time!  That is embarrassing to admit. I have played around with it, but never really settled in and used it.  Wow - I love it!  Just have to remember to switch to WYSIWYG when I do that so it actually writes in the correct place! Don't ask........

This was the year I was going to make Christmas cards. It has been YEARS since I have done that. It was also the year I was going to finish a project for the three kids that has been in my head forever.  Note the use of the word "WAS".  Yes, unfortunately maybe next  year will be the year.  Darn it all - I really want to create the project for the kids and just have to set aside the time and DO IT!  But I seem to get so busy the last half of the year with volunteer commitments that personal projects go by the wayside. Maybe the coming year I can focus and get most of the work done early so there is not a lot left the last half of the year. That remains to be seen.... well enough of my whining. Here's to a productive 2014!! :)

For now, I have to be content with a few cards. This snowflake background pattern is from Birds Cards (her files cut so well) and the snowflake embellishments are also hers. I should have written down what font I used on the tag.....oops!


Pin It Now!

Saturday, November 2, 2013

Happy Birthday, Kendra

Where did the time go?  I cannot believe my first grandchild is turning 13!  How can that be? I still remember so vividly the day she was born.  Should it be such a stretch to imagine she is now a teenager?  I have watched her grow up into a lovely girl, yet something about entering the teenage arena just seems unbelievable to me - and exciting and scary all at the same time.  I am also extremely grateful that I do not have to go through those tumultuous years again!  God bless her Mom!

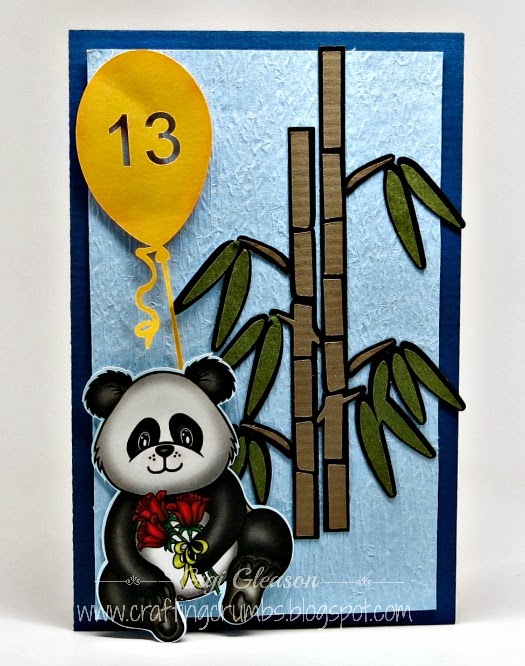
So now to the card. I am sure some of you are going to look at this and go "huh"??  I know, it doesn't look like a card for a girl embarking on a journey into the TEEN years - it looks - well much younger.  But she loves Panda bears - I mean she REALLY loves them.  Halfway through the evolution of this card I called her Mom and said, "Are you sure I should to this?  It just doesn't look like a teenager's card!"  But we both decided to embrace the young girl that still  loves Pandas - as there are many teenage years ahead of her!

And I admit to cheating a little on this card. I "should" have colored this digi image, but with all of the cards I needed to finish for October, I just didn't feel I could do it justice .  So I chose a precolored image that I used for a print and cut on my Silver Bullet Professional . I love that machine.


The print and cut with the SCAL registration marks.


The cut out image - thanks to the Silver Bullet Pro!


And the bamboo is a traced design that I added.  Love the texture of the ruchĂ© paper from Paper Temptress.


You can see the texture in the blue ruché paper and the dimension of the panda and the balloon.


The finished card. (not perfect - I accidentally crumpled the balloon 
AFTER I had taped it down with pop dots. :(

Not every card is as perfect as I might like......

HAPPY BIRTHDAY, KENDRA!


Pin It Now!

Friday, October 25, 2013

Cards for the Family!

My oldest son's wife is a fashion diva.  She looks like she just walked off the cover of Vogue most of the time.  And she is as beautiful on the inside as she is on the outside.  My son is certainly blessed.

I tease her about her love for shoes.  She adores high heels, I mean REALLY high heels and she wears them well.  The funny thing is she is already six feet tall so she certainly doesn't need the height .  I don't blame her at all. If I could wear those 5 inch heels without destroying my body I would, because they just look so wonderful!!

So..... with that in mind..... I had no choice but to make her a card that embraced one of her loves.  I found the perfect cutting file at The Cutting Cafe. It was a shoe shaped card that I thought it would be fun to make and decorate. But then I had an idea to use the card as an embellishment and put a card on a card.  It was definitely something different for me but it was fun to play around with different ideas.


Where the shoe opens up I wrote "Happy Birthday" in a white gel pen.  You can see all of the dimension of the card in this photo.

The card base is a Coredinations paper - I like the "tweedy" look of it.  The dotted paper (on the shoe) is from Bo Bunny. I took the black Sakura glaze pen and went over each dot (who does that??) to give the dots dimension.  It really went fast and I have to say I really like the added texture!!  The heel is glittered paper from American Crafts and it is easy to cut on the Silver Bullet because the glitter is as smooth as silk, so no damage to the blades!  I think it might be fun to wear a pair of shoes that looked like these (for maybe 10 minutes or so!!)


Really happy with how this card came out.  She loves red and black so hopefully will love this too1


And a week later there is another celebration - their wedding anniversary. I think Scott planned it that way so it would be easier to remember (not that he would ever forget...!)  So once the birthday card was finished it was time to work on the anniversary card.  Am I the only one who struggles with those?  I was at a loss for ideas so I defaulted to their wedding colors which were maroon and navy blue - striking really.  It is so hard to believe that this is their second anniversary.


You can clearly see the positive and negative images of both the rose frame cut and the sentiment.  I rescued all of the extra cuts for a future project!

The design is elegant but simple - another one from Birds Cards.  And all of the papers are from Paper Temptress. That should come as no surprise by now!  I am clearly addicted to her papers!  And using the Silver Bullet Pro Cutter guaranteed that I would have a positive and negative image - again - so I have pieces set aside for another card in the future.  Love it!


A close up of the sentiment and detail of the cut.

I kept this card pretty basic with a popped up mix and match sentiment , again from Birds Cards, and just added some pearls and pre-made roses from Wild Orchid Crafts (they have some  beautiful flowers if you are not familiar with the site and need to add to your stash!)


And the final product. The bow was made with my new Bow It All tool.  It is my favorite bowmaker (and I have tried a lot of them!)


Hope you enjoyed these two celebratory cards.  I have one more family member that will need a card the end of the month, so stay tuned for more!  
Pin It Now!

Wednesday, September 11, 2013

August and September Birthday Cards

And there are more!!

The burst of inspiration is still with me so I am taking FULL advantage of it.  This card was made from one of the designs from Birds Cards.  I do love her card backgrounds and it was fun to use some patterned paper again - but even though I chose an entirely different brand of patterned paper (First Edition), I still ended up with purple being the accent color.  It's surprising to me how many times I end up with a card that highlights purple.  I will try to break into a new color family with the next card! (see below - I did it!!)

This card utilizes several designs from Birds Cards: the Circle Square Frame, Flowers 2 and 6 and the stamens.  I also uses her digi stamp in the center of the card and did a print and cut with SCAL and the Silver Bullet Professional.  I took the sentiment one step further and used the FoilMaster to add purple foil to the greeting. I love the sheen of the foil - it is just so darn hard to photograph!

I think this frame has a lot of possibilities.


You can see how detailed the cut is -  even with it still on the mat!


And here is a much better example of the detail.  Look at those little triangles!!!


Love the foiled greeting.    The papers from Paper Temptress are Kunzite and Amethyst 
from the Mica line


Another card that went together easily (and kicked me out of my purple rut) was this one.  Monica's files are so detailed but I never have to worry how my Silver Bullet Professional will handle them.  This is her spring season file and I altered the separate tulip file in SCAL to make it shorter and two sizes.  The paper is my favorite line from Paper Temptress - the mica line (aka Stardream). It cuts like butter and I love the shimmer.


Another intricate cut from the Silver Bullet Professional Cutter.


I really like how this amber color pops on the red.

Pin It Now!