Saturday, September 30, 2017

Mexican Delight Burrito Bowl - Part 2

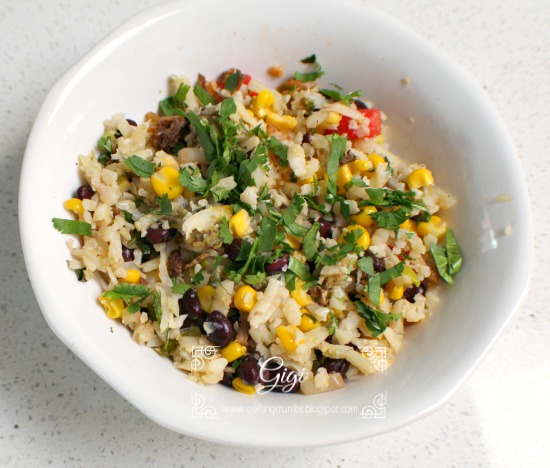
So your mouth is now watering after reading about that delicious cauliflower rice - right? And you may be wondering how this could possibly get better - but it does with the addition of the pork carnitas. This was the first time I have attempted carnitas, but it will definitely not be the last.  This was SO good. (and SO easy!)

I had not planned to post this recipe so didn't take the normal array of photos - just one quick one at the end.  There are great photos at Carlsbad Cravings (link below) - in fact she has tons of mouth watering recipes along with fabulous photos.  Enjoy!

Pork Carnitas (slow cooker recipe)

adapted from Carlsbad Cravings

*these ingredients were for a 4-5 lb pork shoulder roast, but I only had a 3 1/2 and it was fine.  Just  makes this recipe more versatile!

4-5 lb. pork shoulder roast
1 T. olive oil
1/4 c. orange juice
1 t. liquid smoke
2 bay leaves
1 onion, chopped
1 jalapeno, deseeded and chopped
juice of one lime

Wet Spice Rub
3 T. olive oil
2 T. tomato paste
1 T. coconut aminos (or soy sauce)
1/4 c. coconut sugar (or brown sugar)
1 T. cumin
2 t. dried oregano
2 t. salt
1 t. chili powder
1 t. garlic powder
1 t. onion powder
1/2 t. smoked paprika
1/2 t. pepper
*1/2 t. Cuban Island spice (from Savory Spice Shop)

Heat the tablespoon of olive oil over medium high heat and sear the roast on all sides until it is lightly browned.  I used my Instant Pot (*love*) so was able to do everything in one pot.

After the roast is seared, place it on a cutting board or large platter and let it cool a bit.

In the meantime, whisk together all of the Wet spice ingredients in a small bowl.  When the pork has cooled to the touch, coat the roast with the spice rub on all surfaces and place it in the slow cooker or Instant Pot.  Add the orange and lime juice, liquid smoke and the 2 bay leaves.  Top the pork with the onion and jalapeno.  Cook on LOW for 8-10 hours or until the pork is fall apart tender and shreds easily with a fork.

Carefully remove the pork to a cutting board, shred it and return it back to the juices in the pot.  Cook on low for 20 minutes.  While it is cooking, preheat the oven to 450 degrees.  Line 1-2 baking sheets with foil (depending on the size of the roast.  A smaller roast will only need 1 baking sheet.

After 20 minutes, remove the pork from the slow cooker and place the shredded pork on the baking sheet(s) in an even layer.  Drizzle with some of the remaining juices and bake for 15-20 minutes, then broil until the meat begins to crisp.  Watch it carefully so it doesn't burn.  Drizzle with additional juices as desired and toss.

Serve over rice, the loaded cilantro cauliflower rice (YUM!), in a tortilla, on a salad - however you like.  Top with diced tomatoes, diced avocado, chopped green onion, chopped cilantro, - whatever you desire.

I sprinkled cotija cheese on top for an extra layer of flavor.

Pin It Now!

Thursday, September 28, 2017

Mexican Delight Burrito Bowl - Part 1 (the healthy part!)

Just to show I don't spend all day making cards (although I am not sure what would be wrong with that!) I have two recipes to share.....because after making them together, it was a definite "party in my mouth" experience!  And yes, you could certainly enjoy one without the other, but just this first time - make both!!

First of all, have you jumped on the cauliflower rice bandwagon??  I know - I had a hard time wanting to even try it and I like cauliflower - but the whole thing seemed too "different".  But I was so wrong - once again!  I have made several variations over the past few months and each was okay as a rice substitute, but THIS one is undeniably the best.  You can close your eyes and eat every morsel and never taste cauliflower.  You will be convinced you are eating a wonderfully flavored Mexican rice because of all of the luscious savory bites.  And you can prep a lot of it ahead of time - which is always a bonus!

Loaded Cilantro Lime Cauliflower "Rice"

adapted from Cooking Classy

1 medium head cauliflower (around 2 lbs)
2 T. olive oil
1/2 c chopped green onion plus more to garnish
3 cloves garlic, minced
1 1/2-2 c. frozen corn, thawed and WELL drained)
1 can black beans, rinsed and drained
1 firm avocado, diced
1 large Roma tomato, diced
1/3 c. fresh  cilantro, chopped (with more for garnish)
2-3 T. fresh lime juice ( I love lime juice in all things Mexican!)

Cut the cauliflower into florets and discard the core.  Some pulse the florets in a good processor, but I like the uniformity of grating it.  Set the grated cauliflower on paper towels to absorb any excess liquid.  You want it as dry as possible.

Heat the olive oil in a 12" skillet over medium high heat.  Add 1/2 c. green onions and the garlic and saute about 30 seconds. Add the grated cauliflower (aka cauliflower rice) and saute an additional 6 minutes or till crispy tender.

Add the corn and black beans, season with salt and pepper, and heat through a few minutes.  Remove from the heat and add the avocado, tomatoes, cilantro and lime juice and toss well.  Serve immediately.


If you are lucky enough to have leftovers, this reheats beautifully.  I used it as a base for a burrito bowl, but it would make a great side dish alongside a plate of enchiladas or tacos. It is SO good...

Stay tuned for Part 2 to see how I turned this into a fabulous main dish! Pin It Now!

Tuesday, September 26, 2017

Foiled Flowers - Part 2

This summer, thanks to Patricia at Paper Temptress, I became acquainted with the artistic images from Graciellie Designs.

The detail in that rose is incredible.  And it was such fun to do and relatively easy.

First I traced the image in SCAL and created a cut file for both the large rose and the center bud.I printed the digi images on regular card stock using a monolaser printer, foiled the images with the FoilMaster and then cut them out with the Silver Bullet. I also created a shadow image of the larger rose and cut out of a black card stock to make the image pop.


Always challenging to capture the beauty of the foil and the card at the same time!
Love the shimmer of the Paper Temptress Mica card base.


The rose image is from her Strong and Courageous collection.
The sentiment is from her Classic Greetings.


This view shows a little of the dimenwion -  
both the large rose and the center are on foam dots.


Pin It Now!

Saturday, September 23, 2017

Foiled Flowers - Part 1

The first card I would like to share uses a digi image from Power Poppy.  I love the intricacy and beauty of her drawings and wish I had 1/10th of her artistic talent.  But at least I can enjoy what she creates and share it with others.

This card was a process, but it was a reminder to me that sometimes you just have to stick with something until you get it right!  I decided I wanted to foil this image and originally printed it on colored card stock.  But no matter how I tried to frame it after it was foiled, the colors in the foil just washed out.  A lesson learned - a white background can be the best way to highlight a design as it doesn't interfere with it! So once I printed it on the white card stock and foiled the image, it was much better, but the lines were so thin it was a struggle to see the color variations in the foil.

I was ready to give up, but then remembered that I had the DecoFoil glue.  So I traced the already foiled image with the glue.  The tip was super fine and it was much easier to do than I thought it would be. It was really a dream to use.   I waited for it to get tacky and then reapplied the foil.  SUCCESS!  I had the result I wanted - and I was delighted. The photos just don't do it justice.                                                                                                           


This digi image is Tulips in Hobnail Pitcher from Power Poppy!


Trying to highlight the many colors in the foil and the dimension.
It is so pretty in person.


Although this was the finished card, it was difficult to get the right angle to capture the foiling.
But you can certainly see what a beautiful image this is!
See the photo below to catch a better view of the variegated foil.


Pin It Now!

Thursday, September 21, 2017

Birthday Blooms

So many August and September birthdays - which just means lots of cards to share!

I have been cleaning and reorganizing my craft room (seems to be a bi-monthly project!) and paused an extra minute or two when I ran across the two bins full of 4x6 patterned card stock pads.  Because most of the cards I make are larger, I forget to incorporate these smaller patterns. So with this card I realized I could cut it in half and use it as a great accent on a larger card. It worked out so well that I am eager to try it again!

The greeting was simply printed in SCAL on a monolaser printer, foiled in gold Deco Foil, and then cut into a tag image.  It was super simple but gave the card a nice finishing touch.


The main pattern for this card came from one of my Dover Electronic clip art books. Their images are royalty free and they easily convert into vector images for cutting.  And there are lots of options with each one - you can actually make a stencil, or cut out the pieces to mimic a stenciled design as I did here.

Here is another card using the Dover Electronic Clip Art.  I loved the soft image of the large butterfly and the flowers.  I used Paper Temptress Glimmer Text paper for the main image against the dark blue PT Incandescent.


I added some rhinestones for interest. I love this butterfly!

It felt like it needed a little something to stand out more, so I added glitter to the flower images and love the result. It often doesn't take a lot to make a statement.


A closeup of the flowers, embellished with Glamour Dust crystal glitter.

I totally forgot to take a final photo of the entire card as the glitter was an afterthought, but hopefully you get the idea!  It's a fun and sparkly card!


Pin It Now!

Sunday, September 17, 2017

Butterfly Wishes

I have a fun butterfly card to share today. When I look back at what I have created over the past two months, there has definitely been a recurring theme of sorts...butterflies, foiling, and florals.  Clearly, those are all things I love and I have enjoyed doing a lot of experimenting. Stay tuned for more!


First is just a simple foiled butterfly that I made for a dear friend.  The butterfly image is one of many from Crafty Vectors.  I printed it on a laser monoprinter, ran it through the FoilMaster with a variegated foil, and then cut it out using the SCAL software - it makes it so easy and is so exact.  The rest was just a matter of layering the card pieces together.  I love the simplicity of it.


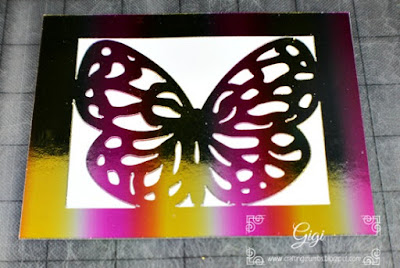
Ready for the print and cut. 


A closeup of the cut lines before it was pulled off the mat.

Oh - before I forget to highlight it, the "Happy Birthday"  ribbon is printed with the Brother P-Touch Embellish new ribbon and tape printer.  I have not used it a lot, but it is definitely fun to be able to print on ribbon and I will be glad when they come out with more ribbon options.  And it doubles as a tape printer so I love that it is multipurpose.

Lots more to come soon!


Pin It Now!

Tuesday, September 5, 2017

Crafting and Generosity in the Wake of Harvey


I have been so touched by the amazing generosity of the crafting community the past week. So many companies (especially the small ones) have been sending a percentage of profits to TX or creating groups of items where proceeds will go to help.  It is just a reminder that it doesn't always need to be a large gift to make a difference; a lot of small gifts add up as well and bring help in just the same way.

In that vein, I was reading a post from Patricia at A Little Hut.  She lives in the Houston area and luckily is okay, but she has been spending a lot of her time volunteering to help others who did not fare as well.  She also spent sleepless nights during the howling winds - so she drew.  Her story is here.

I loved the simple but stately qualities of her bird (the state bird of Texas) and wanted to use it to celebrate a birthday.  Out of tragedy and sadness, good things can happen.  And I am hoping this bird will bring joy to the recipient.

In her details about her creation with the bird, she didn't have perfect shade she wanted for one of the colors in the leaves. So she took a colored pencil and made the shade she wanted.  OMG - a lightbulb went off,  Why did I never think of that - I can create the colors I need with pencils, markers or watercolors.Duh!!  And it just so happened that I ran out of the silver Mica paper (from Paper Temptress) that I wanted for the lighter gray color, so I grabbed the opal Mica paper and colored it with a marker.  And you will see the unexpected but fun results!


A little closeup of the bird - see the mottled gray coloring? That is the marker colored paper. 
I love it and can't wait to try it again with other mediums.
I also embossed the background to give it some interest,
and added sequins and clear butterflies from the 28 Lilac Lane collection.


I attached the bird with foam dots to give it some dimension. I also cut an
extra layer of the stems out of black and offset it to define the leaves a bit more.


Thank you, Patricia, for all you are doing to help those who are suffering so much devastation.  
God bless Texas (and Florida who may need all the prayers we can spare as well).
Pin It Now!

Friday, September 1, 2017

Catching up on Birthday Cards - multiple posts! to come!

I just want you to know that I have not been lazy this past month - I have been BUSY!!  I had forgotten, foolishly, that August was a month FULL of birthdays (including mine!)  So I have been making cards like crazy and trying to get ahead for September so I can end my "late streak".

Still working on the creativity aspect, but it is slowly coming into some sort of a rhythm and I am capitalizing on every second of it, So prepare yourself for a plethora of cards, sprinkled with healthy muffin recipes in between.   I think if I can download my photos from the camera as I take them, or at least the same day, and edit them, it will be a lot easier to just blog and grab the photos to illustrate.  It's the photo editing that takes me the most time - the writing comes easy. So we will see...... I think it will be a better plan if I can stick to it!

I started writing this days ago - why can't I finish one task at a time? I seem to be flitting from thing to thing but I am determined to stick with this and start posting again.  And it's good for me to focus on something other than the heat and humidity here - it's just plain yucky, even on the coast.

So starting September with a post! :)

The first card I would like to share is a birthday card using one of Birds Cards cutting files. I love her files because they cut well and they are so versatile.  The framed greeting is a simple print and cut done in SCAL software on the Silver Bullet.  And then I decided to foil the greeting which made it even more fun and gave the card a little sheen.

The file ready for the print and cut, I foiled it, 
keeping the foil off the registration marks, 
and then cut it out on the SB.


The greeting is popped up on foam dots.  You can see the sheen of the foil at this angle.
The patterned papers were from my stash that I am trying to put to good use!
Little pearls adorn the corners.


The next card I think I posted before, but I changed it up a bit this time.  I don't often use the same design, but I loved the feel of this card and it was for a special couple who both needed get well wishes at the same time (two entirely different medical issues - they so deserved a card - at least!!)

The design is from Dominic (Crafty Vectors) and I cut the butterfly in a frame in several layers, with a foiled acetate layer on top to mimic the flutteriness (is that a word(?) of the wings.

I added pearls on the body and took some flower stamens, cut them off and colored the pearls on the tip to make antennae.  That was fun and something I will definitely do again!


You can see the foiling on the greeting as well as the foiling on the acetate.  
This is one of my favorite cards - but then again I LOVE butterflies and have fun
trying to do different things with them.

This card was delivered with some get well muffins to hopefully brighten their days. They are both doing well and I am so happy to have them as neighbors here at the beach!


Pin It Now!