Showing posts with label Paper Temptress Mica. Show all posts

Saturday, March 30, 2019

Hello Card - Graciellie Design

 I have been spring cleaning and uncovering layers/piles/drawers full of craft supplies that either need to be used or donated. So I sent boxes of "stuff" over to the Boys & Girls Club because I know they put all of it to good use as they have the main site plus have after school programs in 8 schools.  They are always happy to receive whatever I can share.  So it makes the giving away process so much easier!

And during that process I always seem to get invigorated and feel creative again because I am reminded of all that I have wanted to use and forgotten about - or just haven't had time.  I find ideas whirling around in my head again and it just feels so good.  So even tho my craft room is in a bit of chaos at the moment (I promise new pics soon when I CLEAN it up), it's all good.  I am rediscovering the things I love doing and starting physical lists of what I want to try as the ideas come because I just don't trust my memory anymore!  I should not say that out loud. :(

I have done the same with the kitchen and I am sure that is why I have started doing more baking and experimenting there as well - so there will be more recipes to share soon - it all feels good. And maybe that is part of what spring cleaning is all about - letting go of what gets in the way and making room for whatever it is you want to do or what feels important in the moment. So glad I am at least in the process!  Progress is often baby steps, but at least there is movement. I will take it.

Enough chatter - on to the card.

This is one of the newer designs from Graciellie Design.  She is such an engaging artist and her artwork always makes me smile.  The image is from her "Your Kindness" collection and it was such fun to color even tho I am still a work in progress on that front!


The fun thing about coloring on vellum is that it is so forgiving whether it is markers or pencils.  You color on the backside and it is super forgiving - you don't have to do a lot of blending


This was printed in SCAL using a print and cut on the Silver Bullet Platinum.
I purposely left an edge because I wanted it to pop a little more...


And here it is from the front - so soft and the colors are 
diffused but I love how subtle the colors are - like a gentle spring day.


Here it is assembled on the card with ribbon and backing
and some foam squares to pop it up a little.


Designed in SCAL from a simple font and cut on the Silver Bullet Platinum.
Look at now narrow the lines are - cut with ease!


 Loving the finished product - hope you do too!


Pin It Now!

Monday, December 17, 2018

Heart Cards for those Close to my Heart...

The time is flying by and I am still playing catch up. I am not even going to apologize - because that is getting old for me and for you!  I am just going to keep plugging along and sharing as best I can.

These cards were for my DEAR daughter in law  and son on their anniversary and for her birthday, about 5 days apart.   I love making cards for them because they are so appreciative of the love I put into their cards.  It's a win win for me :)

Megan's card was using a wildflower design from Crafty Vectors. Dominic has long been one of my favorite designers and I have used his floral framed designs in the past many times.  They are interspersed all over my blog! 


So for this card I cut out the design on a white card stock and then I sprinkled it with Nuvo Shimmer Powders and lightly spritzed with water to get the colors to explode. I just love the effect!


And for their anniversary card, I chose a beautiful image from Power Poppy - Follow Your Heart (I am clearly on a heart theme here!!).  I printed it on the mono laser and foiled the heart in red and silver.


I am going to try to keep these posts short so I can catch get more of these "older projects" up there to share and hopefully inspire you to be creative too!

And remember, it may be the holiday season, but it is so important to take time for yourself and do the things that make you happy and fill up your heart and soul.  xo


Pin It Now!

Thursday, October 4, 2018

Baby Cards - Celebrating a girl and a boy!


I love making baby cards and I don't get to do them often. So what fun to actually have one of each to create in the same month.  I had a great time trying to make them as special as I could.

The baby girl card was for the precious little granddaughter of my neignbors who have become such dear friends and welcomed me into their family. How lucky am I?  This is their second grandchild and first girl. Their first is her brother, Merritt, who I have spoken of here and who I love almost as much as my own grandson.  He has stolen my heart and so has his precious sister. They came over here when she was only a week old and I got to hold her while Mom and Dad took a break.  Good thing the grandparents were gone for the evening or I would not have had that much time with her!  It was so special.  I am not sure what it is about holding a baby, but it is truly the most wonderful feeling in the world.  I am so grateful to have been able to share in their joy and their lives.

 The cutting file for this card is from Birds Cards.  Her designs are detailed and cut beautifully.  I use the Silver Bullet Platinum to easily cut the detail out of card stock from the Paper Temptress White Diamond and Pop Tones.  The background paper is from Echo Park (I hit my neglected stash box!) and I love how it all came together.


Tried to capture the dimension of this card. The greeting and the 
baby buggy are sitting atop foam squares.  I used some adhesive lace to
border the buggy and make it more feminine.  I really love it!

I was in a bit of a rush to make the card for the baby boy so I only  have one photo - but it captures the spirit of celebration.  This is for someone special who serves on the board of Oceanside Boys & Girls Club with me and he runs a local Buffalo Wings.  He and his wife are expecting their first child, a precious little boy. We are all so very excited for them.

The design is from two separate designs from Miss Kate's Cuttables and her designs never disappoint.  The papers are from Paper Temptress and the patterned background is from my stash. :) (can you tell I am trying to utilize what I have??   Making a concerted effort...)


Pin It Now!

Saturday, February 17, 2018

It's a New Year - a little ...ummmm... LOT belated!!

It is hard to get back into blogging when months have gone by.  I feel like there is so much to share because I wanted to at the time, but life, as it does, got in the way in a variety of ways.  I was reminded time and time again, that my plan or priorities, were not God's plan for me.  So I tried not to fight that battle and worked on letting go.  Sometimes life can feel like a fairly smooth drive from one point to the other with just a few bumps and curves on the road - not too hard to manage.  And then other times, the journey is much more challenging with steeper hills, unexpected detours, even black ice on the road where you have NO idea where you are going and you have to trust.  There have been a lot of detour-filled roads lately on this life path and I am learning to slow down and do my best to navigate them in a more thoughtful and safe way.  Not sure any of this makes sense, but over the next few weeks I will share a little of what some of the challenges have been.

What I continue to learn is that I cannot do anything without family, friends and God. One thing constant about life is change and adapting to that can be difficult.  But all we can do is put one foot in front of the other and move forward....not back.  That is not always easy, but oh so necessary.  And the steps don't have to be at warp speed!  Sometimes just taking a few steps forward is enough because that is all I can handle. And other days, I feel like I can cover miles.  So I try to judge less and accomplish whatever I can and be satisfied with that.  Another tough lesson - how do I be satisfied with less when I want to accomplish soooo much more?!?  It is all ok because if I am doing my best, then that is all I can do and my best is enough.  One of the many mantras running through my head these days.  So whether it is baby steps or giant leaps, it is all just fine.

So onward we go.  Let's close this post out with a few of last year's cards that I made for gifts at Christmas time.  They are basically "money" cards for the people in my life who make things easier for me - from the mailman to the nail lady and house cleaner.  These were fun to make and since I am not crazy about recreating the same card over and over, these all have the same theme, but are a little different from each other. And the recipients were happy to receive them.  Mission accomplished! Enjoy.


And I hope you will stay with me on this year's  blog.  I plan to do lots of cards, more baking (and more variety), some new cooking techniques (like sous vide - so much fun and so delicious), and some new crafts too if I can carve out the time. There are always new things I want to learn, and I am hoping I will be able to have some success and share new ideas with you too.


Thanks for reading!

Pin It Now!

Sunday, November 5, 2017

Happy 6 Year Anniversary!

I try to do something special when it comes to anniversary cards for my kids, and this time was no different.  But it was actually the first time I had ever made a gate-fold card. What was I waiting for?  Monica's files are SO detailed, but this cut beautifully with the Silver Bullet.  I wasn't sure exactly how I was going to pull it all together, but I am happy with the final results.


I can hardly believe that Megan and Scott have been married for six years.  Where has the time gone?  For their anniversary card this year, I turned to the beautiful and intricate files from Monica's Creative Room.  She has a wide variety of projects and cards and you can tell she puts many hours into the creation of each one. I have never been disappointed by her work and am in awe of it!


You can see the detail even with it still on the cutting mat. The 
card stock is Paper Temptress Vintage Luster - one of my all time favorites
You can see the beautiful texture in all of the photos...


Here is the file all cut out and ready to become a card.
I cannot get over the beautiful detail.


I cut a sheet of colored vellum just inside the card dimensions 
(choose inner shadow in SCAL) and glued it around the edges  
 to line the card and highlight the cut areas.


A closeup of the front all finished and ready for the mail.  
The pearls gave it a bit of elegance and interest.


I tried to "spotlight" the Happy Anniversary greeting,
 but it still didn't show up very well.

I wrote my personal message on a separate piece of paper and tucked it in the envelope behind the card so it wouldn't interfere with the design!  

May they have many more happy anniversaries!đź’•đź’•đź’•


Pin It Now!

Tuesday, October 3, 2017

A Community College Retirement

I don't think I have ever made a retirement card before - and this one was SUCH fun. This special lady devoted her career at our local community college to overseeing the scholarship department.  She was so dedicated to every one of those students and she knew their hopes and dreams and rejoiced in their successes. She touched the heart of everyone who met her.  So I am sad to see her leave, but excited for the adventure ahead of her. She deserves to travel and kick up her heels!


So when I found a this "paradise" image among the stenciled clip art designs that I have, I knew it was the one to use for her card.  I wanted to make a happy, colorful card, and I think I managed that.  It was fun to use up a variety of paper scraps and emboss some of them for detail.


You can see the design in the sand from one embossing folder, and a different
one was used on the tree trunk.  Also used Nuvo Glitter Drops on the layers
of the water.  I sprinkled glitter onto the sun after it was coated in Glossy Accents.

The sky was painted with Distress Oxide inks - those are so much fun to use and they glided and blended easily over the glossy card stock.


I hope she is on an island somewhere...... sipping a cocktail and soaking in the sun...... AND relaxing!

Bon Voyage my friend!

Pin It Now!

Friday, September 1, 2017

Catching up on Birthday Cards - multiple posts! to come!

I just want you to know that I have not been lazy this past month - I have been BUSY!!  I had forgotten, foolishly, that August was a month FULL of birthdays (including mine!)  So I have been making cards like crazy and trying to get ahead for September so I can end my "late streak".

Still working on the creativity aspect, but it is slowly coming into some sort of a rhythm and I am capitalizing on every second of it, So prepare yourself for a plethora of cards, sprinkled with healthy muffin recipes in between.   I think if I can download my photos from the camera as I take them, or at least the same day, and edit them, it will be a lot easier to just blog and grab the photos to illustrate.  It's the photo editing that takes me the most time - the writing comes easy. So we will see...... I think it will be a better plan if I can stick to it!

I started writing this days ago - why can't I finish one task at a time? I seem to be flitting from thing to thing but I am determined to stick with this and start posting again.  And it's good for me to focus on something other than the heat and humidity here - it's just plain yucky, even on the coast.

So starting September with a post! :)

The first card I would like to share is a birthday card using one of Birds Cards cutting files. I love her files because they cut well and they are so versatile.  The framed greeting is a simple print and cut done in SCAL software on the Silver Bullet.  And then I decided to foil the greeting which made it even more fun and gave the card a little sheen.

The file ready for the print and cut, I foiled it, 
keeping the foil off the registration marks, 
and then cut it out on the SB.


The greeting is popped up on foam dots.  You can see the sheen of the foil at this angle.
The patterned papers were from my stash that I am trying to put to good use!
Little pearls adorn the corners.


The next card I think I posted before, but I changed it up a bit this time.  I don't often use the same design, but I loved the feel of this card and it was for a special couple who both needed get well wishes at the same time (two entirely different medical issues - they so deserved a card - at least!!)

The design is from Dominic (Crafty Vectors) and I cut the butterfly in a frame in several layers, with a foiled acetate layer on top to mimic the flutteriness (is that a word(?) of the wings.

I added pearls on the body and took some flower stamens, cut them off and colored the pearls on the tip to make antennae.  That was fun and something I will definitely do again!


You can see the foiling on the greeting as well as the foiling on the acetate.  
This is one of my favorite cards - but then again I LOVE butterflies and have fun
trying to do different things with them.

This card was delivered with some get well muffins to hopefully brighten their days. They are both doing well and I am so happy to have them as neighbors here at the beach!


Pin It Now!

Wednesday, June 21, 2017

A Special Wedding....


This past weekend, my family traveled to Fresno where my daughter and granddaughters live.  It is not my favorite place to travel as it is a long car ride on a good day (about 5 hours).  And in the summer, it is hot.  Fresno did not disappoint when it comes to summer weather..  It was in the 90s when we drove in and 102 on Saturday - ugh.  People tend to say that dry heat isn't as bad, but let's face it - HOT is HOT!!

But enough of that - once settled in, we were able to enjoy some family time. I loved having extra time with my two boys (who are really adults!), my DIL and my adorable grandson. He entertained all of  us with his dancing and chattering and toddler antics the whole time.  It was great fun.

Saturday was the day of the wedding and all went well. I don't think I have ever seen my daughter happier, and I hope that stays with her the rest of her life. Her daughters love her new husband, and his daughters love Missy.  Seems to be a beautiful blended family.  What more could I hope for - right?

Her colors were gray with purple accents, so I used that inspiration to design her wedding card.  I wanted it to be simple and elegant and think I achieved that.  I used a beautiful image from Power Poppy ( LOVE her floral designs) and foiled it in purple. The foiling is so difficult to capture, but hopefully with the different angles you can see how pretty it was. I was thrilled to see how all of the detail was enhanced by the foil.


A perfect example of how difficult it is to capture the color and shimmer
of the foil.  But also a good way to see the detail of the digi image.
It is beautiful in its simplicity.


A little better capture of the foiling.  Now you can see why I love it.
It just brought the image to life.


The sentiment is from Anna Griffin, stamped on Gina K Heat Resistant acetate 
and heat embossed.

I wish them a very HAPPY life.....


Pin It Now!

Tuesday, February 14, 2017

Valentine Fun!

I hope everyone is feeling loved and special, especially today.

The best part about today, for me, is reminding my grandchildren that they are loved.  And making cards for them is a fun way to do that.

I relied on the images from Miss Kate's Cuttables again to create their Valentine cards.

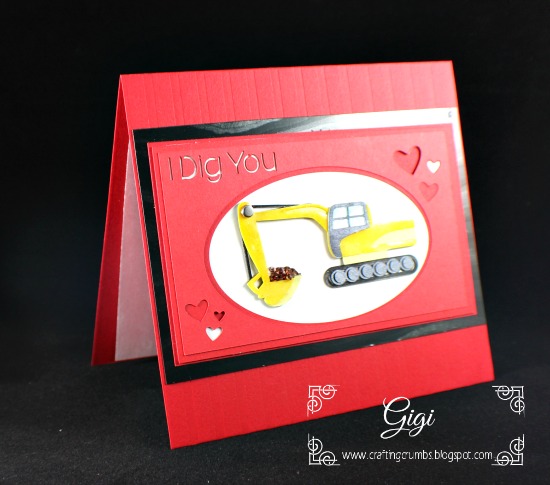
First of all, Carter is totally into trucks - ALL BIG TRUCKS and the noisier the better. He loves trash trucks and dump trucks and bulldozers - well you get the idea.  So when I saw this file I knew it was what I had to make for him.  I hope he likes it!


This is the cute little "digger". I have glossy accents on the
deeper yellow to make it shine and colored little rocks
being picked up.  So much fun to make!


Here is a side view so you can see some of the dimension and shine.


And the final product - I love it!

As for the girls in northern CA, I am really feeling their age gap now when I make cards for them. I used to be able to make similar cards, but now with Kendra (16) and Haley (10), I cannot get away with two too cutesy cards!!  I need to be a little more grown up with the teenager; at least I think I do!

So Kendra's card is feminine and bright and a tad simpler. 


I love all of the dimension and sparkle in this one. I hope it makes it through the mail in one piece!!


I have just recently started adding sequins to cards. They are fun to play with and add a nice touch!

Haley's card is still cute and a bit more playful.  I don't know how many more years I can get away with that!

This little bee has double wings with a layer of vellum over them.
He is really cute in person!


I thought the marbled vellum over the hot pink gave this a bit of a fantasy look and added
to the floating format.

I hope all three of them have a GREAT day!!

Happy Valentine's Day to all!

Pin It Now!

Thursday, November 10, 2016

Happy Halloween and Sweet Sixteen! (a late share!)


This card was one of the most fun I have made in a very long time - and totally out of my comfort zone - as far as themes!!!  But this is what my oldest granddaughter loves, and with her birthday falling the day before Halloween, I have always tried to tie the two occasions together. I was stumped this year because I thought it was time to leave Halloween behind and just focus on her sweet sixteen birthday, but her Mom came to the rescue with this idea and it all fell together.


Here is the initial result using a file from SVG Cutting Files.  The cardstock
is a smooth glittered paper from American Crafts (both the black and silver glittered paper)
and I decorated the skull with a variety of gemstones. The hard part is knowing when to stop!


To add a feminine touch to the skull, a Prima flower from my stash
was accented with Distress inks to complement the card base.


                             The Happy Sweet 16 greeting is drawn in the SCAL software with the pen tool.
A label was drawn around that and then the whole thing was shadow cut. 
The pen tool makes it so easy to write whatever you want.


The final touch of the gemstone eyes was honestly so much fun and seemed to give this card and image so much character.  The best part is that she thought it was "super cool" and loved it. That makes every bit of work SO worth it!! 

Happy Sweet 16, Kendra!


Pin It Now!