Showing posts with label birthday. Show all posts

Tuesday, February 27, 2018

Sweet Valentine Memories....

I have to say upfront, that this is a bit of an embarrassing post.  I am in my mid-sixties (yes that is enough of an admission) - but wait - there's more.  Can you believe I have never ever - NEVER EVER - piped frosting?!?  I know - what have I been waiting for???  I totally admit that this first attempt is not a work of art - the pictures say it all.  But it was a labor of love and honestly, it was really fun.  Will I do it again??  Yep - because I clearly need to practice - and my efforts made two little boys VERY happy = huge payoff!


I was feeling guilty that I had not made Valentine cards this year - not sure why, but just  had no inspiration.  But I didn't want the day to go by and not do anything for Carter.  Plus, my neighbor's little grandson who is 2 years old, was spending Valentine's Day with them, so I had double motivation to bake something yummy.  And this recipe was just perfect for two adorable little boys.

SUPER MOIST CHOCOLATE CUPCAKES      

from Sally's Baking Addiction            

3/4 c. all purpose flour
1/2 c. unsweetened cocoa powder (I use King Arthur Triple Cocoa Blend)
3/4 t. baking powder
1/2 t. baking soda
1/4 t. salt
2 large eggs
1/2 c. natural cane sugar
1/2 c. packed light brown sugar
1/3 c. oil (I use Spectrum canola and coconut oil blend)
2 t. pure vanilla extract (I like Mexican vanilla when making a chocolate recipe)
1/2 c. buttermilk, room temperature

Preheat the oven to 350.  This makes 14 cupcakes, so line a muffin tin with paper liners and put two liners in a second tin.  Set aside.

Mix the flour, baking powder, baking soda, cocoa powder and salt in a large bowl and whisk until well combined.  In a medium bowl, mix the eggs, sugars, oil and vanilla together and whisk until smooth and thoroughly combined.  Pour half of the wet ingredients into the dry ingredients..  Then add half of the buttermilk.  Whisk gently for a few seconds.  Repeat with the remaining wet ingredients and buttermilk.  Stir until just combined; do NOT overmix.  The batter will be thin.

I used a small ice cream scoop to fill the liners halfway.  It is important to only fill them halfway to prevent the batter from spilling over the sides or sinking.  Bake for 18-20 minutes or until a toothpick inserted in the center comes out clean.  Allow them to cool completely before frosting.

These cupcakes can be made a day in advance.  Keep them at room temperature and cover tightly.  They can also be frozen (unfrosted) for up to two months.  Thaw overnight in the fridge and bring to room temperature before frosting.

STRAWBERRY FROSTING
 (also from Sally's Baking  Addiction)

This makes about 3 cups of frosting and is perfect for frosting these chocolate cupcakes.  YUM!

1 c. (12 g) freeze dried strawberries
1 c. (235 g) unsalted butter, room temperature
4 c. (480 g) powdered sugar
3 T. (45 ml) whole milk
1 t. Tahitian vanilla extract (Tahitian vanilla is great with fruit recipes, but any vanilla is fine)
salt, to taste, if needed

Using a blender or food processor, process the freeze dried strawberries until they become a fine powder.  There should be about 1/2 c. of the powdery strawberries.  Set aside.

In a large bowl, beat the butter on medium high speed with a stand mixer until it is creamy, about 2 minutes.  Add the powdered sugar, strawberry powder, milk and vanilla.  Beat on low speed for about 30 seconds, and beat on high speed for two minutes.  Taste the frosting and add a pinch of salt if it seems too sweet.    (the frosting will keep up to 5 days in the refrigerator; store in covered container).

This frosting is soooooooooo good and I love that the light pink color is from the freeze dried strawberries - no artificial coloring at all.


Anticipation!


Chocolate and strawberries - a perfect duo!


Mmm....Mmm...Good!  Frosting first - always!

I delivered a plate of cupcakes to Carter the day after Valentine's Day (luckily he is too young to realize Grammy was late!) and I heard that they were used as bribery (I mean rewards) for the rest of the week!!  Multi-purpose cupcakes - even better!

If you have not jumped on the cupcake and piped frosting bandwagon yet - you really must. If I can do it - or at least attempt to do it - so can you!

Enjoy!


Pin It Now!

Monday, December 19, 2016

December Birthday Cards


Here it is a week before Christmas and I still have Christmas cards and recipes to share.  I guess I better make a real concerted effort to post a lot in the next week!!  And what's wrong with sharing a few Christmas recipes in January to get a jump start on the coming year - right??  Geesh...... one of these days I will do a better job of juggling all of it. But for now, until the little elves come and give me a hand, I will do the best I can!

I needed to get a few birthday cards made, so I tried to combine birthday and holiday and am really pleased with the results.  I made ornament embellishments for both cards using two entirely different files and designers, but kept the same greeting because it worked so well!


This design is from Craft Vectors (Dominic). It is one of his Christmas Baubles collection.
It was cut out of gold vinyl.

The designs were cut out of vinyl then transferred to adhesive backed acetate to mimic an ornament. Then each was glittered from the back side. It's a bit tricky to stay in the lines (my perfectionist striving self struggled with glitter that went awry), but I still love  how they came out!


This is the end result - after the adhesive acetate has been added
and it has been glittered from the back.


Here is the second design from A Little Hut and is part
of the Poinsettia  Gift Set.   It was cut from silver
vinyl and also glittered from behind once the acetate was adhered to the front.
This is a relatively simple way to get a stunning look.


This was the first card I did with simple sequins added to the card base. 
The sequins reminded me of falling snow.


I used the same font in both, cut out of vinyl but made this ornament a bit larger
and added the glittered bow.

More projects and goodies to come.....stay tuned!


Pin It Now!

Tuesday, September 6, 2016

And Even MORE Summer Cards.....

It has been quite a month for card making! And there are still more on my to do list.


Love the soft colors with the vibrant flower.  Dominic's files cut beautifully.

The first card  is another birthday card.  The file is from Crafty Vectors (Dominic) and those of you who know me know I love his files.  Each of his beautiful floral designs have options to make several different cards.  I am partial to the flower in frame design because it just looks so clean and finished.  And his files are so well made that I can always use the remaining pieces to create another card.  That's a win-win!


And the second card was for my daughter in law.  She has been a special education teacher , served the past two years as an assistant principal, and was just promoted to principal of a new school that she helped open two years ago.  This is such a well-deserved honor (albeit an increased work load) but she has worked hard for this and I am so happy for her.  The teachers and children are the real winners here.


You can see the detail of those tiny circle patterns here - so perfect!

So I wanted to make her a card to express how happy I am for her.  This was from a jpeg online that I used as a sort of stencil, cutting the design out of the card front and letting the contrasting color shine through.  Gold stars were popped over the larger stars to give it some dimension .  It's really a simple card, but I love how it came out.


Added some gold stars a little off-centered from the red star background. 
Gold dots are brads with the ends snipped off.
Congratulations is P-Touch labeler TZ tape in gold.

And here is one more birthday card - with a simple birthday wish. This was also a stencil image that I created with a shadow image, tied the flower with simple variegated floss, and added some clear dew drops to add a little interest.  The Happy Birthday was printed through SCAL and then cut out using a tag from the software library.  Remember, when you do a print and cut, be sure to hide the text layer while cutting out the shape or this will happen!!


This is what happens when you forget to "hide" the text layer -
the machine sees it as a font that needs to be cut! Totally user error!

This was a silly mistake, but one I seem to make repeatedly when I haven't done print and cut in a while.  And even though I didn't mean for it to happen, look at the detail of the cuts (before I stopped them!)  My Silver Bullet continues to delight me with its ability to do whatever I ask of it - even if it's ultimately the wrong thing!

And here is the end result when I pay attention to what I am doing!


Pin It Now!

Saturday, July 9, 2016

A Couple of June Cards

The end of last month brought a need to make a variety of cards, so I decided to showcase the two together -  a birthday and a get well .  Actually there was a third - a sympathy card, but I must have sneezed when I tool the photo as it was THAT much out of focus.  So when I make another one like that (and I used a new to me technique too) I will share.  And since I have not been able to find a really good spot in my beach condo to take photos, I have ordered something that will help me immensely and hopefully you will see the difference in a couple of weeks - at the most!

The birthday card was for the mother of a dear friend - I grew up on the same street and she was one of my mother's special friends.  Her daughter has been a dear friend since we were both three years old - and we are both well beyond that now!  I spent many of my childhood hours/days/months  at her home - I was an only child so life with a family of five brothers and sisters  was much more exciting!   I wanted to live there.  We seem to want what we don't have, especially when we are young, and realize many years later just how lucky we were to have exactly what we needed...... I guess that is what getting older  maturity - does for you.

So here is the card for my dear friend's mother.  In later years, I have called myself the adopted daughter since I was always hanging around there - whether or not they wanted me to!  She celebrated her 88th birthday and that is such a joyous occasion.


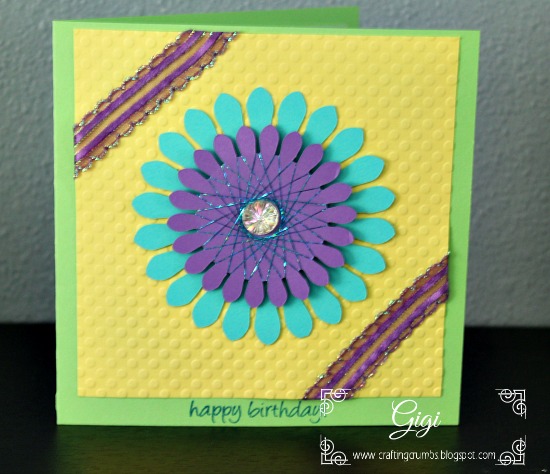
This is spirella that I have not done in a while - it's addicting.
The ribbon is really purple, it just isn't showing well in this photo. 
All of these beautiful colors are from the PopTone collection at Paper Temptress.
Next -- in my own back yard, one of my "new" neighbors is recovering from a hip replacement, so I wanted to let him know I was wishing him well.    He knew my father well, so we bonded immediately when we met almost a year ago now.  He has an affinity for vintage cars, so I found  an illustration online, traced it, cut out the various parts and put it all together to make a  "get well soon" card for him.  I handed it to him this week - just 11 days after his hip replacement and he was walking around with barely the use of a cane.  I was and still am in awe!  Good for him!


This was fun to do and was easy to trace with the SCAL software.

Each of the cards is quite different, but it was gratifying to push myself creatively and try some new things, while reaching out to special people to let them know I care...


Pin It Now!

Friday, August 8, 2014

Birthday Brunch Bake! - Part Two (the food)...

Well it was a great weekend here...... all of the kids were together to celebrate Rob's birthday (my youngest)

Rather than do our usual birthday dinners, we had a special brunch that was actually really fun and a much easier way to entertain!  Why did it take me so many years to figure that out??  Good grief....

In the midst of getting breakfast/brunch on the table, I totally missed the photo of this awesome breakfast treat.  It's one of those that you have to take the photo quickly because it deflates pretty quickly. By the time we sat down to eat it looked more like topography map of a valley surrounded by mountains! (that is the extent of my geographic terms!)  But........ once we all overcame the visual, the actual taste was FABULOUS!  Oh my gosh........ it was like eating dessert for breakfast - but the eggs and bread made it "legal"  - right??  The best description I can come up with is..... it tasted like a cremĂ© brulee topped bread pudding.  Is that decadent enough?  If not...... well, will have to work on that one!  Just trust me - it was delicious!

Bacon and a fresh fruit salad rounded out the meal and it was just fun to have the three kids and two and 1/3 grandkids with everyone laughing and talking at the same time.  I don't know what is more fun than an animated family gathering! :)  I loved every minute as the times we are all together are few and far between and I cherish every one of them!

French Toast Bake

adapted from Butter with a Side of Bread

Base:
1 loaf of Hawaiian bread, cut in 3/4" strips
8 eggs
2 cups milk
1 cup heavy whipping cream
1 tsp. vanilla bean crush (KAF)*
1 tsp. butter vanilla bakery emulsion (LorAnn)*
1 1/2 tsp. cinnamon
1/2 tsp. nutmeg
===============
Topping:
3/4 cup (1 1/2 sticks) butter
1 1/3 c. brown sugar
1 c. flour

Place the strips of bread in the bottom of a buttered 13x9" baking dish.  In a large bowl, mix the eggs, milk, cream, vanilla, cinnamon and nutmeg.Pour over bread slices.  Cover with plastic wrap and refrigerate overnight.

In the morning, preheat the oven to 350.  Then combine the butter, brown sugar and flour in a medium sized microwave safe bowl.and heat in the microwave for intervals of  30-45 seconds  for several minutes, or until the mixture is completely melted.  Pour over (it can be thick so you may need to spread it quickly) the bread and place it in the oven for 45-60 minutes.  It will come out beautifully tall and deflate as it cools.

The directions say to cool for 5 minutes...... I would say at least 15 or warn your guests as the brown sugar mixture is HOT!!!  But........it is oh.....so.......good!!

* Or use 2 tsp. vanilla extract in place of the extract and emulsion


Early prep....


Hot buttery brown sugar mixture as it goes into the oven...


Fresh out of the oven...one hour later....


The sunken wonder!! LOL  You can't tell, but the candle was sitting in a glass star holder and it sunk into the middle of the bread!! Rob had to blow that flame out FAST!!


So..... just to be sure you are paying attention - did you catch my reference to the "odd number" used in reference to my grandchildren??  Yes there is news.........

Scott and Megan are expecting their first child the middle of February. 


We are all quite excited - thrilled - elated - and more!! Pin It Now!