Showing posts with label Ball Jam and Jelly Maker. Show all posts

Thursday, June 19, 2014

Low Sugar Raspberry Swirl Lemon Poppy Seed Bread

There was a great sale on blueberries, raspberries and blackberries this week at the local health food store and I stocked up.  I knew I wanted to make blueberry jam and raspberry jam, and finished those this morning. I love being able to make my own jam with the Ball Electric Jam Maker (see earlier post).

Once they cooled and were refrigerated, I decided to put some of the excess raspberry jam to good use.  I would not have thought to layer the jam in the middle of the quick bread without the ingenuity of other food bloggers. This recipe is delicious and the original recipe is linked below.

I love trying new things, changing ingredients just a little, and still have it turn out delicious.  And I really didn't think I loved poppy seeds that much, but in this bread, they melt in your mouth and add great flavor!


This tastes as good as it looks - maybe even better :)

Low Sugar Raspberry Swirl Lemon Poppy Seed Bread

adapted from Eat Cake for Dinner

1/4 c. butter, softened
3/8 c. Truvia Baking Blend
1 egg
1 egg white
2 tsp. vanilla extract (or 1 tsp. double vanilla extract)
3/4 c. non-fat vanilla bean Greek yogurt (I used Fage FroYo vanilla)
1 1/2 c. all-purpose flour
1 tsp. baking powder
1/2 tsp. baking soda (if using regular sugar, decrease the baking soda to 1/4 tsp.)
1/8 tsp. salt (otherwise known as a dash!)
2 Tbsp. poppy seeds
1/3 c. raspberry jam (I used my low sugar homemade raspberry jam)


Lemon Glaze

1 c. powdered sugar

2 Tbl. lemon juice
1 tsp. meringue powder (optional) to help harden the icing.  A great tip from Jen!


Preheat oven to 350 degrees.  In a medium bowl, cream together the butter and Truvia Baking Blend.  Add the egg, egg white, vanilla extract, lemon zest and mix until well blended.   In a separate bowl, combine the flour, baking powder, baking soda, salt and poppy seeds and whisk together  Add dry ingredients and Greek yogurt alternately to the batter, starting and ending with the dry ingredients and mix until just combined. Do NOT overmix.
Spread half of the batter into a 9x5-inch lightly greased loaf pan.  Top with raspberry jam, and spread over the batter leaving about 1/2" border of batter.  Do not swirl the jam.  Top with the remaining batter and carefully spread out evenly to the edges, being sure to cover all of the jamBake for 45-50 minutes or until a toothpick inserted in the center comes out clean. Cool in pan 10 minutes, then invert to a wire rack and cool completely. Meanwhile, make the glaze.


Drizzle the glaze over the cooled bread (see photos) or cover the whole loaf with the glaze, your preference.


The jam is my  homemade low sugar raspberry jam. YUM!


This will definitely be making a return appearance often at the breakfast table.  
It is the perfect complement to a cup of coffee - and makes a great mid afternoon snack too!


Pin It Now!

Thursday, April 3, 2014

Jam - a gift for any occasion

Let's forget that this post was originally planned during the Christmas season.  But the concept works for any time of year, especially now if you are starting to think about all of the wonderful fresh fruits that will be beckoning you to buy them in the months ahead. I love spring and summer for that very reason - all of the glorious fruit. But if you are like me, it all looks and smells so good that you overbuy and then wonder what in the world you are going to do with ALL of that fruit before it gets too ripe to enjoy.

The answer??   Make jam!

Up until a few months ago, I had never made jam - no  - not EVER!   And I was never tempted to as it seemed like so much trouble with all of the sterilization of the jars and canning process and ugh -


The Ball Automatic Jam and Jelly Maker

Well the Ball Jam and Jelly Maker has clearly made a believer out of me -there is nothing like homemade jam and all you need is fresh fruit or good quality juice (for jelly).  Because you don't go through the canning process, the jam doesn't last forever - 3-4 weeks in the refrigerator or 6 months in the freezer. (However mine is lasting  MUCH longer than that in the refrigerator).

I know I am lucky living in southern CA because berries are in the stores just about year round. So when I was trying to think of something different to do for my neighbors this year, I quickly decided to make mixed berry jam.


How beautiful are those raspberries and blackberries?  YUM!


All crushed and ready to be made into jam.

With this special machine, it just doesn't get more gratifying.  Fresh jam in less than a half hour - love it!

Once you crush the fruit, you are ready to go. The pectin goes in the machine first and then the berries or juice (if making jelly). After a short amount of time, you add the sugar, cover it, and let it finish cooking.  I use the low sugar pectin so mine is not as sweet, but the fruit flavor is stronger.  It's a personal preference - they make a regular pectin which is used in the same quantity, but the sugar is increased. Equally easy to use.


The berries are cooking with the pectin.


Sugar has been added and the cooking finishes with the lid on.


Time to fill the jars with fruit goodness!

I had made it a few times and was pleasantly surprised at how good and easy it was!  And jam would be appreciated year round and so easy to package for any holiday or celebration.


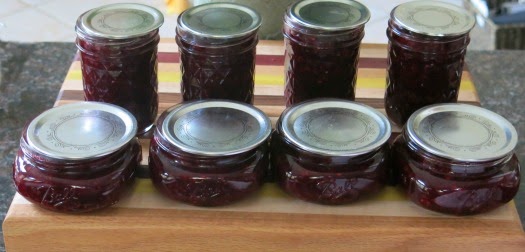
The jam is cooling with the inner lids barely on.


Ready for the refrigerator - or delivery!


These were Christmas gifts, but they truly would make 
a welcome gift for any occasion.


Pin It Now!