Saturday, July 25, 2015

Life's Changes........the Call of the Beach!

WARNING ....... LONG POST!!


When I moved into my current home in 2008, I was sure it was going to be my forever home.  I did not want to even consider another move.  I was tired - no exhausted is a better word. And I had totally remodeled this house to create a home I COULD stay in forever.......

But..........

I guess, for me, the definition of  "forever" was about 8 years!  I have felt a very strong pull the last six months to move closer to where I grew up.  Yes, I am living in the town where I was born, but I grew up less than a mile from the ocean.  And even though I am only 15 minutes from sitting on the warm sparkling sand and listening to the mighty waves crashing on the shore, I rarely drive down there..... that is until about 6 months ago when I felt my future change in front of me.

We have two" family" condos "on/near the beach" that have been rented the past thirty years.  We (the kids and I) made the decision to sell the one with the better view, but it is a block away from the beach shore.  And that caused some of us to look at the remaining one on the strand - it sits about 200 feet from the ocean.  It's small, in comparison to where I live now.  I would have to downsize over 50% and that is a lot! Plus there is no garage (underground parking but no individual garage where we all (yes we all) store our overflow of "stuff".  And it's on the second floor of the building (there are only two floors) - so getting in and out takes thought and planning. Elevator down, keys to everything, locked parking garage for safety - little hurdles that at times have felt like big hurdles.

But the more thought I gave it - nearly daily for SIX months, the more I felt the pull to move.  Am I quite ready at this stage of my life to downsize that much?  No - not really.  But the opportunity is now and if I am going to do, I want to do it because it's what I want, not because I have to or need to. I want to do it on my terms.  I DON'T NEED the four bedrooms I now have.  I DON'T NEED a backyard to care for (although I will miss my ever-giving lemon tree)...  I DON'T NEED all of the STUFF I have accumulated over the past eight + years. (OMG  -  I so don't need all of that!)

And that is when the fear sets in... how do I  reduce my living space 58%? (it's the more about the THINGS that fill that space - not the space itself!)  Where do I store the cleaning supplies and tools and all of the things that are now in cupboards in my garage?  What do I do with three sets of dishes (I know - really??)  And the list goes on. Sometimes the fear is so powerful that it has stopped me in my tracks and I have tried to talk myself out of this crazy idea.  I have a wonderful home in a great area so..........why???

But..... then.... I realize it's only crazy if I don't follow my heart.  It's only crazy if I become my biggest obstacle.  It's time to change my life for the better.....  so..... the baby steps begin......

I have been scouring Pinterest for storage and decorating ideas -  how to live in smaller spaces etc. There are so many great ideas out there and I am going to implement all that I can.

I do WANT to simplify my life.  I WANT to be free of the stuff that fills up my space now.  I WANT to surround myself with the room to explore the things I love to do. What do I really WANT AND NEED?...  A safe place to sleep, a comfortable atmosphere and wonderful space to to just "be".  I will have all of that and more. And from my little deck I will be able to see the ocean and the pier that I walked on from the time I was a little girl.  I can sit on the deck with my mug of coffee in the morning and watch the seagulls dive for breakfast.  I can relax on the deck in the evening and enjoy the majesty of the setting sun while sipping a glass of wine or grilling dinner.  Every time I think of where I will be in about five months (give or take) I feel such peace - the peace that comes with knowing that this is a path I am meant to walk.

I am SO excited!!!


Currently all plans are on hold as there is a tenant there until the middle of August.  Then the remodeling will begin.  There is a lot of work to be done from renovating bathrooms and the kitchen to redesigning a few things and adding new flooring and a fresh coat of paint that make the years of wear and tear vanish.  I am eager to set up a great kitchen to allow me to continue the cooking and baking that I love and my office/craft room to have that perfect space to carry on my volunteer work with organizations and explore some new crafts while embracing the ones I still love. And there are some life changes that will additionally occur in the middle of all of this, but it's just a few detours in this journey called Life... This all feels so right even in the face of some challenges!

I am following my heart and taking care of me!  
(what a concept - it's about time I figured that out!)

So..... if I am quiet for periods of time over the next few months, it just means I am busy with plans. But I will pop in and update you as I can.  I plan to take pictures of everything once it is empty and then show the transformation over time.  And of course, once I am settled in, there will be the final reveal!  I CAN HARDLY WAIT!


It's going to be the best time of my life!
Pin It Now!

Friday, July 17, 2015

Blueberry Buttermilk Crumb Muffins


Blueberry Buttermilk Crumb Muffins

adapted from The Clever Carrot

1 3/4 c. organic flour or whole wheat pastry flour
2 tsp. baking powder
1/4 tsp. fine salt (I use bread salt from King Arthur)
1 c. blueberries (plus 1/2 c. for top)
2 eggs (I use pastured)
1/3 c. coconut oil (melt then measure)
3/4 c. organic cane sugar
3/4 c. buttermilk
2 tsp. vanilla

Topping Ingredients::
1/2 c. flour
3 Tbsp. melted salted butter
3 Tbsp organic cane sugar
1 tsp. cinnamon

Mix the crumb topping ingredients (I like to mix them well with a fork until crumbly) and set aside.

Preheat the oven to 375.  Line a muffin tin with paper baking cups.

In a large bowl, combine the flour, baking powder and salt.  Whisk well. Add the 1 c. blueberries and toss gently so the blueberries are coated with some of the flour (it keeps them from dropping to the bottom of the batter).

In a smaller bowl, whisk the eggs together.  Add the coconut oil, sugar, buttermilk and vanilla.  Whisk until the ingredients are well blended. (I used a hand blender to be sure the sugar was well mixed).

Muffin batter waiting for the topping...


And here is the topping - so delicious

Spoon the batter into the muffin tin, filling each about 2/3 full.  Sprinkle the crumb topping over the top of each muffin - dividing as evenly as possible.  Press 2-3 blueberries into the top of each muffin.

Ready for the oven with added blueberries...

Bake for 15-20 minutes or until a toothpick inserted in the center cones out clean. Cool for 10 minutes on a wire rack and then remove from the muffin pan to finish cooling.

Baked and ready for eating

These are some of the "softest", lightest muffins I have made in a long time.  Definitely worth making again soon!


Pin It Now!

Sunday, July 12, 2015

Happy Birthday Neighbor!


A very special lady in the neighborhood has a birthday today.  She has the most beautiful yard around because that is her love - flowers, plants, vegetables - you name it, she can grow it.  And she is really a master - she isn't just successful at it, but she understands why it does well or what needs to change in order to improve the results. She is amazing and her backyard always reminds me of the most enticing, welcoming park with the birds always singing and the butterflies fluttering among the greenery.....

Design from Dover Clip Art - converted to cut file
Paper is Paper Temptress Mica

We both love orchids, so I added to her "collection" both in the simple gift and in the card I made.  I used an image from Dover royalty tree Floral Stencil Designs and turned that into a cut file -  so easy.  The background is another Brusho experiment using the yellow ochre and sea glass.  The more I play with the Brusho colors the more fun it is but will try not to overdo it!

The stamp is from Hero Arts and I used my MISTI to double stamp to get the best color intensity from the ink.  Absolutely LOVE the MISTI - it's getting me to use my stamps again!

Sea glass and yellow ochre Brusho colors on watercolor paper


Closeup of the design and pearl embellishments.  Simple but effective, I think.


Happy Birthday, Lo'Vetta!


Pin It Now!

Monday, July 6, 2015

Baptism Day for Carter -


This was a special weekend.  Not only was it a celebration of our country's independence, but in our family, it was also a celebration of Carter's baptism.  It was a very small intimate ceremony- just family and close friends of Scott and Megan -  it was truly a blessed day.

I had been trying to figure out the perfect gift, even though we were told "no gifts".  How can a Grammy not bring a gift??  Nope - not gonna happen! Besides, I had already made it when the "no gift" edict came down - so too late for me!

I found the coolest idea on Pinterest. (how did we come up with ideas before Pinterest?!?)  This is where I got my inspiration. I loved the idea of a printed plaque, but remembered that I had some mirrored plastic (from Darice and Tim Holtz).  I have been wanting to try engraving but I have been such a coward. :(  So I figured no time like the present.  And let me preface the rest of this by saying it's a good thing I had a surplus of mirrored plastic as there is definitely a learning curve with engraving. But I kept trying and finally ended up with a gift I am so proud of and happy to share with Carter.  I had it framed so it would be a little more "finished".  Here is how it turned out when all done. (as you can see in the pictures above, engraving on mirrored surfaces is really difficult to capture in a photo...)


This is mirrored plastic - hard to capture the sheen of the mirror
Can you see his name is spelled out in the verses? That was fun!


A closer look at the engraving - all done in SCAL with the new crosshatch fill


All framed and ready to reside in Carter's room.

Next up was his card.  Back to Pinterest I went.  It was not as much help this time. Tons of ideas for girls, but not so much for little boys!  So I kept it simple using blue and silver and white.  I found a decorative cross on the internet that became the central focus of the card and am happy with how it took shape.

Cut file printed on laser printer and foiled with FoilMaster.


Results of the print and cut...


The finished cross

It was fun to put the FoilMaster to work along with the Silver Bullet.  They are such good partners!!


Embossed background with Stained Glass folder .


To personalize the card and occasion :)


May God bless you always, Carter J...

Pin It Now!

Wednesday, June 24, 2015

A Brusho Birthday Card

I think this may be my new favorite card ever - I mean EVER!!!  For those of you who make cards, you know how much fun it is when you start to put something together and it takes shape on paper even better than you had it in your head.  That is how this process played out.

What did I do before Pinterest?? When I am stuck for inspiration and ALL of the blogs I follow are not quite "directing"  me (don't get me wrong - I have a list of projects that I want to try because of all of them - but wanted something different for the birthday of this friend - just not sure what!)

And then I saw some fun ideas using Brushos and that was all I needed.  I had created some background sheets while playing with them  and wasn't sure what to do with them and this seemed like just the right project. I am still learning and am a bit heavy handed with the sprinkling of the Brushos, but working on that!

I still want to use them to cut out some shapes, but this time I just cut out a simple cylinder shaped background and let the white image on top pop - and I think it does!  This is so simple with just the white and red, but I love how it all came together and am eager to try similar  ideas again.


Love the way the Silver Bullet cuts the thin lines in this image. And look at the fun splashes of color that you get from the Brushos.  This is the Rose Red color.

So not only did the idea succeed (and look at the detail in that butterfly cut), but the stamped greeting was exactly what I wanted.  I know that seems like a no-brainer, but I have rarely had a stamping success like this one. No matter what I do, I either slip with the stamp, or the ink goes down too light in one area or - well you get the picture.  But not this time.  I used my new MISTI tool that everyone is talking about and loving and you can add me to that list.  I was able to position the greeting perfectly and stamp it. The first image was a little splotchy, so I re-inked it and did it again.  Perfection.  You don't have to worry about the positioning being off because nothing moves or shifts and you get a stamp in the exact same spot each time.  I know I will be stamping more now - and loving it!  If you don't already have this tool and you like to stamp -it is an investment worth making. LOVE LOVE LOVE it!!


The central image is a png I found on the internet that  I just traced in SCAL.
The greeting is  Hero Arts stamp.


The image has tiny foam squares behind it to give it dimension on the card.

So........Happy Birthday to my dear friend, Robbie. I hope she likes this card as much as I enjoyed making it.  Cannot wait to try some other ideas that have emerged from doing this...


Pin It Now!

Sunday, June 21, 2015

Happy Father's Day!


Sometimes simplicity needs to take over when there are no ideas in your head!  Such was the case with this card.   First of all, I needed a masculine themed card - strike one for me.  It's no secret that I have a hard time with those.  Strike two came when I realized that tomorrow(now today!)  is THE day and there was NO way I was going to get it in the mail and delivered in 24 hours. So that destroyed whatever ambition I had to get it done - which became an overwhelming obstacle for most of the day.

So I gave myself a swift kick (mentally) and vowed to at least get it up on the blog so the wishes would be there and the promise of the delivery in a reasonable time (my definition of reasonable is totally different than the post office) would have to do..........

So..... for my oldest son on his VERY FIRST FATHER'S DAY.....................


A simple print and cut with patterned "Happy" letters - found the idea on Pinterest                           (a treasure chest of ideas no matter what the topic!)


Did a little scoring to give the card some dimension and added cut off brads for interest.


Preppy Carter J!


Carter and Dad - what a pair!


Sending love and hugs and wishes for a great day with that beautifully handsome  4 1/2 month old. 
 The time is flying SO fast!


Pin It Now!

Tuesday, June 2, 2015

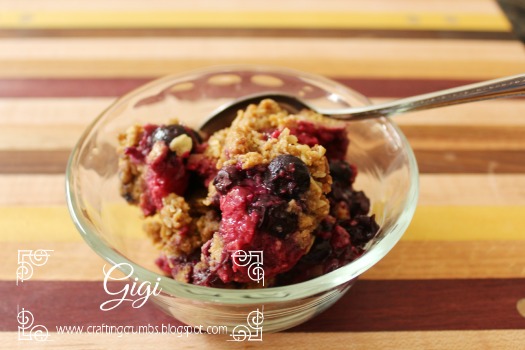
Mixed Berry Cobbler Crisp

This dessert coincided nicely with the Memorial Day weekend with the red and blue  (and of course a scoop  of vanilla ice cream or a dollop of whipped cream would be the perfect touch of white for a patriotic theme.)


Also, at least in CA right now, berries are a great price so I had beautiful fresh blueberries and raspberries in the fridge.   And I played with the original recipe and used coconut sugar to make it a little healthier (gives a lighter caramel taste and you don't get such a sugar rush) and added rolled oats, because they I can justify a few bites for breakfast - right??  I do the same with oatmeal raisin cookies - if they have oats in them, they are okay any time of the day :)  Some call it cheating but I call it healthy eating!  I can rationalize about anything!


Mixed Berry Crisp

adapted from Bake or Break

3 c. assorted berries (I used 2. blueberries and 1 c. raspberries)
1/2 Tbsp. lemon juice
1 c. organic all purpose flour
1/2 tsp. baking powder
1/2 tsp. salt
1/2 c. butter (1 stick), softened
3/4 -1 c. coconut sugar (if  you want it sweeter, use the 1 c. as coconut sugar is not as sweet as brown sugar.  I was perfectly happy with the 3/4 c., however)
2 tsp. vanilla extract
1/2 c. rolled oats

Preheat oven to 375.  Grease a 9x6" rectangle pan or an 8-9" round baking dish.

Place the clean and drained berries in the prepared baking dish. Drizzle the lemon juice over the top of the berries - no need to mix.

Whisk the flour, baking powder and salt in a small bowl and set aside.

For ease of clean up, I prepared the topping in a food processor.  (If you prefer, you can beat the butter, sugar and vanilla together until creamy and then mix in the flour mixture until crumbly and proceed).
Place the softened butter, vanilla and coconut sugar in the food processor and pulse until it is nice and creamy and well blended. You may need to scrap down the sides once, but this will blend quickly! Add the flour mixture and the oats and pulse a few quick times until you have a crumbly mixture that is well incorporated.


Ready for the oven...

Sprinkle the mixture evenly over the top of the berries so they are covered evenly.

Bake for 30 minutes, or until the top is lightly browned and the fruit is bubbly.


Freshly baked...

This is SO delicious. You could easily double the fruit and use the same amount of topping if you want . And this would be delicious with peaches or apples or apricots or.....  I cannot wait to make it again and doing most of the work in the food processor made it even easier!


Pin It Now!

Thursday, May 21, 2015

Happy Birthday, Missy...


Today is the celebration of another family birthday - my daughter who lives in northern CA.  I hope she has a wonderful day full of hugs and love from her daughters and all things that make her happy.

This card was an experiment.  My kids tend to be my "guinea pigs" when it comes to trying new card making techniques. I know if the card fails, they will still love the thought.  At least that is what I tell myself...

I have been reading about Brushos all over the internet and seeing amazing things created with them. So this was my first try and I cannot wait to do more.  I want to make pages of colors and cut them out rather than just use them as background.  And next time I would probably use less as this is a bit intense, but I love the colors.  This  background represents just two colors used - look at all of the variations of color that literally explode off the paper.  It's such fun and makes a non artist feel talented!  LOL


Isn't that fun??

I used a clip art pattern for the dandelion image and great mica paper from Paper Temptress.  It's a whimsical card, but I am happy with it - I hope she likes it. :)


I love the fine detail...


Love this dandelion image...


A print and cut with the greeting that was foiled...

I love the rhinestones but they are really hard to capture in a photo - 
they are scattered throughout the background...

HAPPY BIRTHDAY MISSY!


Pin It Now!

Monday, May 18, 2015

Sending Words of Sympathy

I have talked about it before.... making a sympathy card is without a doubt the most difficult card to make.  And there are certainly situations that make it even harder.  This was one of those times.


I have been blessed to have a lot of warm and wonderful people enter my life.  The dear lady who is the recipient of this card is truly one of my guardian angels. She came into my life when I moved back to CA after having lived in Arizona for 12 years.  I was not in the strongest physical shape and needed a part time caregiver.  That is when this special woman created a "forever spot" in my heart.  She not only helped me for a year (I was in wheelchair at the time and couldn't drive) but she challenged me to live - really live and reach for all that I could do.  Over time and a lot of tough love on her part, I found the will and the strength to leave the wheelchair behind and fight the system to drive again.  She saw the strength inside of me even when I couldn't, or didn't want to.  I owe her so much.  And even though we mutually ended the employer/employee relationship, we have remained close friends for the past ten years.

A week ago I received a very short email from her. She is now in her 80s,  but living a full and active life. Sadly she shared that her oldest son had recently passed away and that the healing would now begin.  My heart ached for her and I felt/feel so helpless.  So this card is for her - this special lady who was a transforming light in my life.   I hope it reminds her that she is dearly loved...now and forever...


God bless you and your family.....


Pin It Now!