Monday, February 23, 2015

A Special Sympathy Card


I love making cards, but this is one "occasion" that I do struggle with the card. There are always emotions interfering with any creative process that may be trying to develop.  I want the card to speak to the family or individual.  I want them to know that I care. But how do you put all of that into the construction of a card?

I don't have the answer to that, but I try to do the best that I can.  This was a tough card to make. A friend had lost her grown daughter. The circle of life is just not supposed to work that way :(  So I what bring me solace and peace - the beauty of nature.  I found a stained glass patter in one of the Dover Art clip art books I have and turned it into a cuttable design. Dover Art has many books with royalty free clip art that really helps when you are looking for the perfect inspiration.

The papers are once again from Paper Temptress with a touch of silver vinyl for the accents on the wings of the dove.  Some of those cut lines are very fine and the Silver Bullet did an awesome job as always.


The cut vinyl


The detail of the remaining cut

I hope this card brings the family a little peace and solace and reminds them that they have a community of friends who care.......


I cut the whole design out of white card stock so I would have a "template" in order to place 
the pieces in the right spot.  It made the placement so much easier!


Details of the embossing...


Pin It Now!

Wednesday, February 18, 2015

Chicken and Dumplings with Einkorn Flour

This is a real comfort food for me.  I don't remember eating a lot of this growing up, in fact I may not even have tried it until I was an adult.  I just am not sure.  But I do know that it quickly became a comfort food for me - much like chicken soup or chicken and noodles.  It's warm and satisfying and gets better with every bite.

The einkorn flour makes this dumpling a little softer and lighter but not a bit of the taste is compromised.  I can hardly wait to make it again.  And if you don't have einkorn flour, feel free to substitute with any flour you have on hand.  The original recipe was actually designed for regular flour.


Stove top cooking at its best - ready to serve! (yes - the top is COVERED in dumplings!) YUM!

Chicken and Dumplings with Einkorn Flour

adapted from How Sweet Eats

1 1/4 lbs. boneless, skinless chicken thighs
1 tsp. sea salt
1 tsp. black pepper
2 Tbsp. olive oil
4 Tbsp. unsalted butter
2 shallots, diced
1/2 c. sliced baby carrots
4 garlic cloves, minced
1/2 tsp. chopped fresh rosemary
1 tsp. chopped fresh thyme
1/4 c. Einkorn or regular flour
4 c. low-sodium chicken stock or broth
1 c. white wine
1 c. water
1/3 c. heavy cream or half and half

Dumpling Batter
 2 1/2 cups Einkorn or regular flour
1 tablespoon baking powder
1/2 teaspoon salt
2 large eggs, lightly beaten
1 cup buttermilk

Season the chicken with salt and pepper. Heat a large pot over medium-high heat and add olive oil and 2 tablespoons of the butter. When hot, add the chicken to the skillet and cook it on both sides until dark golden brown and cooked through, about 5 to 6 minutes per side. Remove the chicken and set aside in a bowl;shred when cool.Reduce the heat to medium and add the other 2 tablespoons of butter. Add the shallots, carrots, celery garlic, rosemary and thyme. Add a pinch of salt and pepper, stirring well. Cook until the vegetables are soft - about 5 minutes.

While the vegetables are cooking, mix the dumplings. Whisk together the flour, baking powder and salt in a large bowl. Combine the milk and eggs, and stir into the flour until just mixed. Set aside for a few minutes. (mine sat for 15 minutes or more and the batter rose and made very light dumplings.

Stir the 1/4 cup flour into the veggies with a wooden spoon until it coats the vegetables, then continues to stir until the flour cooks and turns golden brown, about 5-10 more minutes, depending on the stove. Slowly add the chicken stock a cup at a time, stirring well the entire time so the mixture thickens. Add the shredded chicken to the pot. Increase the heat a bit and bring the mixture to a simmer, then continue to cook while it bubbles for about 10 minutes. The liquid should have a thick consistency. Slowly add the heavy cream or half and half and stir well. Drop large spoonfuls of dough all around the top of the pot. The dumplings may cover the top of the mixture. The mixture should be bubbling for 10 to 15 minutes so it cooks the

Sprinkle fresh chopped parsley over the top of the dumplings. Serve immediately!
IF you have leftovers, add a little milk when reheating.


Unbelievably good!


This was SO good I ate it almost every night for a week.  Sometimes when I have leftovers I have to force myself to eat them, but there was no forcing with this one!  I was quite content to have a small bowl of this every night!  I hope you love it too!


Pin It Now!

Saturday, February 14, 2015

Happy First Valentine's Day, Carter!


This just popped up on my phone.  What a way to begin the day!!
Carter is 12 days old today!


I have to start this  post with an apology. I have a DEAR friend (who I hope will remain a dear friend after she reads this!) whose birthday is also today.  I had limited time this week - and didn't plan ahead well enough. :( So....... when I realized I had to make two cards this week and only had time to make one.......well new grandson Carter won out.  So my friend's birthday card will be fashionably late, but full of love nonetheless......  I hope she forgives me.

I had the great fortune today to deliver this Valentine card in person yesterday and bring him a special Valentine outfit (see above photo!) for his first "heart" day. (and you are right - every day is "heart" day when there is a baby involved...)  I spent a good part of the day with them and held him in between feedings and was truly in seventh heaven.  I am totally smitten with this little guy. He has stolen my heart, and it is quite clear that he has stolen the hearts of his Mom and Dad as well, and everyone who meets him. What a love bug!!


This is the cute Valentine Monkey from Miss Kate's Cuttables. 
Papers are mainly from Paper Temptress .


Also from Miss Kate's Cuttables


For his special card, I went back to the animal theme of the nursery and used the cute monkey from Miss Kate's Cuttables. I love her files and these animals are just TOO adorable.  A lot of her images have multiple layers, but they are fun and quite easy to put together. This one was no different.


Not the best photo - having a shadow problem for some reason!


This card is Mom and Dad approved. And hopefully one day it will bring Carter a smile as well.


Happy Valentine's Day.

Pin It Now!

Monday, February 9, 2015

WELCOME TO THE WORLD! BIG NEWS!!!


It's been a pretty wonderful week in my life.  As I announced here many months ago, my oldest son and his were expecting their first child and have been enjoying the mystery of "what are we going to have?"  Well - the wondering is over and this special blessing entered the world at full speed - TWELVE days early!  and he - yes HE - is absolutely gorgeous and perfect in every way.  He was born Monday morning  (a week ago) and weighs a very healthy 8 pounds, 1 ounce.


An hour old.........


The world, well at least my world, is a much brighter place with the birth of Carter Jameson Bricker.  Don't you just love that name?   It is such a strong wonderful name.

Let me digress a minute.  I had been thinking about making a card to celebrate his birth and take it with me to the hospital.  But over the weekend, once I finally got an idea, I had to figure out what to do.  I wanted to make it with either a boy or girl theme, but had no clue which they were going to have.  So I decided to cut out a pink bow and blue bow that could be placed on the card at the last minute.  Successful idea!  And easy to implement. So late Sunday night (it never fails that I get a burst of creativity when I should be heading to bed...  but that was ok - I was committed to getting it ready and putting it aside for my drive to the hospital -thinking  I had two weeks)  So I got all of the layers cut out and ready to go and went off to bed, planning to finish putting it together in the morning.  But that dedicated time never came, because the phone rang at 4:15 AM, just three hours later, and the unfinished card remained on my craft counter as I raced 45 minutes away to get to the hospital on time.  Best laid plans..........

So anyway, when I finally returned from all of the excitement, I was excited to actually be able to assemble the card and reflect the "boy" theme!  So I pulled out plenty of blue card stock to utilize the appropriate color and the card came together perfectly.  I was so happy.  I had already made a pattern for "Welcome Little One" as I had planned to put that on the front of the card.  But now...... 24 hours later..... I had a name!  So Carter Jameson went on the front and off it went to Megan and Scott.


Detailed zebra cut - thanks to the Silver Bullet Cutter.


Zebra design compliments of Miss Kate's Cuttables.  Love her designs 
and they are so easy to cut!


Inside of the card....papers all from Paper Temptress


Can you tell how overjoyed I am?  The first male grandchild and one that is only 45 minutes away instead of the two girls who are 6 hours away.  I know - I am still so lucky. They could all be across the United States or even overseas, but they aren't.  We are all in one state, just a bit scattered.  I love each and one of them with all my heart.  But what is it about a baby that just consumes every part of your being.  It doesn't diminish your love for anyone else, but your heart just expands - and explodes with love and tears of joy and oh so much gratitude.

So... welcome new little love....... CARTER JAMESON BRICKER (CJ when he is all grown up!)
We love you so....


Is he not the most beautiful little boy you have EVER seen?!?


Pin It Now!

Wednesday, February 4, 2015

Einkorn No Knead Bread

So your first question may be "What in the world is Einkorn?  Right?"  I thought the same thing when I began the process of researching flours and learning about all the varieties that existed. Einkorn is one of the many flours considered an "ancient grain" along with others like barley, kamut, teff, spelt, buckwheat and more.       Many of these are also gluten free and rich in mineral content.  Some are quite high in protein and rich in fiber.  Einkorn is one of the oldest and purest forms of wheat.

Einkorn is very high in protein, vitamin B6, potassium and other minerals and even though it is wheat, it is very low in gluten.  Some people who are gluten intolerant are able to eat einkorn flour.  You can read more about it here.


No Knead Einkorn Bread

From the Jovial website

5 c. (600 gr) all purpose einkorn flour
1 3/4 c. (410 gr) warm water
1/4 tsp. (1 gr.) yeast (this is not a misprint - REALLY just 1/4 tsp!)
1 tsp. salt (I used bread salt from King Arthur)

Mix the flour, salt and yeast in a large mixing bowl.

Add the warm water and mix well. This is an interesting dough in that it is VERY soft and sticky and hard to mix.  The easiest way to mix it, per the website, is with your hands. But I will warn you that it's messy and you will have to be in the mood to get your hands STICKY!!  This is perfectly normal with this kind of flour - just a warning.  You do not need to add more flour at this stage - just hang in there and mix it as thoroughly as you can, however you can.  (yes I love a challenge so I hung in there as I had heard wonderful things about  this flour and figured it was worth it. And by the way, I was right!  Totally worth it!)

Take a spatula or wooden spoon or something sturdy and scrape down the sides of the bowl and flatten the top so you have a relatively flat top.

Cover the bowl with plastic wrap and let rise in a dark place for 12-14 hours.  I used a ceramic bowl and put a plate over the top  of the plastic to block the dough from being exposed to the light.  Again, per the website instructions, the dough will darken when exposed to light (it won't hurt the dough at all, you will just get a darker product because of the carotenoids in the dough that will darken when exposed to light).

When the dough is ready (I let mine rise for the full 14 hours), place a ceramic or cast iron pot in the oven and heat for 30 minutes to 500 degrees and then lower to 450.

In the meantime, take the bowl of dough and turn it out onto a well floured surface.  I used a large pastry cloth as it keeps the mess contained and is easy to shake off when I am done.  Pat the dough flat with well floured hands or a dough scraper, and then fold each of the four sides toward the center, using additional flour to make a round shape.  The dough will be super soft and will not be like a "normal" ball of dough..


 Handle it minimally.  The shape does not have to be perfect as it will rise and fill out as it bakes in the oven. quickly shaped mine and placed it on a parchment square and put the whole thing in the hot ceramic pot as soon as it had heated for 30 minutes.  Once you have the dough in the hot ceramic dish, cover it and make for 40 minutes, keeping the lid on the entire time.  If you prefer a darker crust, remove the lid and bake for an additional 5-10 minutes uncovered.

Lift the loaf out of the dish (leaving it on the parchment paper makes that much easier) and cool on a wire rack. Let cool at least an hour before slicing.

I really LOVE the look of this loaf and the taste was delicious - not quite as "wheat" tasting as white whole wheat, but not as "bland" as white flour.  Hard to describe, but trust me, it is delicious.


This is not an inexpensive flour as 2 lbs is roughly $8 ($4/lb), but it is so healthy and delicious, it is worth using whenever you feel like spoiling yourself with a very nutritious grain.

And I weighed all of my ingredients to get the measurements as accurate as possible. I love my kitchen scale. It takes all of the guesswork out of baking!


Pin It Now!

Wednesday, January 28, 2015

"Celebrate" Birthday Card


This card was made for a special friend.  This began as a Dreamweavers stencil (I have quite a collection of them) that I traced and then turned into a cut file with a shadow layer.  I love the interesting look you can get when you paper piece a stencil rather than color it!  Such fun.

The papers are of course from Paper Temptress and the yellow background was enhanced with an quatrafoil embossing folder.


Quatrafoil embossing for added texture


The center of the flowers was accented with a little gold liquid pearl and the vertical greeting was added using the SCAL software


Love the detail...


An added greeting...

It was a relatively simple card but am happy with the results.  And my friend was too!


Pin It Now!

Saturday, January 24, 2015

Homemade "A Little of Everything" Pizza

So far this year,  I have clearly on a bread kick, be it loaf or crust. (stay tuned for more varieties of the no knead crust bread to come).  I had gone to the store to get a different variety of toppings for an "everything" pizza to fulfill a request.  :)  I am not a huge pepperoni fan ( I know - borderline shameless) but I acquiesced and got some turkey pepperoni along with new Italian salami (new to me), mild Italian sausage, mushrooms, red onion, a variety of colored peppers (mild) and fresh mozzarella cheese - that makes such a difference when you have a chance to grab some.

I haven't made pizza dough in ages so am clearly out of practice. The last time I made some I used my bread machine to do the kneading. This time I did it the old fashioned way and that was fun - and equally delicious. I had forgotten how gratifying it is to work with dough.  The crust was a bit thicker than I like, but it was still delicious.


I will admit that this pizza was a bit "ingredient variety heavy,but because I didn't put a lot of everything on, it didn't taste like too much. The flavor was fabulous. And pizza is very forgiving - lucky for me.  It is hard to mess it up!

Hope this will inspire you to create your own soon. It's an easy treat for a cold winter's night....

This is the pizza -  it's in stages of creation starting in the lower left:
homemade sauce and parmesan cheese, sopressata (a new salami to me and delicious!), tri-colored pepper slices, red onion slivers and mushrooms, turkey pepperoni, fresh mozzarella (YUM!) and cooked mild Italian sausage.  And then of course the end result.  Are you hungry yet??
Pin It Now!

Monday, January 19, 2015

Healthy Blueberry Orange Wheat Bread with Cream Cheese Icing...

When I saw the photos of this recipe come in to my blog feed about a week ago from "Eat Cake for Dinner", I knew I had to try it.  It had two of my favorite things - blueberries and oranges - although I am not sure I would have thought to put them together. I have made plenty of blueberry and lemon recipes but never thought of using a different citrus.  My mother used to often put orange zest in cookies, but I didn't carry that forward in my baking.  Mothers DO know best! :)

I wanted to make it a little healthier, so I opted for white wheat flour instead of all purpose, and half honey crystals (great sugar substitute) instead of the sugar.  I had not used the honey granules before so was a little timid to use them entirely, but next time I will as they were great and the flavor was fabulous.

The aroma of the baking bread was so distractingly wonderful that I kept walking into the kitchen exclaiming, " OMG that smells wonderful!".  It made me feel like I was in the middle of an orange grove..... It was sheer heavenly!  I love citrus anyway, but this was sunshine in a loaf pan!

Blueberries and oranges =BRILLIANT idea!  So happy to share this healthier version with you!


Look good?  Oh it is!

Healthy Blueberry Orange Wheat Bread with Cream Cheese Icing

adapted from Eat Cake for Dinner

1/2 c. unsalted butter, softened
1/2 c. organic cane sugar
1/2 c. honey crystals
2 eggs (I use only pastured eggs now)
2 tsp, grated orange zest
2 tsp. vanilla (homemade)
1/2 c. plain Greek yogurt (homemade)
1 Tbsp. milk
2 c. white wheat flour
1 1/2 tsp. baking powder
1/2 tsp. salt
1 1/2 c. fresh blueberries

Orange Cream Cheese Icing
2 oz. organic cream cheese
zest from half an orange (about 2 tsp.)
1/2 c. organic powdered sugar
2 Tbsp. fresh orange juice (from the zested orange)

Preheat the oven to 350.  In a mixing bowl, cream the butter and sugar and honey crystals together.  Add the eggs, one at a time, and beat well with each one.  Then add the orange zest, vanilla, Greek yogurt, and milk and mix at low speed until well combined.

In a large bowl, combine the white wheat flour, baking powder and salt.  Toss the blueberries in the flower mixture and coat well (this will prevent them from all dropping to the bottom of the batter while baking).

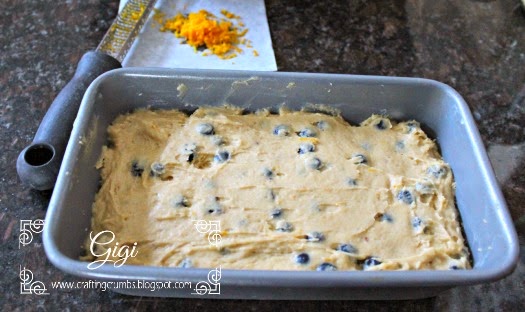
Gently add the wet ingredients to the dry ingredients and fold together until just combined well.  The batter will be unusually thick. (Don't worry!  It will be okay!) Spoon the batter into a lightly greased loaf pan.  Bake for 60-70 minutes or until a toothpick inserted in the center comes out clean.


You can see how really thick this batter is - it's okay. It will bake beautifully.

Remove from the oven, cool on a rack for 10 minutes, and then remove from the pan and finish cooling.


When totally cool, frost with Orange Cream Cheese Icing (ingredients above)


See the orange zest in the icing?  You could make it thinner with more orange juice and drizzle it,
but I loved it like this.  Either way will work just fine.

Place the cream cheese in a small glass dish and microwave for about 15-20 seconds until the cream cheese is very soft.  Add the rest of the icing ingredients and mix very well until smooth. (you will want to eat it with a spoon so try to resist the temptation!)  Instead, frost the top of the loaf or thin with more orange juice and drizzle it over the top.


Look at ALL of those blueberries!  Every bite is full of berry flavor.


So moist....


Every bite is a treat...

Store the bread in the refrigerator.... if it lasts that long! Pin It Now!

Thursday, January 15, 2015

Happy Birthday, Penny!

Since the actual card is en route to its destination (and yes it will arrive a "little" late...), it seemed like the next best thing was to turn this post into a birthday greeting, so.........

Happy Birthday to you..........


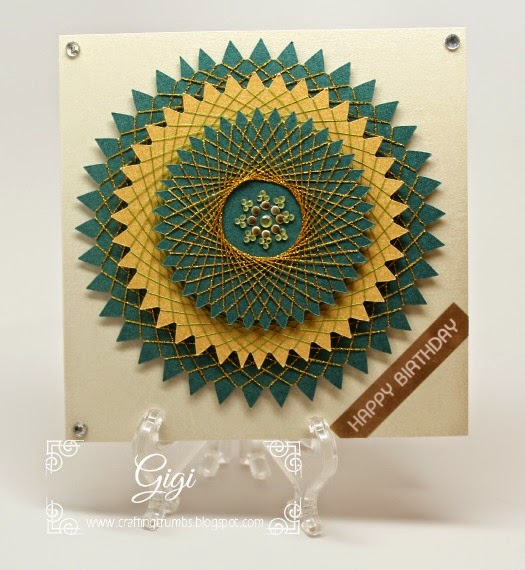
This card uses one of Penny's own shapelie files - the Starburst shapelie.  I resized it in SCAL software so I would have 3", 4" and 5" shapes.  I decided to do spirelli on each because that is such a simple craft technique and really adds a WOW when all is done.  I really should use it more often - it's a great way for me to utilize metallic threads left over from other projects!  And you can use any thread that you like or have on hand - I just happen to prefer the sparkle.

Spirelli is just wrapping thread around a design. The shorter the interval between wraps, the larger the opening when you are done.  The wider the interval, the smaller the opening as you can see in the pictures. The two largest shapes were wrapped at 10 spaces apart, the center top shape was wrapped at 15.


Numbered on the back in case I get lost counting!


All three shapes wrapped - green with gold and gold with green.

From here I just stacked the shapes with foam tape to give it dimension  and kept the rest of the card simple so this medallion could be the star.  The Happy Birthday Greeting was done on my  Brother labeler with satin silver on gold tape.  A few crystal rhinestones and this card was in the mail.


Card stock is the Mica from Paper Temptress.


 I hope it makes it safely to its destination.  In the meantime, birthday wishes are flying your way....


Happy Birthday, Penny!

Pin It Now!

Tuesday, January 13, 2015

Experimenting with Crusty Bread


I know there are a gazillion versions of this online, but this is the one (actually two) that happened to catch my eye - the recipe I used (reference below) had a bit more yeast and salt and used lukewarm water. Not sure that any of those are a deal breaker.  I made it simple this time but after giving this a try, I cannot wait to make all sorts of varieties of this.  Love the idea of fresh dill and havarti cheese,  gorgonzola and rosemary, roasted garlic and just about anything (!) - and the list goes on - even cinnamon and raisins.

The recipe I used was from Chef In Training.  But there is an old one, very similar, with a great video that they just added last week and this is what inspired me to jump on the bandwagon!  Check out this video at Simply So Good - and there is even a separate section with tons of ideas for add ins!

It literally took less than 10 minutes to put together and I needed no fancy tools - just a bowl and a spoon. This is a recipe that will convince you that ANYONE can make fresh bread - yes anyone.  I admit to not being a novice to homemade bread and alternate between the bread machine (clearly cheating) and the old fashioned kneading that makes me feel so empowered when the end result looks like a real loaf of bread!
This gives you all of the comfort of making your own bread and takes away all of the obstacles. I don't think you can go wrong if you follow the directions.


My trusty ceramic clay pot - love it. Great for this kind of baking


The bread dough after 17 hours..... nice and bubbly


After a very quick knead (really just a few light flips in flour)


Ready for the oven -the parchment makes it easy to place inside and take out

 I let this loaf go about 17 hours and I think I could easily have baked it at 15 or less as the kitchen was warm, but it is a very forgiving loaf!


Used a bit too much flour, but heavenly regardless

I am not quite sure why my loaf is sporting a mohawk, but it just made me chuckle when I took it out of the oven.  Leave it to me to make bread that makes a statement!

I can hardly wait to try more flavor combinations!  This may be a series of bread posts - or at least photos. And I plan on taking a few baking classes from Craftsy to try new bread baking techniques.  I look forward to learning and sharing!


It IS as good as it looks


And even better with butter!

Pin It Now!