Tuesday, June 3, 2014

Get Well for a Dear Friend

A very special friend has been recovering from surgery and I finally got this card in the mail to her.  I hope it makes her smile.  This is one of those projects that looked one way in my head and entirely different when it was all done.

I started with the focal point - the doily from one of Monica's files - and cut it out from Paper Temptress glimmer paper.


Monica's Doily (#91) and two shadow layers

I made a very thin lattice background to help the doily stand out a little (I need to learn to plan it out first rather than adapt as I go!)


The negative space left from the very thin lattice cut for the background (see photo below). Yes I forgot to take a separate photo of the lattice before it was glued on!

I added different sizes of turquoise and light green rhinestones for the finishing touches.  Even though this was a get well card, it would work for any occasion.


The finished card set on incandescent card stock from Paper Temptress. (note the thin lattice 
over the black card stock, cut, peeking out on the sides!)


A close up of the final product!  Hope you like it.

Get Well my friend!


Pin It Now!

Sunday, June 1, 2014

Decadent Chocolate Chip Cookies

I have been craving cookies for a while now.  I try not to bake them too often because they are clearly my weakness. They are just too easy to grab.  I have been known to have coffee and a cookie for breakfast

I wasn't sure these would be good because I overdid some of the ingredients - imagine that?


Not the most professional photo , but you get the idea -lots of flavorful ingredients


Here they all are just waiting to be mixed in the dough...YUM!!

The recipe called for light brown sugar and I used my new favorite muscovado sugar. I love the richness it adds to quick breads and muffins, but was worried when the cookie dough had a very strong molasses smell and taste  (yes, I do sample my cookie dough!)

But all of that seemed to mellow out when they baked in the oven. And I ended up with one of the best cookies I have made in quite some time.  Everyone who tried them loved them!

Decadent Chocolate Chip Cookies                                                            

 adapted from Two Peas and Their Pod

3 cups flour
1 tsp. sea salt
1 tsp baking soda
1 1/2 tsp. baking powder
1 cup butter, softened
1/2 c. sugar
1 1/2 c. muscovado (molasses) sugar*
2 large eggs
2 tsp. Vanilla Bean Crush extract (King Arthur)
1/2 c. milk chocolate chips
1/2 c. bittersweet chips (King Arthur Flour - or any dark chips)
3/4 c. butterscotch chips
3/4 c. Heath Toffee Gits and Heath Bits o'Brickle
Extra sea salt for sprinkling on top of baked cookies

*You can certainly substitute light or dark brown sugar, depending on your taste.

Preheat oven to 350.  Line a cookie sheet with parchment paper and set aside.
In a medium bowl, whisk the flour, sea salt, baking soda and baking powder; set aside.

In the bowl of a stand mixer, cream butter and sugars together until light and creamy, about 5 minutes.  Add the eggs and vanilla and beat for an additional 2 minutes.  Slowly add the flour mixture to the butter mixture.  Add a little at a time and mix just until blended.  Stir in all of the chips and toffee pieces.

Drop about 1-2 tablespoons of dough (depending on how many cookies you want to make) onto the prepared cookie sheet, placing the dough balls about 2 inches apart. Bake for 12 minutes or until the edges are slightly golden brown.  Remove from oven, sprinkle with a pinch of sea salt,  and allow the cookies to cool for 2-3 minutes before removing to a wire rack to cool completely.


Cookie dough perfection!


Just the right amount of sea salt on top (with another dusting after baking.


Fresh out of the oven...


Rich, delicious, and I dare you to eat just one!!

Pin It Now!

Monday, May 26, 2014

A Heartfelt Get Well Card.....

I have a dear friend who was recently in the hospital for a heart repair.  As far as I am concerned, there is not one single thing wrong with his heart, but some rather renowned cardiac surgeon felt otherwise! Anyway..... he and his dear wife are doing well. She is certainly relieved and happy to have him home and heading for a full recovery - GREAT news!!  His heart is mending beautifully!

In my usual form of late, the get well card was just mailed.  I am not sure why I cannot get things done in a timely manner anymore.  I always use to be early with everything, but no longer!  It's the thought that counts, right?  I so hope so........

My inspiration for the card was one of the  Dreamweavers stencils. They have a wide variety of beautiful stencils (many of which are quite at home in my craft room!)and some of them are vertical greetings.  I used a take off on their Get Well greeting, cut it out of some fun Coredinations card stock that I have had sitting around here forever, and then cut a lot of layers with the Silver Bullet Professional.  The greeting is backed with Paper Temptress brown bag, the rectangle is Coredinations and the mat shadow is Paper Temptress Basis card stock.


You can see the detail of the letters on the mat and the various layers...


The card front....

I used some white and taupe Coredinations for the background that I ran through a Teresa Collins embossing folder (Woodgrain) and then distressed it to show the detail of the embossing. I love the look of that and have vowed to do more of that - it was like watching magic before my eyes. :)  I think the light sanding really made the woodgrain pattern pop!!  The whole thing was placed on Kraft card stock from.. you guessed it.... Paper Temptress.


Wanted to share a close-up of the woodgrain distressed.  I love the wood pattern.

Since this card was for a male, I didn't want to overdue it with too much, so I used the Fern Branch from Penny Duncan Creations (thank you Penny!) and cut it out of Paper Temptress Mica and Pop Tones papers to add a slightly different look.


This was a relatively simple card for me and I would like to play around more often with the vertical greeting  idea -it was a fun twist.


Pin It Now!

Wednesday, May 21, 2014

Family Birthday Cards .... Part Three - My Daughter


This is a post about failure and success -  no, not my daughter!  But her birthday card that turned into multiple efforts, was definitely a lesson in perseverance....

You may think it strange that I chose to do a sunflower for a spring birthday, but that is her favorite flower .  And honestly, I wouldn't mind channeling a little fall weather right now with all of the heat and fires we have had here in San Diego county the past week.  It has truly been the worst I have ever seen, and I have lived here most of my life.  I have never seen the Santa Ana winds that bring the hot, dry air in the month of May - never.  And ten fires in two days all in our county?  It has been absolutely unbelievable.  I am so very grateful that no one I know lost their home or was injured.  And I am counting my blessings.  There are dry areas of brush and growth everywhere and , as my parents always said, "there but for the grace of God go I."  So today, I am full of gratitude.

Back to the sunflower.... this is one of Dominic's beautiful flowers and it cut perfectly.  In hindsight, I should have used a card stock weight material for the this flower.  I really do love how it turned out, but with the way the text weight paper buckled under the glossy accents....well I ultimately could not send it to her. And yes, tried putting it under a heavy book (several) overnight that that just didn't work.  Note to self:  Know when to stop when embellishing a card!  So as much as I love the look of the card with the glittered glossy accents, it will not be on it's way to her (at least not this year!!!)


It's the buckling of the outer frame that really bothered me.  I love the look of it but was just so unhappy with the final presentation.  So maybe not a total failure, but still not a card
I felt I could happily send to my daughter!


So...... late last night I decided I just needed to try again and do something different .  Feeling like I needed to stick with the sunflower theme, I found a free clip art of a sunflower stencil that seemed quite simple.  Of course, true to form , I could not leave well enough alone!  LOL  So I traced the design in SCAL and added several shadow layers for a little more interest.  The shimmery papers that I love are from Paper Temptress - the mica line - and the center of the sunflower is ruche paper - love the texture and it cuts easily with the Silver Bullet Pro.


Initial cutting of the top layer of petals (bad lighting - didn't adjust for night light)


Individually embossed the petals (5 at a time so I wouldn't lose the placement) and glued to the orange(truer color below) before I removed them from the mat.


An unexpected bonus - a negative stencil created from the orange petals.  
Expect to see this as part of another card at some point!


Layered petals with two shadow layers - a yellow/gold marbled cardstock and
antracite mica (Paper Temptress) to give it that "pop".


I embossed each of the amber sunflower petals with a dot embossing folder before attaching them to the flame petals.  And the dark brown ruche center was embossed with a "mesh" folder for even more texture.


Chocolate brown ruche cardstock (Paper Temptress) embossed with a the Mesh embossing folder.


The sunflower center with a visitor.  Do you love that little ladybug as much as I do??

Did you see the cute little ladybug sitting in the center of the flower?? I made that thanks to the inspiration of  Susan Tierney-Cockburn (Susan's Garden)! This blog has a great explanation of how to make them with the Viva Decor Pens.  I want to make more - they are so much fun and so easy.  And I think it would be fun to use a similar technique to make other things ... just what I need - more ideas of things to create! :)


A view of the finished card with all of the elements together. So happy with this one!

I kept the same sized card as the first one since the greeting on vellum was already printed and the envelope was addressed and stamped!    I really do like the square cards - there is just something nice and clean about the presentation - not too small and not too large!  Juuuuuust right! (channeling Goldilocks here!)


Another view.  It's all about the ladybug - she makes me smile!


This is one of those times when starting over was clearly the right thing to do.


I hope you enjoy these cards - and learn from my mistakes.  I would like to say that I will not make this same error again, but...... I don't necessarily learn the first or even second time around.  I am still going to think about how to save part of this so if I come up with a good alternative (already thinking of one) I will post it later... so stay tuned for more experiments from the craft room.

And I have a ton of online class videos to watch, so hope to be having some fun with new techniques. I want to improve my marker coloring, play with colored pencil shading that I used to love to do, learn how to stamp with watercolors and more.

Also looking forward to having a little more time in the kitchen to share some fun summer recipes.
Stay tuned and stay well.....


HAPPY BIRTHDAY, Missy!

Pin It Now!

Friday, May 2, 2014

Family Birthday Cards.... Part Two - My Youngest Granddaughter!

HAPPY BIRTHDAY, HALEY!!!

I can hardly believe that my youngest granddaughter will be 8 in a few days. How could that be??  I love this age - she is still a little girl, but there are glimpses (thank goodness they are quick) of the young woman she is becoming.  Please let the time slow down!!

A special note about her May 5th, Cinco de Mayo, birthday.  She was born on my dear father's birthday, her "Papa", as my children fondly and adoringly called him. Unfortunately, they never had the pleasure of meeting each other, but I have no doubt there is a special place in their hearts for each other.

So....what kind of card do I make for an eight year old?? After talking to her Mom, my card choices were anything related to Frozen (what a great movie!!), Monster High (I was clueless!), One Direction or Wonder Woman!!

After doing some searching for inspiration , I settled on the Monster High logo.  I am not a big fan of skeleton skulls, but the little girl was just too cute!!  So I found the same font on Dafont.com and tried to imitate the color patterns.  It is called Runy Tunes Revisited!  What a name!  I traced the logo in SCAL and made the cupcake with a variety of papers from Paper Temptress.  The gradient paper is actually a pattern made in Inkscape and printed on to Luster canvas text weight paper from Paper Temptress too.  I love the way the letters still shimmer through the ink.


 Just placed the letters randomly on a dark background so you could see the gradient color
in each letter - I loved learning something new....

This card was so much fun and I hope she has as much fun receiving it as I had making it!

All of the papers used are from Paper Temptress - the mica, luster and sparkle lines.  There are more details below under the pictures.


The cut pieces - using Paper Temptress Black Sparkle (shadow of cupcake) Luster for the skull and cupcake frosting (frosting embossed with a Cuttlebug embossing folder) and Mica for the wrapper...


A closer look at the Azalea Mica in the bow and wrapper and mat with the embossed Luster frosting (D'Vine Swirl - Cuttlebug) and embossing on the Laser Luster )Dotted Chevron - Teresa Collins) for the background.  I love the layers of texture.  Glossy Accents make the skull eyes shine!


Here are the printed letters matted on Canvas Luster  and then again on the Black Sparkle 
similar to the actual logo


The cupcake is on pop dots to give it a little more dimension.


And finally... the finished product.  A birthday card for a 
very sweet eight year old girl.


Pin It Now!

Sunday, April 27, 2014

Family Birthday Cards...... Part One - My Oldest Son!

This is the time of year when I really need to be looking ahead as I have three family birthdays in the span of a month.... my oldest son, my youngest granddaughter, and my daughter .  I am usually ahead of the curve, but not this year.  With my daughter and granddaughters visiting the week before Easter, it really threw off my timing, not to mention that Easter was SO late this year.

So last week I started on my granddaughter's card because let's face it - kids cards are SO much easier to do than adult cards.  And for me, female cards are TEN times easier than a card for a male. So poor Scott already had two strikes against him.  And it wasn't until I got about halfway through a card I needed for May, that the realization set in that I had not started my son's card yet and it needed to get in the mail.  Yikes! The panic was on!

He loves all things Disney (yes even at the age of 39, you don't outgrow Mickey Mouse and all of his friends), and is an avid golf player, but I felt like I had exhausted those topics in previous years!  So I looked and I looked and I looked. I went through all of my stamps, digi and rubber. I searched through my endless collection of card sketches and books with card ideas.  Nothing.  Even Pinterest failed me - so I knew I was in serious trouble at this point!  Finally after stepping away from it, I just decided that the greeting was the most important thing and keeping it simple was probably a good idea.

Before I go on to the card portion, I just have to say that I can hardly believe that 39 years have passed. I can remember the anticipation, fear, excitement, worry - all of those emotions that come tumbling in at once, as if it was yesterday.  The fear was because he was a big baby and he was losing oxygen fast, so they did an emergency c-section. I was terrified, but he was healthy and beautiful.  It was a tumultuous first month as the two grandmothers took care of him most of that time as I ended back in the hospital with an infection and it was touch and go for a while.  But we clearly had a happy ending.  There is nothing like your first born.  All of your children are special, but that first one is truly that first miracle - and there is nothing in the world like that experience.  He is all of my hopes and dreams wrapped into one wonderful person.  Thank God he has a sister and brother so all of the pressure is not on him!!  I love him dearly.

Now, onto the card....


You can see the detail of the letters cut with the Silver Bullet Professonal.


I had to do a closeup of the papers as they are so beautiful with the gold flecks running through them.  The red and blue are from the incandescent line from Paper Temptress.  
And the tone on tone white striped paper creating the lattice work is from the luster line.  
I love how these papers make everything look so special.


And here is the final product.  The file is from Birds Cards - it is her Card Cover series.  I altered it a little and added the greeting.  The buttons were made with the Epiphany Crafts Shape Punch (cuts the shape and attaches an adhesive dome to the paper shape). I have had that punch forever and realized it was time to use the tools I have!   The red and blue twine is American Crafts.

So here you have it - a very simple card, done in the colors of  his alma mater (University of Arizona). It isn't my best work, but it is full of love and I hope that is enough.


HAPPY BIRTHDAY, SCOTT!!

Pin It Now!

Thursday, April 24, 2014

Low Sugar Mixed Berry Swirled Lemon Bread

I am still working on cards, but I have one more amazingly delicious bread recipe to post first.  This was so easy and so delicious that I will definitely make it again (and soon!).  I think it would be wonderful with an apricot jam filling instead of the mixed berry too.


Low Sugar Mixed Berry Swirled Lemon Bread

(adapted from Eat Cake for Dinner)

1/4 cup oil
3/8 cup Truvia Baking Blend
1 egg
1 egg white
1 tsp. vanilla extract
1 tsp. Fiori di Sicilia (King Arthur blend of citrus and vanilla - optional)
2 tsp. grated lemon peel
3/4 cup plain Greek yogurt
1 1/2 c. flour
1  tsp. baking powder
1/2 tsp. baking soda
1/8 tsp. salt
1/3 cup mixed berry jam (used my homemade jam from an earlier post!)

Preheat the oven to 350.  Grease a loaf pan and set aside.

In a medium bowl, cream the oil and Truvia Baking Blend together.  Mix in the egg, egg white, extracts and lemon peel until well blended.  In a smaller bowl, combine the flour, baking powder, baking soda and salt.  Add the dry ingredients and Greek yogurt alternately to the oil mixture, ending with the dry ingredients.

Spread half of the batter into the prepared loaf pan.  Top with the mixed berry jam (or jam of your choice), leaving a small border around the edges.  Do not swirl the jam - it will do so naturally!  Top with the remaining batter and gently spread over the jam, covering the mixture evenly.

Bake 45-50 minutes or until a toothpick inserted in the center comes clean.  Cool in the pan for 10 minutes and then invert onto a wire rack and cool completely.

You can dust with powdered sugar or cover in a glaze, but I left it plain for this version!


You can see how beautifully that bit of jam swirls through the bread
and adds an extra layer of wonderful flavor....


Pin It Now!

Sunday, April 20, 2014

Low Sugar Banana Zucchini Decadent Bread!

So when  I decided to bake last night, I was going to make some variation of banana bread and then zucchini bread as both of those main ingredients were in the refrigerator literally SCREAMING to be used.  In a few more days they would have been permanent residents in the trash can!!!

I know - you read the title and thought - how can low sugar and decadent be on the same line.  Have I lost it?  Well that is a different blog post!  LOL   But seriously - it makes perfect sense to me because the decadent and unexpected ingredient is dark chocolate.  If you have been reading my blog recipes, you know I am in love with the King Arthur burgundy chunk chocolate pieces. They are sooooo good - the flavor is the best; they melt better than any chocolate chip or chunk I have ever used, and they add just enough richness without overwhelming the recipe.

I would never have thought to combine bananas and zucchini, but I will definitely be using this combination in other creations. The inspiration was not mine.  I found the basic recipe at Brown Eyed Baker. And the dark chocolate chunks just put it over the top.  I have made chocolate zucchini cake and banana muffins with chocolate chips - so it was natural to add in the chocolate.  It's always better with chocolate, right?  Well in this case, it definitely is!

LOW SUGAR BANANA-ZUCCHINI SURPRISE BREAD!!

INGREDIENTS:

3 cups all-purpose flour
1½ tsp. baking powder
1½ tsp. baking soda
1 tsp. ground cinnamon
1/2 tsp. Penzey's baking spice (mixture of bread friendly spices)
1 tsp. King Arthur vanilla bean crush
1 teaspoon salt
4 eggs
1 cup Truvia Baking Blend
1 cup vegetable oil
2 ripe bananas, mashed (about 1 cup)
2 cups shredded zucchini (used the large grate)
1 cup chopped dark chocolate (I used King Arthur Burgundy Chunks......SO GOOD!!)

DIRECTIONS:

Preheat the oven to 350 degrees.   Grease two 9x5-inch loaf pans and set aside.

In a medium bowl, measure the flour, baking powder, baking soda, cinnamon and salt and whisk together and set aside.

In a large bowl, whisk the eggs. Add the Truvia Baking Blend and oil and whisk until smooth and combined. Add the bananas and whisk until well blended.  Add the flour mixture and stir gently with a rubber spatula until blended. Gently fold in the zucchini and dark chocolate pieces.


Just had to capture the marriage of the zucchini and the chopped dark chocolate.
The flavors blended perfectly and fragrance was intoxicating!!


Divide the batter evenly between the two prepared loaf pans. Bake until a toothpick inserted into the center comes out clean, 50 to 60 minutes. (mine were done in 40-45 minutes, but there is less volume with the Truvia Baking Blend).  Cool on a wire rack for 10 minutes, then remove the bread from the pans and place on wire rack to cool completely before serving. Wrap in plastic wrap and enjoy every savory morsel.
Will keep about 5 days during cool weather.  Refrigerate if necessary.


This is truly as good as it looks!!  Another MUST TRY!!

Hope to be sharing some cards soon - working on a few in my head!!  Trying to get those creative juices flowing....... again!

Pin It Now!

Thursday, April 3, 2014

Jam - a gift for any occasion

Let's forget that this post was originally planned during the Christmas season.  But the concept works for any time of year, especially now if you are starting to think about all of the wonderful fresh fruits that will be beckoning you to buy them in the months ahead. I love spring and summer for that very reason - all of the glorious fruit. But if you are like me, it all looks and smells so good that you overbuy and then wonder what in the world you are going to do with ALL of that fruit before it gets too ripe to enjoy.

The answer??   Make jam!

Up until a few months ago, I had never made jam - no  - not EVER!   And I was never tempted to as it seemed like so much trouble with all of the sterilization of the jars and canning process and ugh -


The Ball Automatic Jam and Jelly Maker

Well the Ball Jam and Jelly Maker has clearly made a believer out of me -there is nothing like homemade jam and all you need is fresh fruit or good quality juice (for jelly).  Because you don't go through the canning process, the jam doesn't last forever - 3-4 weeks in the refrigerator or 6 months in the freezer. (However mine is lasting  MUCH longer than that in the refrigerator).

I know I am lucky living in southern CA because berries are in the stores just about year round. So when I was trying to think of something different to do for my neighbors this year, I quickly decided to make mixed berry jam.


How beautiful are those raspberries and blackberries?  YUM!


All crushed and ready to be made into jam.

With this special machine, it just doesn't get more gratifying.  Fresh jam in less than a half hour - love it!

Once you crush the fruit, you are ready to go. The pectin goes in the machine first and then the berries or juice (if making jelly). After a short amount of time, you add the sugar, cover it, and let it finish cooking.  I use the low sugar pectin so mine is not as sweet, but the fruit flavor is stronger.  It's a personal preference - they make a regular pectin which is used in the same quantity, but the sugar is increased. Equally easy to use.


The berries are cooking with the pectin.


Sugar has been added and the cooking finishes with the lid on.


Time to fill the jars with fruit goodness!

I had made it a few times and was pleasantly surprised at how good and easy it was!  And jam would be appreciated year round and so easy to package for any holiday or celebration.


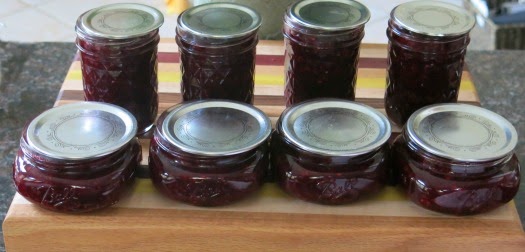
The jam is cooling with the inner lids barely on.


Ready for the refrigerator - or delivery!


These were Christmas gifts, but they truly would make 
a welcome gift for any occasion.


Pin It Now!