Showing posts with label raspberries. Show all posts

Thursday, April 3, 2014

Jam - a gift for any occasion

Let's forget that this post was originally planned during the Christmas season.  But the concept works for any time of year, especially now if you are starting to think about all of the wonderful fresh fruits that will be beckoning you to buy them in the months ahead. I love spring and summer for that very reason - all of the glorious fruit. But if you are like me, it all looks and smells so good that you overbuy and then wonder what in the world you are going to do with ALL of that fruit before it gets too ripe to enjoy.

The answer??   Make jam!

Up until a few months ago, I had never made jam - no  - not EVER!   And I was never tempted to as it seemed like so much trouble with all of the sterilization of the jars and canning process and ugh -


The Ball Automatic Jam and Jelly Maker

Well the Ball Jam and Jelly Maker has clearly made a believer out of me -there is nothing like homemade jam and all you need is fresh fruit or good quality juice (for jelly).  Because you don't go through the canning process, the jam doesn't last forever - 3-4 weeks in the refrigerator or 6 months in the freezer. (However mine is lasting  MUCH longer than that in the refrigerator).

I know I am lucky living in southern CA because berries are in the stores just about year round. So when I was trying to think of something different to do for my neighbors this year, I quickly decided to make mixed berry jam.


How beautiful are those raspberries and blackberries?  YUM!


All crushed and ready to be made into jam.

With this special machine, it just doesn't get more gratifying.  Fresh jam in less than a half hour - love it!

Once you crush the fruit, you are ready to go. The pectin goes in the machine first and then the berries or juice (if making jelly). After a short amount of time, you add the sugar, cover it, and let it finish cooking.  I use the low sugar pectin so mine is not as sweet, but the fruit flavor is stronger.  It's a personal preference - they make a regular pectin which is used in the same quantity, but the sugar is increased. Equally easy to use.


The berries are cooking with the pectin.


Sugar has been added and the cooking finishes with the lid on.


Time to fill the jars with fruit goodness!

I had made it a few times and was pleasantly surprised at how good and easy it was!  And jam would be appreciated year round and so easy to package for any holiday or celebration.


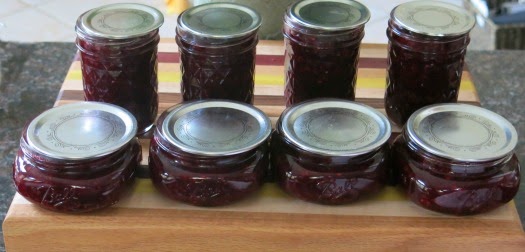
The jam is cooling with the inner lids barely on.


Ready for the refrigerator - or delivery!


These were Christmas gifts, but they truly would make 
a welcome gift for any occasion.


Pin It Now!

Wednesday, October 30, 2013

Raspberry Yogurt Muffins

As much as I have enjoyed making a large variety of muffins the past few months, I am eager for the cooler weather so I can make more yummy soups, stews, and crock pot meals.  I love the way the house fills up with tantalizing scents while those wonderful meals are simmering.....

Can you tell I am ready for fall?  We have finally experiences a bit of chill in the air and I am NOT complaining.  I love an excuse to pull out my sweaters and jeans and boots and get comfy!

But in the meantime, we still get an occasional great buy on a variety of berries, and lately raspberries have been in abundance.  And they have been deliciously HUGE!  I really did take a picture of them for this post, but my camera malfunctioned (translate to mean user error)  so I cannot prove how large and beautiful they were, but hopefully you can still tell in the photos of the end result!

This recipe was easy, and the muffins were light and OH SO MOIST.


Raspberry Yogurt Muffins

adapted from Raspberry Sour Cream Muffins / Weave a Thousand Flavors

1 3/4 cups flour
2 tsp. baking powder
1/4 tsp. baking soda
1/4 tsp. salt
2 containers Dannon Oikos vanilla yogurt (equals about 1 cup)
1 1/4 cup sugar
1/3 cup unsalted butter
1 tsp. vanilla (I love the Vanilla Bean Crush from King Arthur Flour)
3 eggs
zest of 1 lemon
12 oz. fresh raspberries
Powdered sugar

Preheat the oven to 350.  Spray the muffin pan with non stick cooking spray or place a liner in each cup.

In a large mixing bowl, blend the flour, sugar, baking powder, baking soda and salt.

In a medium mixing bowl, mix eggs, Greek yogurt, and vanilla.  With a mixer, beat for a minute or until well blended.

Add the egg mixture to the flour mixture and blend with a mixer for another minute or until the mixture is light and fluffy. Add the melted butter and lemon zest and stir with a rubber spatula until well blended.

Spoon a tablespoonful of batter into the bottom of each prepared muffin cup.


Place a raspberry in the center of the batter and then fill the muffin cups with the remaining batter.  They should be about 3/4 full.

Place three raspberries on the top of each and push slightly into the batter.
Bake for about 22 minutes or until  the tops are golden brown and a toothpick inserted in the center comes clean.

Let the muffin tin cool on a wire rack for 10 minutes. Then remove the muffins and let them finish cooling.

Dust with powdered sugar as desired.

These were scrumptious!


The finished product - and see those raspberries ARE big!


Brimming with berry goodness!


That bite is headed for my mouth!


Pin It Now!

Monday, September 2, 2013

Peach Melba Cobbler

I don't know about where you are living, but, but the peaches that have been available here this year have been incredible.  I am not always a huge peach fan, I think because I have had my share of mushy flavorless peach mpostors. You know the kind? They look so good on the outside,but you cut into them and you just know that first bite will not be memorable, at least not in a good way.

But this summer has been an entirely different experience.  Ohhhhhhhhh goodness....... they have been juicy and sweet and just plain delicious, bite after bite........pound after pound!  So I have been eating them for snacks and cooking with them.  And when I saw this recipe on Iowa Girl Eats (love her!), I knew I had to make it with a twist. She used peaches and blueberries, but I reverted to my Peach Melba obsession and used raspberries.  AND...... I made it low sugar.   It was so delicious. The only thing I would change is to put it in a smaller, deeper dish so the fruit layer has more depth and then the cobbler would cover it completely - or at least almost!

It is delicious plain, with whipped cream or Cool Whip, with a scoop of vanilla ice cream or Healthy Choice vanilla bean yogurt (see pictured below) and works either hot or cold.  You just cannot go wrong!!

And in my world,  when it is mainly fruit, it works for breakfast too! :)


Low Sugar Peach Melba Cobbler


adapted from Iowa Girl Eats Peach A Berry Cobbler

1 c. flour
1/4 c. Truvia Baking Blend (or 1/2 c. sugar)
1 1/2 tsp. baking powder
1/2 c. milk
1/4 c. butter, softened
1/8 c. Splenda Brown Sugar Blend (or 1/4 c. brown sugar)
1 Tbsp. cornstarch
1/2 c. cold water
3 c. sliced fresh peaches, skin on (3 large peaches)
1 c. fresh raspberries
1 Tbsp. butter
1 Tbsp. lemon juice
1 Tbsp. Truvia Baking Blend (or 2 Tbsp. sugar)
1/4 tsp. cinnamon

Preheat the oven to 350.

Topping Mixture:

Combine the flour, 1/4 cup Truvia baking blend, and baking powder in a large bowl and stir to combine.  Add milk and butter and stir until relatively smooth and set aside.

Fruit Mixture:

In a large saucepan, whisk together the Splenda brown sugar blend, cornstarch, and water until smooth.
With heat on medium, add the peaches and raspberries,  and cook until mixture is thick and bubbly, mixing with a wooden spoon.  Add the remaining butter (1 Tbsp) and lemon  juice and stir until the butter is melted.

Pour mixture into an ungreased 1 1/2 quart baking dish (I used a 10"x10" glass dish. Next time I would use a smaller, deeper dish for more fruit concentration and a better coverage of cobbler batter.)  Spoon topping mixture over the top of the fruit.  It does not have to be even or cover completely.  Blend the cinnamon and sugar and sprinkle over the top.

Place baking dish on a cookie sheet and bake for 30-35 minutes or until a toothpick inserted into the center of the dough comes out clean.


Are these not the most beautiful peaches???


Peaches and raspberries simmering goodness...


All cooked and waiting  for the cobbler dough!


Ready for the oven with a sprinkle of  cinnamon  sugar.


All cooked and ready for a taste test!!

This is delicious on its own, with vanilla frozen yogurt or ice cream, or whipped cream or topping.


I love the individual serving cups of frozen yogurt from Healthy Choice!


Who wants the first bite???


Pin It Now!

Wednesday, July 24, 2013

Peach Melba Croissant Puff

OMG!!! I made this several months ago with blueberries as suggested on this blog.  It was fabulous then, but I think it is even more scrumptious now!

It has been a wonderful summer for fresh fruits and the peaches have been as sweet as I ever remember.  I was looking in the fridge for some inspiration and saw the peaches and raspberries and that was it -the perfect combination.

PEACH MELBA CROISSANT PUFF

adapted from "The Girl Who Ate Everything"

INGREDIENTS:

3 large croissants or 18-20 mini croissants, cut up (5-5 1/2 cups).  I use Authentic Gourmet croissants.
3/4 cup chopped peaches, peeled (about 1 medium peach)
1/2 cup fresh raspberries
1 - 8 oz. pkg. cream cheese (I used low fat)
2/3 c. sugar
2 eggs
1 tsp. almond extract
1 c. milk

DIRECTIONS:

Preheat oven to 350. 

Place the cut up croissants in a 9" square pan.  Distribute the chopped peaches and raspberries over the croissants..

In a medium bowl, beat the cream cheese, eggs, sugar and almond extract until well blended.  Add the milk gradually, beating well after each addition.  Pour evenly over the croissant mixture and let stand for 20 minutes.  Sprinkle with cinnamon -sugar. (optional)

Bake at 350 for 35-40 minute or until the center is set and and golden brown, and a knife inserted in the center comes clean.  

Serve warm sprinkled with powdered sugar!

(This can easily be doubled and baked in a 9x13" pan.)


This reheats well the next day too - if it lasts that long!!!


Pin It Now!