Monday, March 30, 2015

Simple Sympathy Card


This is a very simple sympathy card for a special friend.  He fought a hard battle in a short amount of time and has left this world too early.  Unfortunately that could be said of most - it's never enough time......

The papers are all from Paper Temptress (incandescent and two kinds of luster) and the design is from Birds Cards.  This is an intricate design that my Silver Bullet handled with ease....


It's hard to see, but the paper is a deep navy incandescent with a dark navy ribbon.
Pearls in assorted colors were added to finish the look...


Pin It Now!

Thursday, March 26, 2015

Einkorn Banana Bread with Natural Streusel Topping

Still experimenting with einkorn flour.  I really like the taste of it.  It has a slightly sweet taste and doesn't seem quite as heavy to me as whole wheat or white whole wheat.

This bread turned out really well.... nice and moist with a cinnamon goodness.


EINKORN BANANA BREAD WITH CINNAMON-SUGAR TOPPING

adapted from The Einkorn Cookbook

1 3/4 c. (218 g) Einkorn all  purpose flour
3/4 tsp. baking soda
1/2 tsp. salt
6 Tbsp. cold butter, cut into 6 pats/segments
3/4 c. (120 g) coconut sugar
2 eggs
1 cup mashed ripe banana (about 2 medium)
1/2 c. whole milk Greek yogurt (I use homemade)
1 tsp. vanilla

Topping:
1/4 c.  (40 g) coconut sugar
1 Tbsp. cinnamon

Preheat the oven to 350 degrees.  Grease a loaf pan and set aside.

In a small bowl, whisk the flour, baking soda and salt together.  In a food processor, place the butter and sugar and blend well until combined. The mixture should pull away from the sides and form large mass of dough.  Add the eggs, one at a time, and blend each until absorbed.  Then add the mashed bananas, Greek yogurt and vanilla and process again until combined.  Add the flour mixture and blend just until combined. Do not over-process once the flour is added.  Pour into the prepared loaf pan.


The batter ready to bake - covered in coconut sugar and cinnamon

In a small bowl, mix the coconut sugar and cinnamon and pour over the top of the batter.


Fresh out of the oven

Bake for 50-60 minutes until the loaf is golden brown and a knife inserted in the center is clean when removed.

Cool for 15 minutes in the pan and then remove from pan and let finish cooling on a wire rack. This is delicious!


Sooooooo good!!


Pin It Now!

Monday, March 23, 2015

Instant Pot Chicken Tortilla Soup

I have been enjoying learning about my "new" Instant Pot and I just have to say....... I LOVE IT!!  It is a combination slow cooker, pressure cooker, rice cooker, and it makes a dozen other things effortlessly.  I have even made macaroni and cheese in this using pressure settings and I didnt think it was possible to cook pasta in the pressure cooker - but my youngest son said it was the BEST mac and cheese he has ever had.  I will need to recreate that for the blog.  It was definitely worth a repeat performance!

Making soup is an effortless way to get comfortable using a pressure cooker and it tastes like you have slaved over the stove all day.

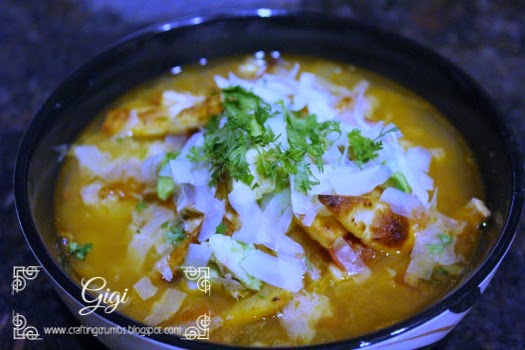
CHICKEN TORTILLA SOUP - in the Instant Pot (pressure cooker)

adapted from Flavorrd.com

2 Tbsp. olive oil (I used garlic olive oil)
1 medium onion, chopped
2-3 cloves garlic, minces
2 - 6 inch corn tortillas, cut into small squares (about an inch)
2 Tbsp. chopped fresh cilantro
3 tomatoes, chopped
1 - 15 oz can black beans, rinsed and drained
1 c. frozen corn
4 c. chicken broth
2 tsp. chili powder
1 tsp. ground cumin
1/4 tsp. cayenne pepper
1 bay leaf
3 chicken breasts (roughly a pound total)

Garnish Ideas:
chopped cilantro
shredded cheddar cheese or your favorite cheese
fried corn tortilla strips
diced avocado
sour cream, if desired

Set Instant Pot to saute, medium heat. Add the olive oil  and onion and cook, stirring until softened. Then add the garlic, cilantro and tortilla squares.. Stir to combine and cook for a minute longer before adding the tomato, black beans, corn, broth, seasonings and chicken breasts.  Cancel saute mode and cover Instant Pot, seal, select Soup mode, and manually adjust time to 4 minutes.

It will take about 10 minutes for the pot to reach pressure and then teh 4 minutes will count down.  While the pot is preparing to pressure cook, heat a little oil in a skillet and fry tortilla strips until golden brown. Drain on paper towels.  Lightly salt the strips immediately after frying.  There should be plenty of time to grate the cheese, chop the cilantro and slice lime wedges for serving.

Corn tortilla strips frying...


Fresh cilantro (oops - not sure why that paper towel is purple!)


Pressure cooked chicken =  Perfection!


After the timer goes off, manually release the pressure, being careful of the steam.  Remove the chicken breasts and shred the meat.  Return the shredded chicken to the pot and stir to combine.  Ladle the soup into bowls and garnish with tortilla strips, cheese and cilantro.    This makes a delicious dinner.


Pin It Now!

Sunday, March 15, 2015

First Watercolor Card......


A month or so ago, I spoke of a dear friend who didn't get her birthday card in time because I made a Valentine card for my new grandson instead. And she ever so graciously accepted my inability to create two entirely different cards in the same time period.  I am so blessed to have understanding friends!

I wanted to be sure to make her belated birthday card extra special.  So why did I think that now was the time to try an entirely new technique that I have never ever tried before - and experiment with different media  - and try to find the print and cut and hope that printing on watercolor paper would work.  Let's just make this project as challenging as possible, right?  Well that's what I do!  And I think I succeeded -it just took extra time.  And the card finally arrived at its proper destination so I can now share its journey!

I recently added the Spectrum Aqua Markers to my craft collection. I have their regular alcohol markers and their blendable pencils (Spectrum Noir) that I also love and I have been watching videos on all three, trying to improve my questionable skills!  I find the Aqua Markers the most forgiving and have been playing around with the best way to use them. I like to scribble the colors on acetate, spritz the paint with water and then color lightly on the watercolor paper, adding more color as needed. This paper is hot press and I was told it was easier to use because it is smoother. I will be experimenting with hot and cold press papers going forward to see which I like better.

What surprised me is how easy it was to print a digi image on my laser printer.  I had to trim the 9x12 watercolor paper to fit and used a lighter weight (90 lb) but it printed perfectly and the ink did not bleed when I added the water color - success!!


A close up of the watercoloring. Digi image is from Fred She Said.
Cut file is from Birds Cards.
Solid colored paper is from Paper Temptress.
Center of flower is highlighted with Wink of Stella glitter pens.


I am looking forward to working with these markers a lot more - and I love that this line of watercolor markers offers a wide range of colors - and they are easy to blend to create even more colors.


I put the magnolia on pop dots to give the card a little dimension and added
some flat back pearls - my default embellishment.


Happy Belated Birthday, my dear Georgia friend!


Pin It Now!