Wednesday, January 28, 2015

"Celebrate" Birthday Card


This card was made for a special friend.  This began as a Dreamweavers stencil (I have quite a collection of them) that I traced and then turned into a cut file with a shadow layer.  I love the interesting look you can get when you paper piece a stencil rather than color it!  Such fun.

The papers are of course from Paper Temptress and the yellow background was enhanced with an quatrafoil embossing folder.


Quatrafoil embossing for added texture


The center of the flowers was accented with a little gold liquid pearl and the vertical greeting was added using the SCAL software


Love the detail...


An added greeting...

It was a relatively simple card but am happy with the results.  And my friend was too!


Pin It Now!

Saturday, January 24, 2015

Homemade "A Little of Everything" Pizza

So far this year,  I have clearly on a bread kick, be it loaf or crust. (stay tuned for more varieties of the no knead crust bread to come).  I had gone to the store to get a different variety of toppings for an "everything" pizza to fulfill a request.  :)  I am not a huge pepperoni fan ( I know - borderline shameless) but I acquiesced and got some turkey pepperoni along with new Italian salami (new to me), mild Italian sausage, mushrooms, red onion, a variety of colored peppers (mild) and fresh mozzarella cheese - that makes such a difference when you have a chance to grab some.

I haven't made pizza dough in ages so am clearly out of practice. The last time I made some I used my bread machine to do the kneading. This time I did it the old fashioned way and that was fun - and equally delicious. I had forgotten how gratifying it is to work with dough.  The crust was a bit thicker than I like, but it was still delicious.


I will admit that this pizza was a bit "ingredient variety heavy,but because I didn't put a lot of everything on, it didn't taste like too much. The flavor was fabulous. And pizza is very forgiving - lucky for me.  It is hard to mess it up!

Hope this will inspire you to create your own soon. It's an easy treat for a cold winter's night....

This is the pizza -  it's in stages of creation starting in the lower left:
homemade sauce and parmesan cheese, sopressata (a new salami to me and delicious!), tri-colored pepper slices, red onion slivers and mushrooms, turkey pepperoni, fresh mozzarella (YUM!) and cooked mild Italian sausage.  And then of course the end result.  Are you hungry yet??
Pin It Now!

Monday, January 19, 2015

Healthy Blueberry Orange Wheat Bread with Cream Cheese Icing...

When I saw the photos of this recipe come in to my blog feed about a week ago from "Eat Cake for Dinner", I knew I had to try it.  It had two of my favorite things - blueberries and oranges - although I am not sure I would have thought to put them together. I have made plenty of blueberry and lemon recipes but never thought of using a different citrus.  My mother used to often put orange zest in cookies, but I didn't carry that forward in my baking.  Mothers DO know best! :)

I wanted to make it a little healthier, so I opted for white wheat flour instead of all purpose, and half honey crystals (great sugar substitute) instead of the sugar.  I had not used the honey granules before so was a little timid to use them entirely, but next time I will as they were great and the flavor was fabulous.

The aroma of the baking bread was so distractingly wonderful that I kept walking into the kitchen exclaiming, " OMG that smells wonderful!".  It made me feel like I was in the middle of an orange grove..... It was sheer heavenly!  I love citrus anyway, but this was sunshine in a loaf pan!

Blueberries and oranges =BRILLIANT idea!  So happy to share this healthier version with you!


Look good?  Oh it is!

Healthy Blueberry Orange Wheat Bread with Cream Cheese Icing

adapted from Eat Cake for Dinner

1/2 c. unsalted butter, softened
1/2 c. organic cane sugar
1/2 c. honey crystals
2 eggs (I use only pastured eggs now)
2 tsp, grated orange zest
2 tsp. vanilla (homemade)
1/2 c. plain Greek yogurt (homemade)
1 Tbsp. milk
2 c. white wheat flour
1 1/2 tsp. baking powder
1/2 tsp. salt
1 1/2 c. fresh blueberries

Orange Cream Cheese Icing
2 oz. organic cream cheese
zest from half an orange (about 2 tsp.)
1/2 c. organic powdered sugar
2 Tbsp. fresh orange juice (from the zested orange)

Preheat the oven to 350.  In a mixing bowl, cream the butter and sugar and honey crystals together.  Add the eggs, one at a time, and beat well with each one.  Then add the orange zest, vanilla, Greek yogurt, and milk and mix at low speed until well combined.

In a large bowl, combine the white wheat flour, baking powder and salt.  Toss the blueberries in the flower mixture and coat well (this will prevent them from all dropping to the bottom of the batter while baking).

Gently add the wet ingredients to the dry ingredients and fold together until just combined well.  The batter will be unusually thick. (Don't worry!  It will be okay!) Spoon the batter into a lightly greased loaf pan.  Bake for 60-70 minutes or until a toothpick inserted in the center comes out clean.


You can see how really thick this batter is - it's okay. It will bake beautifully.

Remove from the oven, cool on a rack for 10 minutes, and then remove from the pan and finish cooling.


When totally cool, frost with Orange Cream Cheese Icing (ingredients above)


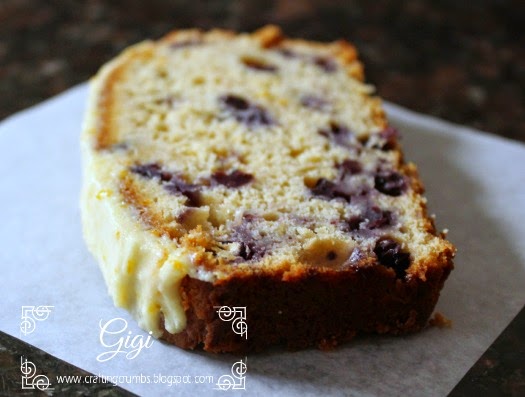
See the orange zest in the icing?  You could make it thinner with more orange juice and drizzle it,
but I loved it like this.  Either way will work just fine.

Place the cream cheese in a small glass dish and microwave for about 15-20 seconds until the cream cheese is very soft.  Add the rest of the icing ingredients and mix very well until smooth. (you will want to eat it with a spoon so try to resist the temptation!)  Instead, frost the top of the loaf or thin with more orange juice and drizzle it over the top.


Look at ALL of those blueberries!  Every bite is full of berry flavor.


So moist....


Every bite is a treat...

Store the bread in the refrigerator.... if it lasts that long! Pin It Now!

Thursday, January 15, 2015

Happy Birthday, Penny!

Since the actual card is en route to its destination (and yes it will arrive a "little" late...), it seemed like the next best thing was to turn this post into a birthday greeting, so.........

Happy Birthday to you..........


This card uses one of Penny's own shapelie files - the Starburst shapelie.  I resized it in SCAL software so I would have 3", 4" and 5" shapes.  I decided to do spirelli on each because that is such a simple craft technique and really adds a WOW when all is done.  I really should use it more often - it's a great way for me to utilize metallic threads left over from other projects!  And you can use any thread that you like or have on hand - I just happen to prefer the sparkle.

Spirelli is just wrapping thread around a design. The shorter the interval between wraps, the larger the opening when you are done.  The wider the interval, the smaller the opening as you can see in the pictures. The two largest shapes were wrapped at 10 spaces apart, the center top shape was wrapped at 15.


Numbered on the back in case I get lost counting!


All three shapes wrapped - green with gold and gold with green.

From here I just stacked the shapes with foam tape to give it dimension  and kept the rest of the card simple so this medallion could be the star.  The Happy Birthday Greeting was done on my  Brother labeler with satin silver on gold tape.  A few crystal rhinestones and this card was in the mail.


Card stock is the Mica from Paper Temptress.


 I hope it makes it safely to its destination.  In the meantime, birthday wishes are flying your way....


Happy Birthday, Penny!

Pin It Now!

Tuesday, January 13, 2015

Experimenting with Crusty Bread


I know there are a gazillion versions of this online, but this is the one (actually two) that happened to catch my eye - the recipe I used (reference below) had a bit more yeast and salt and used lukewarm water. Not sure that any of those are a deal breaker.  I made it simple this time but after giving this a try, I cannot wait to make all sorts of varieties of this.  Love the idea of fresh dill and havarti cheese,  gorgonzola and rosemary, roasted garlic and just about anything (!) - and the list goes on - even cinnamon and raisins.

The recipe I used was from Chef In Training.  But there is an old one, very similar, with a great video that they just added last week and this is what inspired me to jump on the bandwagon!  Check out this video at Simply So Good - and there is even a separate section with tons of ideas for add ins!

It literally took less than 10 minutes to put together and I needed no fancy tools - just a bowl and a spoon. This is a recipe that will convince you that ANYONE can make fresh bread - yes anyone.  I admit to not being a novice to homemade bread and alternate between the bread machine (clearly cheating) and the old fashioned kneading that makes me feel so empowered when the end result looks like a real loaf of bread!
This gives you all of the comfort of making your own bread and takes away all of the obstacles. I don't think you can go wrong if you follow the directions.


My trusty ceramic clay pot - love it. Great for this kind of baking


The bread dough after 17 hours..... nice and bubbly


After a very quick knead (really just a few light flips in flour)


Ready for the oven -the parchment makes it easy to place inside and take out

 I let this loaf go about 17 hours and I think I could easily have baked it at 15 or less as the kitchen was warm, but it is a very forgiving loaf!


Used a bit too much flour, but heavenly regardless

I am not quite sure why my loaf is sporting a mohawk, but it just made me chuckle when I took it out of the oven.  Leave it to me to make bread that makes a statement!

I can hardly wait to try more flavor combinations!  This may be a series of bread posts - or at least photos. And I plan on taking a few baking classes from Craftsy to try new bread baking techniques.  I look forward to learning and sharing!


It IS as good as it looks


And even better with butter!

Pin It Now!